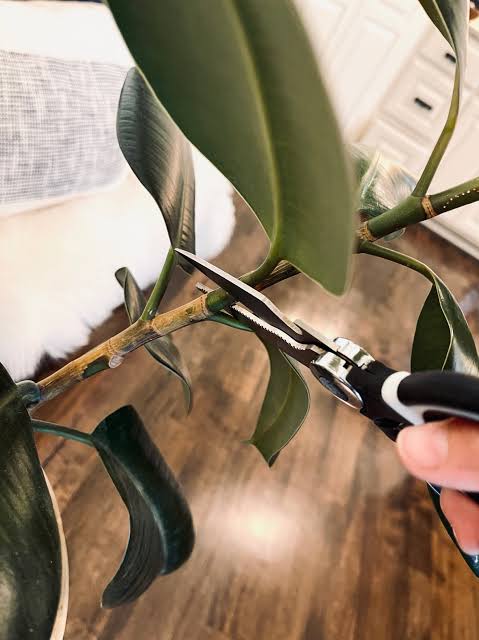
If you love indoor plants, the rubber plant (Ficus elastica) is a timeless favorite. With its glossy leaves, easygoing nature, and air-purifying qualities, it’s no wonder this tropical beauty is a staple in homes around the world. But did you know you can grow new rubber plants from the one you already own?In this guide, you’ll learn how to propagate a rubber plant step-by-step — using simple, proven techniques that even beginners can master. Whether you want to expand your indoor jungle or share cuttings with friends, this guide will help you grow smarter and get healthy, thriving new plants in no time!🌸 Why Propagate a Rubber Plant?Before we get started, let’s explore why you might want to propagate your rubber plant.🌿 Save money: Instead of buying new plants, grow more from your existing one.🌱 Healthier growth: Pruning and propagating encourage fuller, bushier plants.💚 Eco-friendly: Reduce waste and promote sustainable plant care.🎁 Great gifts: Homegrown plants make thoughtful, personal presents.Propagation is one of the most rewarding parts of plant care — it’s like creating life from life!🌿 Understanding Rubber Plant BasicsThe rubber plant (Ficus elastica) belongs to the fig family and thrives in bright, indirect light with moderate watering.There are several varieties, including:Ficus elastica ‘Robusta’ – classic green leaves.Ficus elastica ‘Tineke’ – green with creamy white variegation.Ficus elastica ‘Burgundy’ – dark, wine-colored foliage.Whichever you have, all can be propagated using similar methods.🪴 Step-by-Step Guide: How to Propagate Rubber PlantThere are three main ways to propagate a rubber plant:Stem cuttings in waterStem cuttings in soilAir layeringLet’s go through each step-by-step so you can choose what works best for you.🌱 Method 1: Propagating in WaterThis is one of the easiest and most popular methods for beginners. Watching roots grow in water is exciting — and it requires minimal tools.✂️ What You’ll Need:Sharp pruning shears or scissorsA clean glass jar or vaseRoom-temperature waterRooting hormone (optional)A warm, bright location🌿 Step-by-Step Instructions:Select a healthy stem:Choose a stem about 6–8 inches long with at least two leaves. Avoid stems that look weak or diseased.Make a clean cut:Cut just below a leaf node (where a leaf grows from the stem). This is where new roots will sprout.Remove lower leaves:Leave only one or two leaves at the top. Remove any leaves that would sit underwater.Dip in rooting hormone (optional):This helps stimulate faster root growth, though it’s not essential.Place in water:Put your cutting in the jar so the node is submerged. Use filtered or rainwater if possible.Change the water weekly:Fresh water prevents bacteria buildup.Wait for roots:In 3–6 weeks, you’ll see roots emerging from the node.Transplant to soil:Once roots are about 2 inches long, move your cutting to a small pot with fresh potting mix.💚 Pro Tip: Use a clear glass jar to monitor root development easily.🌿 Method 2: Propagating in SoilIf you prefer to skip the water stage, you can root your rubber plant cuttings directly in soil. This method creates stronger, soil-adapted roots right from the start.✂️ What You’ll Need:Pruning shearsPotting mix (equal parts peat and perlite or coco coir and sand)Rooting hormoneA small pot with drainage holesPlastic bag or mini greenhouse cover🌱 Step-by-Step Instructions:Cut a healthy stem:Use a 6–8 inch cutting, just like in the water method.Apply rooting hormone:Dip the cut end into the powder to encourage root growth.Plant the cutting:Insert it into moist potting mix, about 2 inches deep.Create humidity:Cover the pot with a clear plastic bag to trap moisture (but make sure it doesn’t touch the leaves).Keep it warm and bright:Place in indirect sunlight — around 70–80°F (21–27°C) is ideal.Water lightly:Keep the soil slightly damp but never soggy.Check for roots:After 4–6 weeks, gently tug on the stem — resistance means roots are forming!Once roots are established, remove the cover and treat it like a normal plant.💚 Pro Tip: If your home is dry, mist inside the plastic cover every few days to maintain humidity.🌳 Method 3: Air Layering (for Bigger Plants)Air layering is perfect if your rubber plant has tall, woody stems or if you want to propagate without cutting the whole stem off first.✂️ What You’ll Need:Sharp knifeSphagnum moss (soaked in water)Plastic wrap or a clear plastic bagTwist ties or string🌿 Step-by-Step Instructions:Choose a healthy stem:Pick a section about 12–18 inches from the tip.Make a small cut:Using your knife, make a 1-inch slit halfway into the stem.Insert a toothpick or small object:This keeps the cut open so it doesn’t close back up.Wrap with moss:Surround the cut with moist sphagnum moss.Cover with plastic:Wrap it securely to keep the moisture in. Use twist ties or string to hold it in place.Wait patiently:In about 4–8 weeks, you’ll see roots forming inside the moss.Cut below the new roots:Once the roots are visible and healthy, cut the stem below the moss ball.Plant in soil:Pot it in fresh soil and water gently.💚 Pro Tip: Keep the moss consistently moist — dry moss can stop root development.🌸 Aftercare: Helping Your New Rubber Plant ThriveOnce your new plant is rooted and potted, the next step is to care for it properly.🌿 Light:Bright, indirect sunlight is best. Too much direct sun can scorch the leaves, while low light can slow growth.💧 Water:Water when the top inch of soil feels dry. Rubber plants don’t like sitting in soggy soil.🌡️ Temperature:Keep it between 65–80°F (18–27°C). Avoid cold drafts and sudden temperature changes.🌬️ Humidity:Rubber plants enjoy moderate humidity. Mist occasionally or place near a humidifier in dry environments.🌱 Feeding:Feed every 4–6 weeks during spring and summer with a diluted, balanced liquid fertilizer.💚 Pro Tip: Wipe leaves with a damp cloth to keep them glossy and dust-free — it also helps the plant breathe better.🌻 Troubleshooting Common Propagation ProblemsEven with care, a few issues may arise. Here’s how to fix them:Problem Likely Cause SolutionLeaves turning yellow Overwatering Let soil dry out between wateringsNo roots forming Low warmth or light Move to a warmer, brighter spotMold in water jar Stagnant water Change water weeklySoft or rotting stem Too much moisture Cut above rot and re-rootLeaves dropping Shock from cutting Keep humidity high and avoid moving too much💚 Pro Tip: Patience is key — some cuttings take several weeks to show growth.🌿 Extra Tips for Propagation SuccessAlways use clean, sharp tools to avoid infections.Take multiple cuttings in case one doesn’t root.Avoid direct sunlight on young cuttings.Don’t fertilize until the new plant shows new growth.Keep your tools and hands clean to prevent fungal issues.Remember, propagation is as much about patience as it is about technique.🌼 Conclusion: Grow Smarter with How to Propagate Rubber Plant!Propagating your rubber plant is an easy, cost-effective, and deeply satisfying way to expand your indoor greenery. With just a few simple tools and a little care, you can turn one plant into many — whether through water propagation, soil rooting, or air layering.By following this step-by-step guide on how to propagate rubber plant, you’ll not only save money but also learn more about how plants grow and thrive.So roll up your sleeves, grab your pruning shears, and grow smarter — because the best houseplants are the ones you grow yourself! 🌱✨