
Grow Roses from Cuttings: 2 Best Ways to Propagate
Roses have long been celebrated as one of the most beloved flowers in gardens around the world. Their enchanting beauty and delightful fragrance make them a perfect choice for any landscape. If you’re looking to expand your rose collection without breaking the bank, propagating roses from cuttings is an excellent and rewarding option. In this comprehensive guide, we will explore the two best methods for propagating roses from cuttings, ensuring that you can enjoy these stunning blooms in your garden for years to come.
Understanding Rose Propagation
Rose propagation can be achieved through various methods, including seeds, grafting, and layering. However, propagating from cuttings is one of the simplest and most effective techniques, especially for gardeners who want to clone their favorite rose varieties. By taking cuttings from a healthy rose plant, you can create new plants that are genetically identical to the parent. This process not only saves money but also allows you to preserve the unique characteristics of your favorite roses.
When to Take Cuttings
The best time to take rose cuttings is during the growing season, typically in late spring to early summer. During this period, the new growth is firm but not yet woody, making it ideal for propagation. Choose healthy, disease-free plants as your source for cuttings to ensure the best chances of success.
Selecting the Right Cuttings
When selecting cuttings, look for the following characteristics:
- Healthy Growth: Choose cuttings from vigorous stems with healthy leaves. Avoid any stems that show signs of disease or damage.
- Length: The ideal cutting should be around 6 inches long, with at least two to three leaf nodes.
- New Growth: Opt for stems that have recently grown, as they are more likely to root successfully.
Once you’ve selected your cuttings, it’s time to prepare them for propagation.
Preparing the Cuttings
- Make the Cut: Using a clean, sharp knife or pruners, take a cutting just below a leaf node. This will encourage new root growth.
- Remove Lower Leaves: Trim off the lower leaves, leaving only the top two or three leaves intact. This helps the cutting focus its energy on developing roots rather than supporting excess foliage.
- Optional Hormone Treatment: For an added boost, you can dip the cut end of the cutting in rooting hormone. This hormone encourages root development and can improve your success rate.
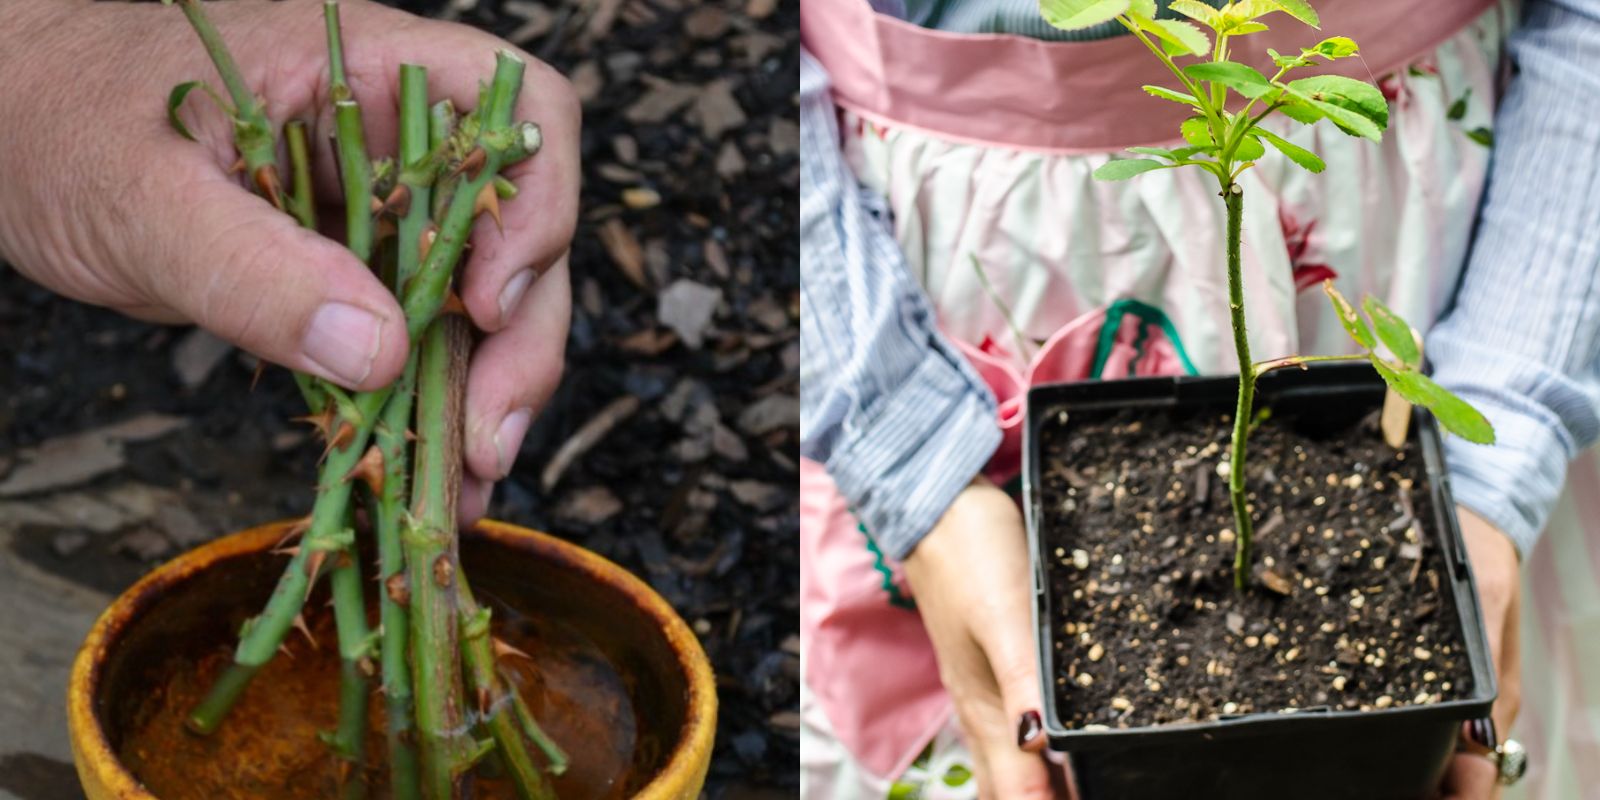
Method 1: Soil Propagation
Soil propagation is a straightforward method that involves planting your rose cuttings directly in a growing medium. Here’s how to do it:
Step-by-Step Instructions
- Gather Materials: You will need a small pot (4 to 6 inches in diameter), a well-draining potting mix, a clean container for water, and optionally, rooting hormone.
- Prepare the Pot: Fill the pot with a sterile potting mix, ensuring it is light and well-draining. You can also mix in perlite or vermiculite to improve drainage.
- Insert the Cutting: Make a hole in the soil with a pencil or your finger. Insert the cutting into the hole, burying it about half its length. Firm the soil around the base of the cutting to remove air pockets.
- Water Thoroughly: Water the soil lightly to moisten it. Avoid overwatering, as this can lead to rot.
- Create a Humid Environment: To maintain humidity around the cutting, cover the pot with a plastic bag or a clear plastic dome. This helps to trap moisture and creates a greenhouse effect.
- Provide Light: Place the pot in a bright location with indirect sunlight. Direct sunlight can be too intense for the cutting, leading to wilting.
- Monitor Moisture Levels: Check the soil regularly to ensure it remains moist but not soggy. Remove the plastic cover for a few hours each day to allow for air circulation and prevent mold.
- Transplanting: After about 4 to 6 weeks, your cuttings should develop roots. You can gently tug on the cutting to check for resistance, which indicates root growth. Once well-rooted, transplant the new roses into larger pots or directly into your garden.
Method 2: Water Propagation
Water propagation is another effective method for rooting rose cuttings. This technique allows you to see the root development more clearly, making it easier to monitor progress. Here’s how to do it:
Step-by-Step Instructions
- Gather Materials: For water propagation, you will need a clear glass or jar and clean, filtered water.
- Insert the Cutting: Place the prepared cutting in the glass of water, ensuring that the lower leaves are above the waterline. This prevents leaf rot, which can occur if the leaves are submerged.
- Positioning: Set the glass in a bright area with indirect sunlight. Avoid placing it in direct sunlight, as this can heat the water and stress the cutting.
- Change the Water: Replace the water every few days to keep it fresh and oxygenated. This helps prevent bacterial growth and ensures the cutting has access to clean water.
- Root Development: After a few weeks, you should begin to see roots developing. Depending on the variety and environmental conditions, roots can take anywhere from 2 to 6 weeks to form.
- Transplanting: Once the roots are around 2 to 3 inches long, you can transplant the cutting into a pot with soil. Follow the same potting instructions as for soil propagation.
Caring for Your New Rose Plants
After successfully propagating your roses, it’s essential to provide them with proper care to ensure healthy growth.
- Watering: Keep the soil consistently moist but not waterlogged. Young plants may need more frequent watering, especially during hot weather.
- Light Requirements: Roses thrive in full sun, so place your new plants in a location that receives at least 6 to 8 hours of sunlight daily.
- Fertilizing: Once your roses are established (after about 6 weeks), you can begin fertilizing with a balanced rose fertilizer. Follow the manufacturer’s instructions for application rates.
- Pruning: As your roses grow, consider light pruning to encourage bushier growth and remove any dead or diseased branches.
- Pest and Disease Control: Monitor your plants for common rose pests such as aphids and spider mites. If you notice any issues, treat them promptly with insecticidal soap or neem oil.
Troubleshooting Common Issues
Despite your best efforts, you may encounter some challenges when propagating roses from cuttings. Here are some common issues and their solutions:
- Wilting Cuttings: If your cuttings wilt, it may be due to lack of humidity or too much direct sunlight. Ensure they have adequate moisture and are placed in a bright but shaded location.
- Rotting Cuttings: Overwatering or poor drainage can lead to rotting. Ensure the soil is well-draining and allow the cuttings to dry slightly between waterings.
- Lack of Root Growth: If your cuttings aren’t rooting, check the conditions. Ensure they have adequate warmth, humidity, and light. Patience is also key—some varieties take longer to root than others.
Conclusion
Growing roses from cuttings is a fulfilling and cost-effective way to expand your garden. By following these two simple methods—soil propagation and water propagation—you can enjoy the beauty of roses without having to purchase new plants. Remember to select healthy cuttings, provide the right care, and be patient as you nurture your new roses into flourishing plants. With a little time and effort, you’ll have an abundance of beautiful blooms to enjoy for years to come. So, gather your supplies and start propagating—your garden will thank you!
Happy gardening! 🌹✨ #RosePropagation #GardeningTips #PlantLovers #GrowYourOwn #FlowerPower #GreenThumb #NatureBeautyRoses have long been celebrated as one of the most beloved flowers in gardens around the world. Their enchanting beauty and delightful fragrance make them a perfect choice for any landscape. If you’re looking to expand your rose collection without breaking the bank, propagating roses from cuttings is an excellent and rewarding option. In this comprehensive guide, we will explore the two best methods for propagating roses from cuttings, ensuring that you can enjoy these stunning blooms in your garden for years to come.
Understanding Rose Propagation
Rose propagation can be achieved through various methods, including seeds, grafting, and layering. However, propagating from cuttings is one of the simplest and most effective techniques, especially for gardeners who want to clone their favorite rose varieties. By taking cuttings from a healthy rose plant, you can create new plants that are genetically identical to the parent. This process not only saves money but also allows you to preserve the unique characteristics of your favorite roses.
When to Take Cuttings
The best time to take rose cuttings is during the growing season, typically in late spring to early summer. During this period, the new growth is firm but not yet woody, making it ideal for propagation. Choose healthy, disease-free plants as your source for cuttings to ensure the best chances of success.
Selecting the Right Cuttings
When selecting cuttings, look for the following characteristics:
- Healthy Growth: Choose cuttings from vigorous stems with healthy leaves. Avoid any stems that show signs of disease or damage.
- Length: The ideal cutting should be around 6 inches long, with at least two to three leaf nodes.
- New Growth: Opt for stems that have recently grown, as they are more likely to root successfully.
Once you’ve selected your cuttings, it’s time to prepare them for propagation.
Preparing the Cuttings
- Make the Cut: Using a clean, sharp knife or pruners, take a cutting just below a leaf node. This will encourage new root growth.
- Remove Lower Leaves: Trim off the lower leaves, leaving only the top two or three leaves intact. This helps the cutting focus its energy on developing roots rather than supporting excess foliage.
- Optional Hormone Treatment: For an added boost, you can dip the cut end of the cutting in rooting hormone. This hormone encourages root development and can improve your success rate.
Method 1: Soil Propagation
Soil propagation is a straightforward method that involves planting your rose cuttings directly in a growing medium. Here’s how to do it:
Step-by-Step Instructions
- Gather Materials: You will need a small pot (4 to 6 inches in diameter), a well-draining potting mix, a clean container for water, and optionally, rooting hormone.
- Prepare the Pot: Fill the pot with a sterile potting mix, ensuring it is light and well-draining. You can also mix in perlite or vermiculite to improve drainage.
- Insert the Cutting: Make a hole in the soil with a pencil or your finger. Insert the cutting into the hole, burying it about half its length. Firm the soil around the base of the cutting to remove air pockets.
- Water Thoroughly: Water the soil lightly to moisten it. Avoid overwatering, as this can lead to rot.
- Create a Humid Environment: To maintain humidity around the cutting, cover the pot with a plastic bag or a clear plastic dome. This helps to trap moisture and creates a greenhouse effect.
- Provide Light: Place the pot in a bright location with indirect sunlight. Direct sunlight can be too intense for the cutting, leading to wilting.
- Monitor Moisture Levels: Check the soil regularly to ensure it remains moist but not soggy. Remove the plastic cover for a few hours each day to allow for air circulation and prevent mold.
- Transplanting: After about 4 to 6 weeks, your cuttings should develop roots. You can gently tug on the cutting to check for resistance, which indicates root growth. Once well-rooted, transplant the new roses into larger pots or directly into your garden.
Method 2: Water Propagation
Water propagation is another effective method for rooting rose cuttings. This technique allows you to see the root development more clearly, making it easier to monitor progress. Here’s how to do it:
Step-by-Step Instructions
- Gather Materials: For water propagation, you will need a clear glass or jar and clean, filtered water.
- Insert the Cutting: Place the prepared cutting in the glass of water, ensuring that the lower leaves are above the waterline. This prevents leaf rot, which can occur if the leaves are submerged.
- Positioning: Set the glass in a bright area with indirect sunlight. Avoid placing it in direct sunlight, as this can heat the water and stress the cutting.
- Change the Water: Replace the water every few days to keep it fresh and oxygenated. This helps prevent bacterial growth and ensures the cutting has access to clean water.
- Root Development: After a few weeks, you should begin to see roots developing. Depending on the variety and environmental conditions, roots can take anywhere from 2 to 6 weeks to form.
- Transplanting: Once the roots are around 2 to 3 inches long, you can transplant the cutting into a pot with soil. Follow the same potting instructions as for soil propagation.
Caring for Your New Rose Plants
After successfully propagating your roses, it’s essential to provide them with proper care to ensure healthy growth.
- Watering: Keep the soil consistently moist but not waterlogged. Young plants may need more frequent watering, especially during hot weather.
- Light Requirements: Roses thrive in full sun, so place your new plants in a location that receives at least 6 to 8 hours of sunlight daily.
- Fertilizing: Once your roses are established (after about 6 weeks), you can begin fertilizing with a balanced rose fertilizer. Follow the manufacturer’s instructions for application rates.
- Pruning: As your roses grow, consider light pruning to encourage bushier growth and remove any dead or diseased branches.
- Pest and Disease Control: Monitor your plants for common rose pests such as aphids and spider mites. If you notice any issues, treat them promptly with insecticidal soap or neem oil.
Troubleshooting Common Issues
Despite your best efforts, you may encounter some challenges when propagating roses from cuttings. Here are some common issues and their solutions:
- Wilting Cuttings: If your cuttings wilt, it may be due to lack of humidity or too much direct sunlight. Ensure they have adequate moisture and are placed in a bright but shaded location.
- Rotting Cuttings: Overwatering or poor drainage can lead to rotting. Ensure the soil is well-draining and allow the cuttings to dry slightly between waterings.
- Lack of Root Growth: If your cuttings aren’t rooting, check the conditions. Ensure they have adequate warmth, humidity, and light. Patience is also key—some varieties take longer to root than others.
Conclusion
Growing roses from cuttings is a fulfilling and cost-effective way to expand your garden. By following these two simple methods—soil propagation and water propagation—you can enjoy the beauty of roses without having to purchase new plants. Remember to select healthy cuttings, provide the right care, and be patient as you nurture your new roses into flourishing plants. With a little time and effort, you’ll have an abundance of beautiful blooms to enjoy for years to come. So, gather your supplies and start propagating—your garden will thank you!
Happy gardening! 🌹✨ #RosePropagation #GardeningTips #PlantLovers #GrowYourOwn #FlowerPower #GreenThumb #NatureBeauty