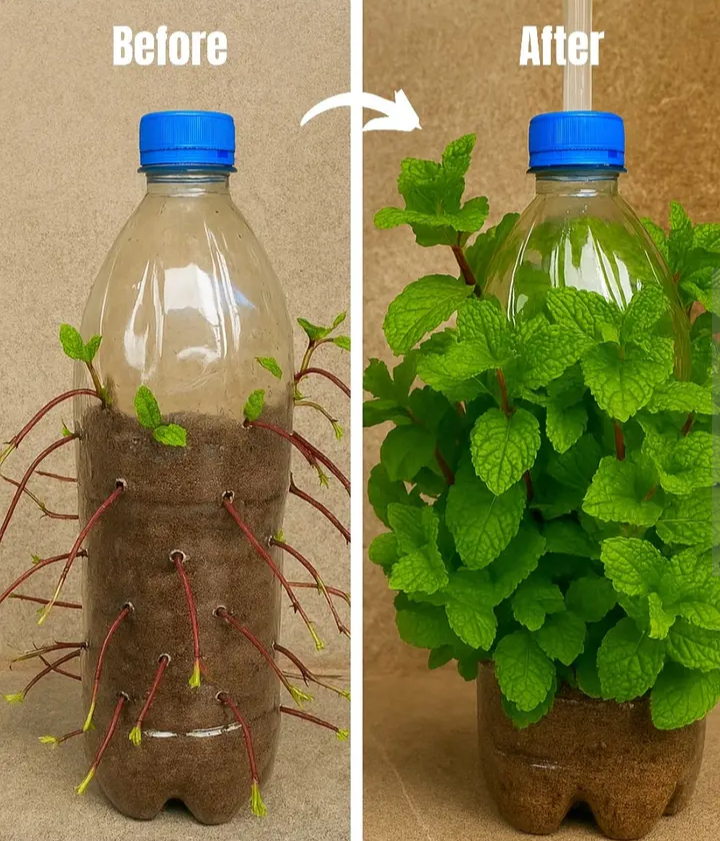
Mint is one of the easiest herbs to grow, and with just a few cuttings and recycled plastic bottles, you can create a thriving, space-saving hanging mint garden almost anywhere — a balcony, patio, porch, kitchen wall, or even a sunny window. Learning how to grow mint from cuttings in hanging plastic bottles is a fun DIY project that even beginners can do with great success. It’s sustainable, affordable, and perfect for gardeners who want fresh herbs without needing a big yard.This guide will walk you through everything: choosing the right mint, preparing cuttings, setting up your recycled hanging system, and keeping your mint thriving all season long.🌿 Introduction: Why Grow Mint in Hanging Plastic Bottles?Growing mint in hanging plastic bottles is not just a gardening trend — it’s a smart and sustainable way to enjoy homegrown herbs with minimal cost and space.Benefits Include:Eco-friendly — reuses bottles that might otherwise be thrown awaySpace-saving — perfect for apartments or small gardensBeginner-friendly — mint is very forgivingLow maintenance — requires little watering or careFast growth — cuttings root quickly and provide harvests within weeksIf you want a simple, rewarding gardening project, this is one of the easiest ways to start.🍃 H2: What You Need to Get StartedGrowing mint from cuttings in hanging plastic bottles only requires basic supplies.H3: Materials ListPlastic bottles (1–2 liter bottles work best)Sharp scissors or utility knifeMint cuttings (from store-bought herbs or your own plant)Potting soil (light, well-draining mix)A nail or drill (to create drainage holes)String, twine, or wire for hangingA spray bottle for gentle wateringThat’s it! Most of these items are common household materials.🌱 H2: Step-by-Step Guide — Grow Mint from CuttingsH3: Step 1 — Take Healthy Mint CuttingsStarting with healthy cuttings is essential.Choose:Fresh, green stemsAt least 4–6 inches longNo yellow or damaged leavesCut just below a leaf node — this is where roots form best.Tip:Remove leaves from the bottom half of the cutting to keep them from touching water or soil.H3: Step 2 — Root the Cuttings in WaterPlace the cuttings in a glass of water so that the naked stem is submerged and leaves remain above the waterline.Within:3–5 days, you’ll see root nubs7–10 days, roots will be long enough to plantChange the water every 1–2 days so the cuttings stay clean and active.Rooting mint in water before transferring to your hanging bottle system gives new plants a strong start.H3: Step 3 — Prepare the Plastic BottlesChoose any size bottle, but 1–2 liters give the roots enough room.How to Prepare:Cut a rectangular opening on the side of the bottle (leave the bottom and top intact).Make drainage holes at the bottom using a nail or drill.Create two holes at the top of the bottle for attaching string.Rinse the bottle thoroughly to remove any residue.Why This Works:Plastic bottles retain moisture well but still allow airflow, helping mint roots grow strong and healthy.H3: Step 4 — Add Soil and Plant the Rooted CuttingsFill the bottle with light, well-draining potting soil, leaving about 1–2 inches from the top.Planting Steps:Make a small hole in the soil.Place one rooted mint cutting per hole.Cover roots gently and firm the soil lightly.Mist with water to settle the soil.Mint is a fast grower, so it will quickly fill the container and spill gracefully over the sides.H3: Step 5 — Hang Your Bottle GardenUse twine, rope, wire, or macramé to hang your bottles from:FencesBalconiesWallsPergolasInside sunny windowsIdeal Sunlight:4–6 hours of indirect or filtered sunMint prefers bright conditions but dislikes extreme heat.Once hung, you’ve successfully completed the core steps to grow mint from cuttings in hanging plastic bottles.💧 H2: How to Care for Mint in Hanging Plastic BottlesMint grown in hanging containers is surprisingly easy to care for.H3: WateringMint enjoys consistent moisture but hates soggy soil.Water when:The top inch of soil feels dryLeaves start to droop slightlyHanging containers dry faster, so check often during hot months.H3: FertilizingMint does not require heavy feeding.Use:Mild fertilizer once every 4–6 weeksCompost tea for organic feedingAvoid strong chemical fertilizersH3: Pruning for Bushy GrowthPrune mint weekly by pinching off the top leaves.This encourages:Full, bushy growthLess legginessMore flavorful leavesRegular harvesting helps keep your mint productive.🌞 H2: Best Locations for Hanging Mint BottlesTo grow mint successfully in hanging plastic bottles, choose the right location.H3: Ideal Spots:Partially sunny balconiesKitchen windowsillsGarden fencesPatio railingsGreenhousesWalls with morning sunlightMint prefers:Bright lightSome shade in the afternoonProtection from strong windsA filtered-sun environment helps prevent leaf burn while keeping your mint lush.🧰 H2: Common Problems & SolutionsEven though mint is hardy, a few small issues can occur.H3: 1. Yellowing LeavesCause: Overwatering or poor drainageFix: Reduce watering; check drainage holesH3: 2. Weak GrowthCause: Low lightFix: Move to a brighter spotH3: 3. Pests (aphids, spider mites)Fix: Spray with a mild soap solution; rinse leaves wellH3: 4. Root RotCause: Waterlogged soilFix: Use lighter soil mix; add more drainage holesMost problems are easy to avoid if you follow basic care steps.🌿 Practical Tips to Grow Mint from Cuttings SuccessfullyHere are the simplest but most effective tricks:✔ Place cuttings in indirect sun for faster rooting✔ Use lightweight potting soil to prevent compaction✔ Don’t overcrowd bottles – 1–2 plants per container✔ Rotate bottles every week for even light exposure✔ Cut mint regularly to prevent flowering✔ Replant fresh cuttings every 4–6 months for the healthiest growth✔ Add mulch (like coconut fiber) to keep soil moist✔ Use bottles with wide openings to allow root expansionThese practical tips make your hanging mint garden thrive effortlessly.🌱 Creative Ideas for Your Hanging Mint Bottle GardenWant to take your project to the next level?Try these fun ideas:🎨 Paint or decorate the bottlesPersonalize your design with colors, labels, or patterns.🪴 Grow other herbs alongside mintSuch as:BasilOreganoThymeParsley🚰 Create a vertical drip systemHang bottles in a stack so excess water drips from one to the next.🌿 Mix mint varietiesTry chocolate mint, spearmint, peppermint, and apple mint together for a fragrant display.🧺 Conclusion: Enjoy Your Fresh, Homegrown MintLearning how to grow mint from cuttings in hanging plastic bottles is one of the easiest and most rewarding gardening projects you can do. It’s low-cost, eco-friendly, and perfect for gardeners of all ages — including beginners. With a bit of sunlight, regular watering, and occasional pruning, your mint will thrive and provide fresh leaves for teas, salads, smoothies, desserts, and more.A hanging mint garden adds beauty, fragrance, and practicality to any home. Whether you’re in a large suburban backyard in the United States, a cozy flat in the United Kingdom, or a small balcony in Canada, this project fits beautifully into any lifestyle.