
Introduction
Grafting is an ancient horticultural technique that enables gardeners to combine the best qualities of two plants into one. This process involves joining a scion (the upper part of the plant) with a rootstock (the lower part), allowing them to grow as a single tree. Summer grafting takes advantage of the tree’s active growth phase, promoting rapid healing and growth. This article will provide a detailed, step-by-step guide to successfully grafting a tree in summer.
The Benefits of Summer Grafting
- Active Growth Phase: During summer, trees are actively growing, which means their cambium layers (the growth layer under the bark) are actively dividing, promoting quicker and more robust graft union formation.
- Favorable Weather Conditions: The warm temperatures and longer daylight hours create an ideal environment for the graft to heal and grow.
- Disease Resistance: Grafting during the summer reduces the risk of fungal infections and diseases, which are more prevalent in cooler, wetter seasons.
Step-by-Step Guide to Summer Grafting
1. Choosing the Right Time
Timing is crucial for successful grafting. Perform grafting early in the morning or late in the evening to avoid the intense midday heat, which can cause the graft to dry out. Ensure that the tree is in its active growth phase, usually mid-summer, when the sap is flowing, and the cambium layers are actively dividing.
2. Selecting Scion and Rootstock
Scion Selection: Choose a healthy, disease-free branch from the tree you want to propagate. The scion should be about 6-8 inches long and contain several buds. Ideally, the scion should be taken from the current season’s growth.
Rootstock Selection: Select a compatible rootstock that is healthy and disease-free. The rootstock should have a diameter similar to the scion to ensure a good match at the graft union. Compatibility between the scion and rootstock is essential for the success of the graft.
3. Preparing the Scion
Cutting the Scion: Using sharp, clean pruning shears, cut the scion from the parent tree. Make sure the cut is clean and smooth to facilitate better union with the rootstock. Remove the leaves from the lower half of the scion, leaving a few leaves at the top to support photosynthesis and growth.
4. Making the Cut
Preparing the Rootstock: Make a clean, diagonal cut on the rootstock at the desired grafting height. The cut should be about 1-2 inches long to provide ample surface area for the cambium layers to join.
Matching the Cuts: Make a corresponding diagonal cut on the scion, ensuring it matches the cut on the rootstock. The cuts should be as smooth and even as possible to ensure a tight fit.
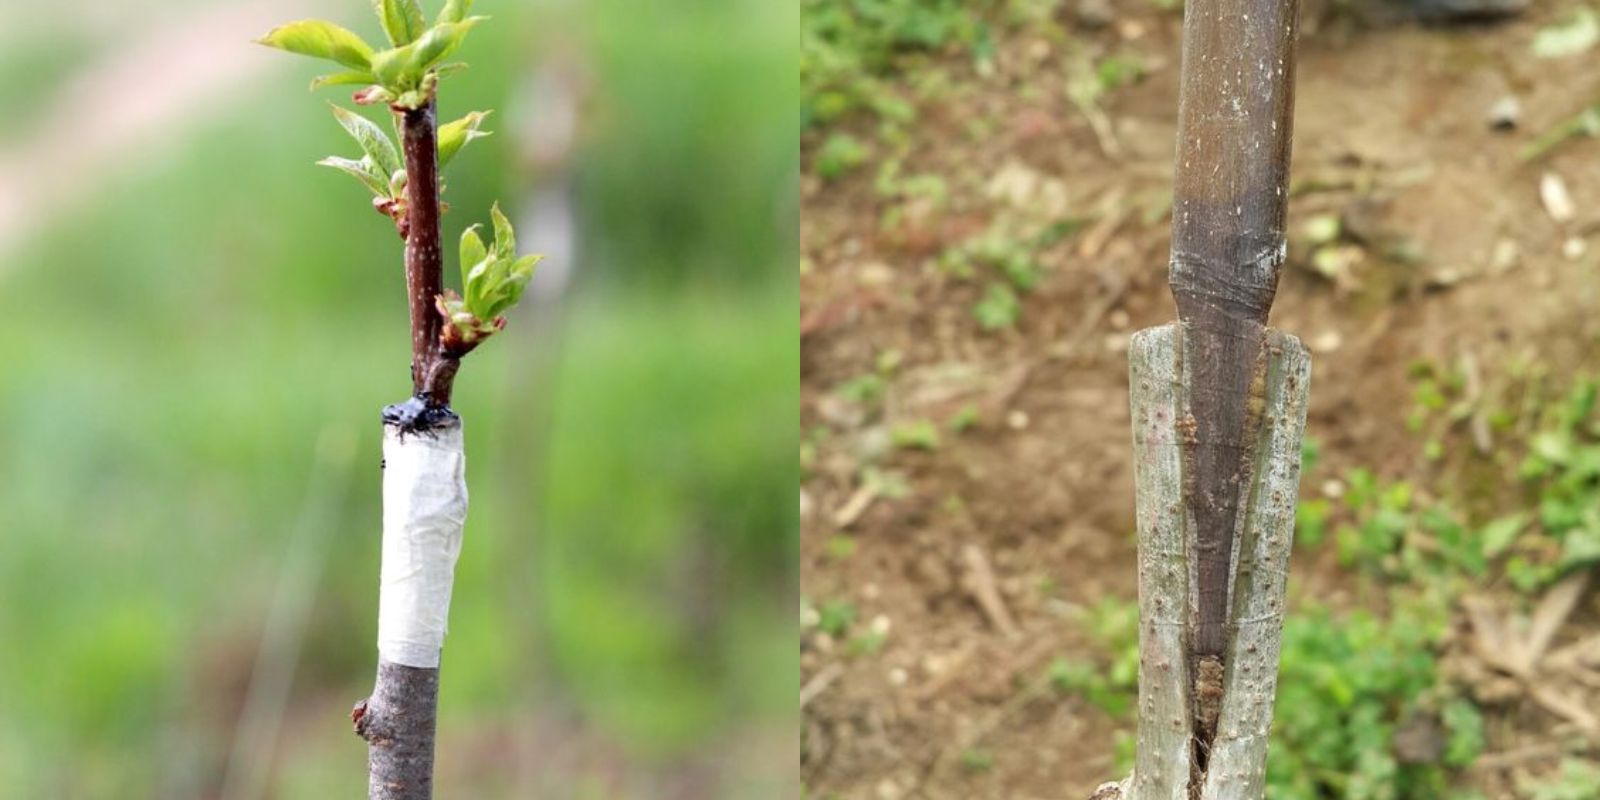
5. Joining the Scion and Rootstock
Aligning the Cambium Layers: Carefully align the cambium layers of the scion and rootstock. The cambium layers are the growth layers just under the bark and must be in contact for successful grafting.
Securing the Graft: Once the scion and rootstock are aligned, wrap the graft union tightly with grafting tape or a rubber band. This holds the scion in place and ensures that the cambium layers remain in contact.
6. Protecting the Graft
Applying Grafting Wax: Cover the graft union with grafting wax or tree wound dressing to prevent moisture loss and protect the graft from infection. This step is crucial to ensure the graft does not dry out and to keep out pathogens.
7. Creating a Humid Environment
Using a Plastic Bag: Cover the entire grafted area with a clear plastic bag to create a mini-greenhouse effect. This maintains high humidity around the graft, which is essential for the healing process. Ensure the bag is secured but allows for some air circulation to prevent mold growth.
Shading the Graft: Place the grafted tree in a location with indirect sunlight. Direct sunlight can overheat the graft and cause it to dry out. If necessary, use shade cloth or other materials to protect the graft from harsh sunlight.
8. Monitoring and Care
Maintaining Moisture: Keep the soil around the grafted tree consistently moist, but not waterlogged. Regularly check the graft to ensure it remains secure and moist. Mist the grafted area if needed to maintain humidity.
Checking for Growth: Monitor the graft for signs of new growth, which indicates successful grafting. Typically, new shoots and leaves should appear within a few weeks to a couple of months, depending on the tree species and environmental conditions.
Removing the Wrappings: Once the graft has healed and new growth is evident, gradually remove the grafting tape or rubber band to avoid constriction as the tree grows. This process usually takes a few months.
Tips for Successful Summer Grafting
- Use Clean Tools: Always use clean, sterilized tools to make cuts and handle the grafting process. This minimizes the risk of introducing diseases and infections.
- Choose Compatible Varieties: Ensure that the scion and rootstock are compatible species or varieties to increase the chances of successful grafting.
- Avoid Extreme Weather: Perform grafting during periods of moderate weather. Avoid grafting during heatwaves or heavy rains, which can stress the grafted tree.
- Regular Monitoring: Check the graft regularly for signs of growth, pests, or diseases. Prompt action can save the graft if issues arise.
Conclusion
Grafting a tree in summer is a rewarding and effective way to propagate specific varieties and improve the characteristics of your trees. By following these detailed steps, you can successfully graft trees and enjoy the benefits of this ancient horticultural technique. Whether you are a novice gardener or an experienced horticulturist, summer grafting offers a unique opportunity to enhance your garden and cultivate trees with desirable traits.
Motivation
Ready to try your hand at summer grafting? Follow these steps and embark on a horticultural journey that combines tradition with innovation. Enhance your garden, propagate your favorite tree varieties, and enjoy the fruits of your labor. Start grafting today and experience the joy of watching your grafted trees flourish!