
Gladiolus, often referred to as “sword lilies,” are among the most stunning flowers, celebrated for their tall, elegant spikes adorned with vibrant blooms. These flowers come in a variety of colors and can serve as beautiful cut flowers or add drama to garden beds. While many gardeners are familiar with planting corms, few know about the fascinating process of growing gladiolus from seed. This article will guide you through the process of harvesting gladiolus seed pods, how to grow them into beautiful plants, and the benefits of propagation.
Understanding Gladiolus Seeds
Gladiolus plants reproduce sexually through seeds, which develop in pods after flowering. Each pod contains several seeds, which can lead to new plants with unique traits. Growing gladiolus from seed can be a rewarding experience, allowing you to cultivate rare or unique varieties that may not be available in the market.
The Benefits of Growing Gladiolus from Seeds
- Genetic Diversity: Growing gladiolus from seeds introduces genetic variation, which can lead to healthier plants that may be more resilient to pests and diseases.
- Cost-Effectiveness: Seed propagation is often more economical than purchasing corms, especially if you aim to grow a large number of plants.
- Customization: By harvesting seeds from your existing plants, you can create new hybrids, potentially leading to unique colors and patterns.
- Connection with Nature: Watching seeds grow into mature plants allows you to experience the entire life cycle of your garden, enhancing your gardening experience.
When to Harvest Gladiolus Seed Pods
1. Flowering Stage
The journey to harvesting gladiolus seeds begins with flowering. After the flowering period, you will notice that the petals start to wilt and fall off. This signals the beginning of the seed pod formation.
2. Seed Pod Development
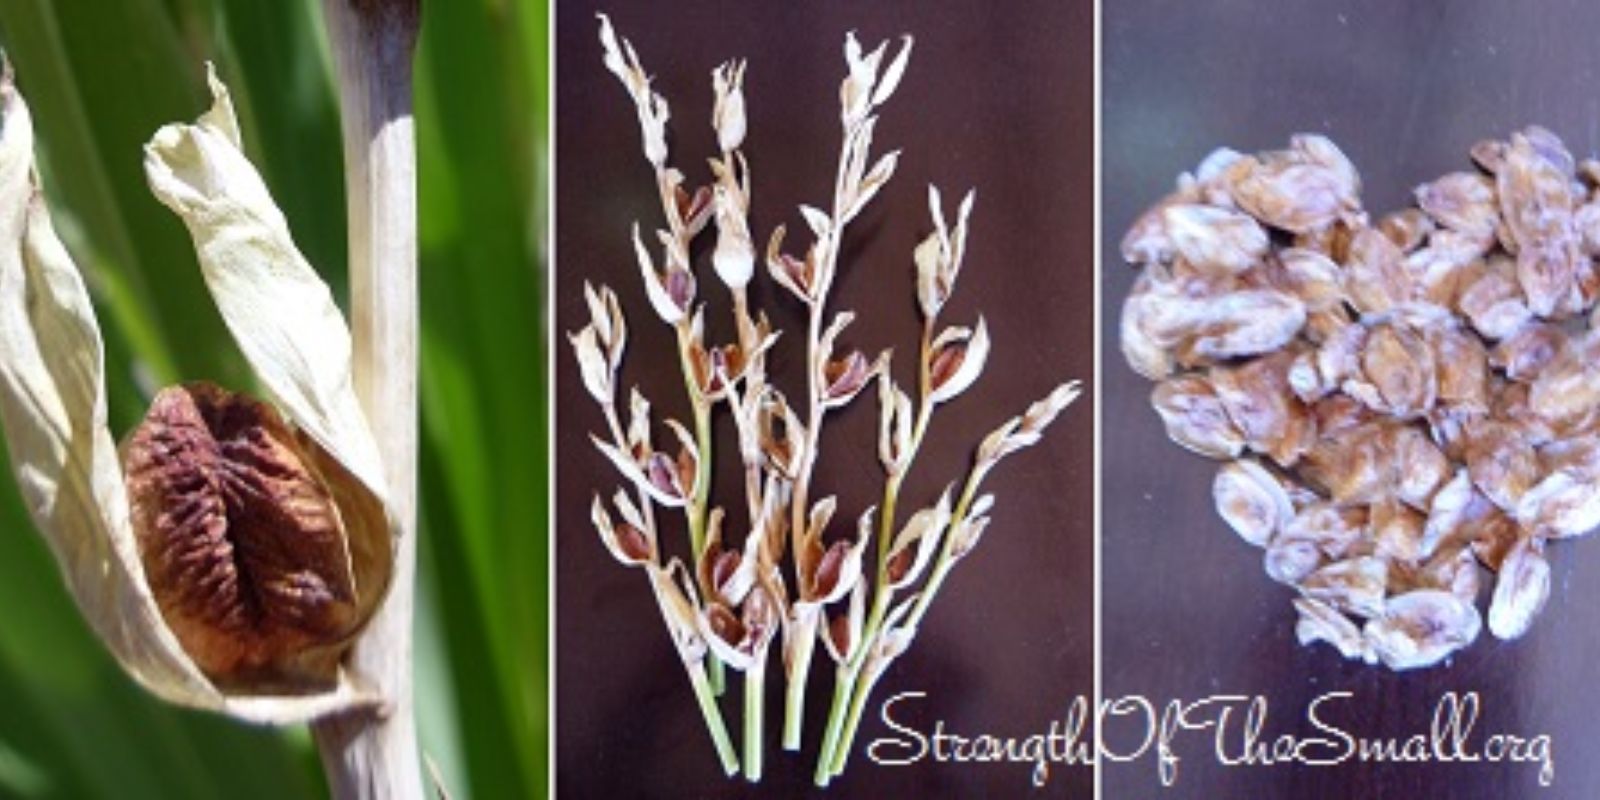
Once the flowers drop, the plant will begin to form seed pods. These pods resemble small, elongated capsules and are initially green. Over time, they will mature, changing color from green to yellowish-brown.
3. Maturity
It usually takes about 6 to 8 weeks for the seed pods to mature fully after the flowers have died back. Monitor the pods closely; when they begin to dry out and turn brown, it’s time to harvest. Mature pods will often start to split open slightly, revealing the dark seeds inside.
Steps for Harvesting Gladiolus Seed Pods
1. Gather Supplies
Before starting, gather the necessary supplies:
- Sharp scissors or pruning shears
- A paper bag or container for collecting seeds
- Labels and a marker for storage
2. Cut the Seed Pods
Using sharp scissors or pruning shears, carefully cut the seed pods from the plant. It’s best to harvest them on a dry day to prevent any moisture from affecting the seeds. Be gentle to avoid damaging the pods.
3. Allow Pods to Dry
After cutting, place the seed pods in a dry, warm location for a few days. This will help them finish drying out and may cause them to split open naturally, making it easier to access the seeds.
4. Extracting the Seeds
Once the pods are thoroughly dried, gently shake or tap them to release the seeds. You can also use your fingers to pry the pods open. Be sure to handle the seeds carefully, as they are small and can be easily lost.
5. Store the Seeds
Store the harvested seeds in a cool, dry place. Use an envelope or a small container and label it with the date and variety. Properly stored seeds can remain viable for several years, making it easy to plan for future plantings.
Preparing for Planting Gladiolus Seeds
1. Timing
The best time to plant gladiolus seeds is in early spring after the danger of frost has passed. This allows the seeds to germinate when temperatures are warming up, giving the young plants a head start.
2. Choosing the Right Soil
Select a well-draining soil mix, as gladiolus prefer a light, sandy soil. You can mix potting soil with perlite or sand to improve drainage. If planting directly in the garden, ensure the soil is loose and well-aerated.
3. Sowing the Seeds
- Indoors: If you want to start the seeds indoors, fill seed trays or small pots with the prepared soil. Sow the seeds about ¼ inch deep, covering them lightly with soil. Water gently to moisten the soil.
- Outdoors: For direct sowing in the garden, create rows or furrows, spacing the seeds about 4-6 inches apart. Cover lightly with soil and water thoroughly.
4. Provide Ideal Conditions
Gladiolus seeds require warmth and moisture to germinate. Place trays in a warm location with plenty of indirect sunlight or under grow lights. Keep the soil consistently moist but not soggy. Germination typically takes 2-4 weeks.
Caring for Young Gladiolus Plants
1. Thinning Seedlings
Once seedlings have developed their second set of true leaves, thin them out, leaving only the healthiest plants. This prevents overcrowding and allows each plant to receive adequate nutrients.
2. Fertilization
Apply a balanced fertilizer once the seedlings have established themselves. This will provide the necessary nutrients for robust growth. Follow the manufacturer’s instructions for dosage and frequency.
3. Watering
Keep the soil consistently moist, especially during dry spells. However, avoid overwatering, as this can lead to root rot. Water early in the morning or late in the afternoon to minimize evaporation.
4. Transplanting
When the seedlings are about 6 inches tall and have several leaves, they can be transplanted outdoors if started indoors. Choose a sunny location in your garden and space them about 12-18 inches apart to allow room for growth.
Harvesting and Storing Gladiolus Corms
As your gladiolus plants mature and bloom, they will eventually produce corms. This is an exciting step in the life cycle of your plants, as it allows you to propagate even more gladiolus in future seasons.
1. Timing for Harvesting Corms
After the flowering period, allow the foliage to remain for at least 6 weeks to store energy in the corms. When the leaves start to turn yellow and die back, it’s time to harvest.
2. Digging Up Corms
Use a spade or garden fork to carefully dig up the corms, taking care not to damage them. Shake off excess soil and allow them to dry in a shaded area for a few days.
3. Storing Corms
Once dry, store the corms in a cool, dry location in a paper bag or mesh container. Label them with the variety and date. Properly stored corms can be planted again the following spring.
Conclusion
Harvesting gladiolus seed pods and growing new plants from seeds can be a rewarding experience for any gardener. It not only allows you to cultivate unique varieties but also connects you with the entire life cycle of your garden. By following the steps outlined above, you can successfully harvest, plant, and enjoy the stunning beauty of gladiolus in your own backyard.
Engage with Fellow Gardeners
Have you tried growing gladiolus from seeds? Share your experiences and tips in the comments! Let’s inspire each other to create beautiful, thriving gardens together! 🌺🌱 #Gladiolus #SeedHarvesting #GardenInspiration #PlantPropagation #GardeningCommunity #FlowerGardening