
Introduction:
Growing giant pumpkins is an exciting and rewarding endeavor for gardeners who dream of producing the largest, most impressive fruits. Achieving a successful harvest of giant pumpkins requires attention to detail, especially when it comes to pollination. Proper pollination is crucial for ensuring healthy fruit development and maximizing the potential size of your pumpkin. In this article, we will guide you through the essential steps of giant pumpkin pollination, providing you with the knowledge to help your pumpkins reach their full potential.
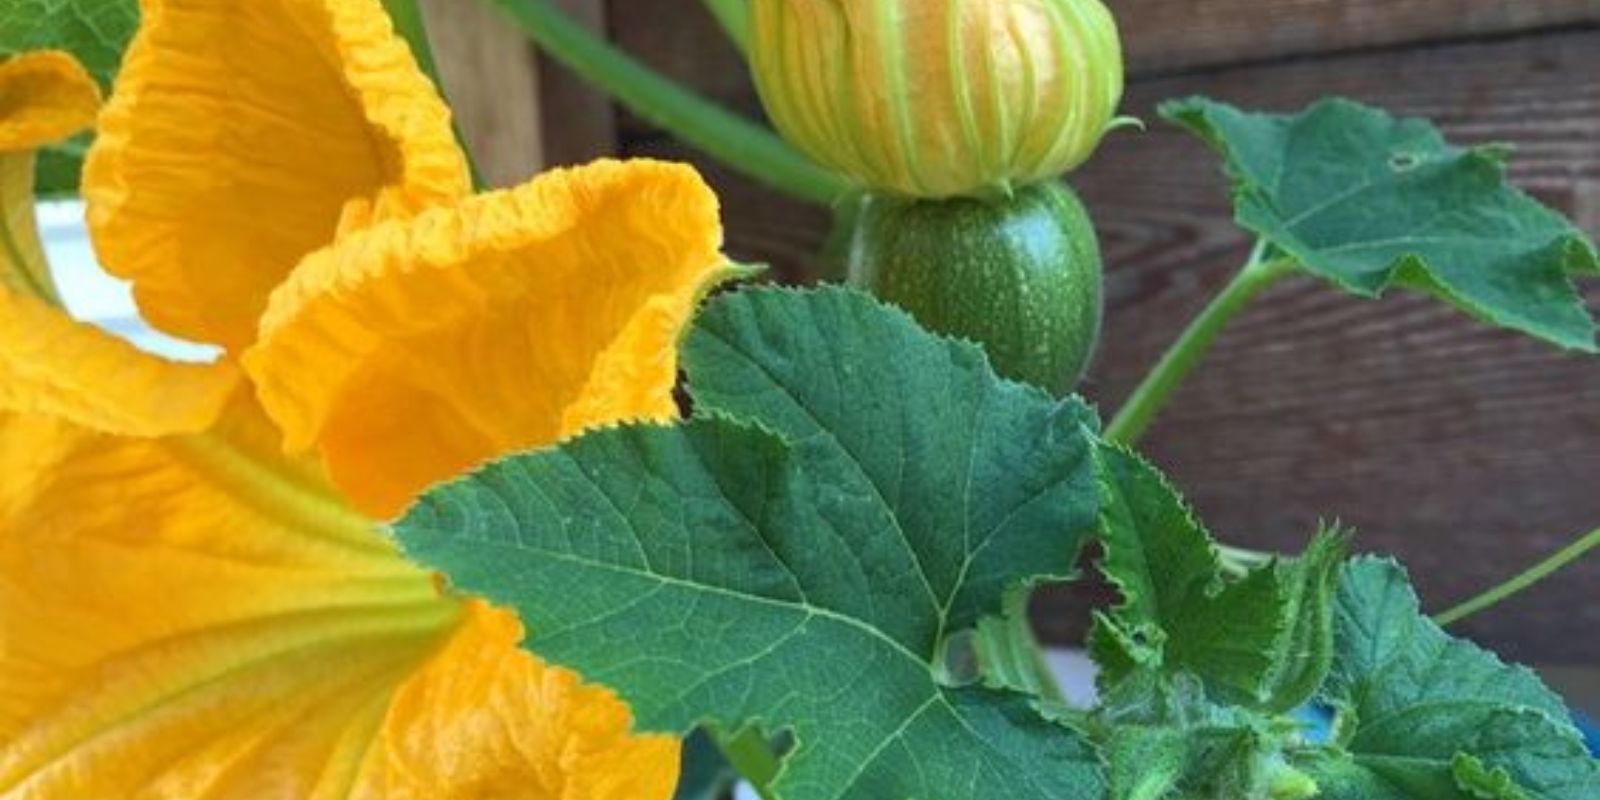
Understanding Pumpkin Flowers:
Before diving into the pollination process, it’s important to understand the different types of pumpkin flowers and their roles in reproduction. Pumpkin plants produce two types of flowers:
- Male Flowers: Male flowers typically appear first and are responsible for producing pollen. They have a single, long, slender stem and lack the swelling at the base that characterizes female flowers.
- Female Flowers: Female flowers are the ones that develop into pumpkins. They have a swollen base, known as the ovary, which will eventually grow into the fruit if pollinated successfully. Female flowers are usually fewer in number compared to male flowers and require proper pollination to produce fruit.
Steps for Successful Giant Pumpkin Pollination:
1. Identifying Flowers:
The first step in successful giant pumpkin pollination is identifying the male and female flowers on your plant. Male flowers will typically appear before female flowers and are easily recognizable by their long, slender stems and lack of swelling at the base. Female flowers, on the other hand, will have a small, immature pumpkin at the base and are usually found closer to the main stem of the plant.
Inspect your pumpkin plant regularly to determine when both male and female flowers are present. Ideal pollination occurs in the early morning hours when the flowers are fully open and receptive.
2. Collecting Pollen:
Once you have identified a male flower in bloom, it’s time to collect pollen. To do this, gently remove the male flower from the plant by cutting it off at the base with clean scissors or pruning shears. Using a small brush, cotton swab, or even a clean paintbrush, collect the pollen from the stamen of the male flower. Be sure to collect pollen from several male flowers to ensure you have an adequate supply.
3. Transferring Pollen:
With the pollen collected, the next step is to transfer it to the stigma of the female flower. Carefully remove the female flower from the plant, taking care not to damage the delicate structures. Using the brush or swab with the collected pollen, gently dust the stigma (the central part of the female flower) with the pollen. Make sure the pollen is evenly distributed over the surface of the stigma for effective pollination.
After transferring the pollen, reattach the female flower to the plant or ensure it remains in its natural position. Pollination can be performed manually, but in some cases, natural pollinators such as bees may also assist in the process.
4. Securing the Pollination:
To protect the newly pollinated female flower from pests and environmental factors, cover it with a cloth or netting. This will help prevent insects and animals from disturbing the flower and ensure that the pollination process is not interrupted. The covering should be light and breathable to avoid overheating and to allow sunlight to reach the flower.
5. Monitoring Growth:
After successful pollination, keep a close eye on the developing pumpkin. The fruit should begin to swell within a few days to a week after pollination. Monitor the pumpkin’s growth and provide it with adequate water, nutrients, and support as needed. Giant pumpkins require plenty of water and nutrients to reach their full size, so ensure the soil remains consistently moist and apply a balanced fertilizer regularly.
Troubleshooting Common Issues:
Even with careful pollination, you may encounter some challenges during the growth of your giant pumpkin. Here are some common issues and solutions:
- Poor Pollination: If the pumpkin does not begin to swell after a week of pollination, it may indicate poor pollination. In such cases, try pollinating additional female flowers or using pollen from different male flowers.
- Pest Problems: Insects such as squash bugs, aphids, and spider mites can damage pumpkin plants and affect fruit development. Regularly inspect your plants for pests and use appropriate treatments, such as insecticidal soap or neem oil, to manage infestations.
- Disease Issues: Pumpkin plants can be susceptible to diseases such as powdery mildew, downy mildew, and bacterial wilt. Ensure good air circulation around your plants, avoid overhead watering, and remove any diseased plant parts promptly. Use fungicides or bactericides if necessary to control diseases.
Post-Harvest Care:
Once your giant pumpkin has reached its full size and has matured, it’s time to prepare for harvest. Cut the pumpkin from the vine using a sharp knife or pruning shears, leaving a few inches of stem attached to the fruit. Handle the pumpkin with care to avoid bruising or damaging the skin.
Store the pumpkin in a cool, dry place with good ventilation to prevent rot. Giant pumpkins can be displayed as decorative pieces or used in various culinary applications, depending on your preferences.
Motivation:
Growing giant pumpkins is a challenging yet incredibly rewarding experience. By following these steps for successful pollination and providing your pumpkins with the care they need, you can achieve a bountiful harvest of impressive, oversized fruits. Ready to embark on your giant pumpkin journey? Start pollinating, and watch your garden produce these extraordinary vegetables! 🎃🌟