
If you’ve ever dreamed of growing your own lemons but didn’t know where to start, you’ll be thrilled to know that it’s easier than you think! Growing a lemon tree from a cutting can be a rewarding and relatively simple process, even for beginners. With a few basic steps and some patience, you can have your very own lemon tree thriving in your garden or on your windowsill. In this article, we’ll explore the benefits of growing lemons from cuttings, provide a detailed step-by-step guide to help you get started, and offer some helpful tips to ensure your lemon tree grows healthy and strong.
Why Grow Lemons from Cuttings?
Before diving into the process of growing lemon trees from cuttings, let’s take a moment to consider why this method is so appealing.
- Cost-Effective: Purchasing a mature lemon tree from a nursery can be expensive. Propagating a tree from cuttings is a much more affordable option.
- Quick Results: Growing lemon trees from cuttings allows you to skip the germination process. The cutting already has the potential to grow roots and establish itself, meaning you can expect faster results.
- Genetic Consistency: Growing a lemon tree from a cutting ensures that the new tree is genetically identical to the parent tree. This means that if you’re growing a particular variety you love, your cutting will produce the same fruit as the original tree.
- Space-Saving: Lemon trees grown in containers are an excellent choice for those with limited space. You can grow your tree indoors or on a balcony, making it a great option for urban gardeners.
Now that we’ve established why you should grow lemons from cuttings, let’s walk through the steps you need to follow to propagate a healthy lemon tree.
Step-by-Step Guide to Growing Lemons from Cuttings
Step 1: Select a Healthy Parent Tree
The first step in propagating a lemon tree from cuttings is to choose a healthy parent tree. The cutting you take will only be as healthy as the tree it comes from, so it’s essential to pick a tree that’s disease-free and strong.
Look for a mature lemon tree with vibrant green leaves and no signs of pests or diseases. Ideally, the tree should have fresh growth (new stems and leaves) that you can cut for propagation.
Step 2: Take the Cutting
Once you’ve chosen your parent tree, it’s time to take the cutting. The best time to take cuttings is during the spring or early summer when the tree is actively growing. Choose a healthy, softwood stem (a new growth that is not yet woody) that is about 6-8 inches long.
Using clean, sharp pruning shears, cut just below a leaf node (the point where a leaf is attached to the stem). This is where the roots will eventually sprout. Be sure to cut at a 45-degree angle to give the cutting the best chance of rooting.
Step 3: Prepare the Cutting
After taking the cutting, remove any leaves from the bottom half of the stem. This will prevent the leaves from rotting when submerged in water or soil and will allow the cutting to focus its energy on root development.
If you’d like, you can also remove any flowers or buds on the cutting. While these are beautiful, they can drain energy from the cutting as it tries to establish roots. A cutting that is focused solely on root growth is more likely to succeed.
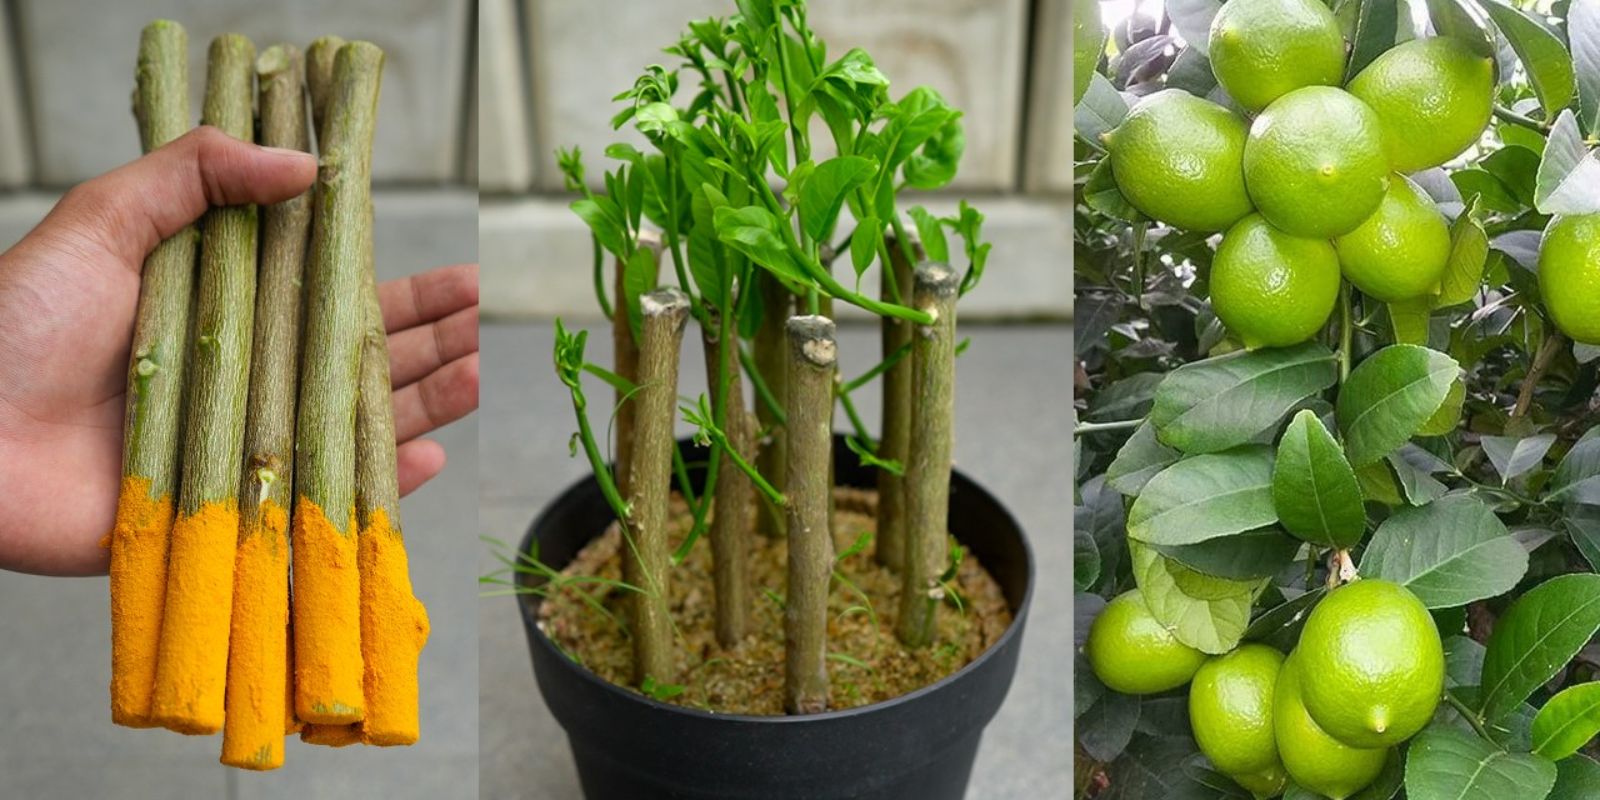
Step 4: Apply Rooting Hormone
Rooting hormone is not always necessary, but it can help speed up the rooting process and encourage better root development. Dip the cut end of the cutting into rooting hormone powder or gel, covering the exposed stem.
While rooting hormone can be purchased at most garden centers, some gardeners prefer to make their own by using natural substances like cinnamon or honey, both of which have antifungal and antimicrobial properties.
Step 5: Choose a Growing Medium
Lemon tree cuttings can be propagated in either water or soil. Both methods work, but each has its advantages.
- Water Method: Propagating cuttings in water allows you to visually monitor root development. Simply place the cut end of the stem into a jar or glass of water, making sure the leafless portion of the cutting is submerged. Change the water every few days to prevent stagnation and bacterial growth.
- Soil Method: Alternatively, you can plant the cutting directly in a pot filled with well-draining potting mix. Use a mixture that is designed for succulent or cactus plants to ensure good drainage. Plant the cutting about an inch deep and gently firm the soil around it.
Both methods can be successful, but water propagation is often easier for beginners because you can watch the roots form. If you choose to propagate in soil, be sure to keep the soil lightly moist and avoid overwatering.
Step 6: Create a Humid Environment
To encourage the cutting to root, you need to create a humid environment. This will help keep the cutting from drying out and give it the best chance of survival. If you’re propagating in water, place the jar in a location with indirect sunlight but not direct sunlight, which can cause algae growth in the water.
If you’re using the soil method, you can create a small greenhouse effect by covering the pot with a plastic bag or a plastic dome. This will help maintain the humidity level around the cutting, which is crucial for root development.
Step 7: Provide the Right Conditions
Lemon tree cuttings require warmth to root successfully. The ideal temperature for rooting is between 70°F and 80°F (21°C to 27°C). Keep the cutting in a bright location, but avoid direct sunlight, which can scorch the tender stem.
If you’re propagating indoors, a sunny windowsill is perfect, but make sure the cutting doesn’t get too hot or too cold. A warm, stable environment will encourage faster root growth.
Step 8: Wait for Roots to Develop
It can take several weeks for the roots to begin forming. Be patient and resist the urge to check the cutting too frequently. If you’re using the water method, check the cutting every few days for root growth. Once the roots are about 2-3 inches long, you can transfer the cutting to a larger pot with soil.
If you’re using the soil method, gently tug on the cutting every few weeks. If you feel resistance, this means that roots have begun to form.
Step 9: Transplant the Cutting
Once the cutting has developed a strong root system, it’s time to transplant it into a larger pot. Choose a pot that’s slightly larger than the cutting’s root ball, and fill it with well-draining potting mix designed for citrus trees.
Carefully remove the cutting from its original pot or water container, being careful not to damage the delicate roots. Plant it in the new pot, firm the soil around it, and water gently. Place the pot in a sunny spot and continue to care for the young lemon tree as it grows.
Step 10: Ongoing Care and Maintenance
Once your lemon tree has been successfully propagated and transplanted, it’s important to continue providing it with proper care.
- Watering: Lemon trees need regular watering, but they don’t like to sit in soggy soil. Make sure the pot has drainage holes, and let the soil dry out slightly between waterings.
- Fertilization: Once the tree starts growing, you can begin feeding it with a balanced, slow-release fertilizer. Avoid over-fertilizing, as this can harm the tree.
- Pruning: Prune your tree regularly to encourage bushy growth and remove any dead or diseased branches.
- Sunlight: Lemon trees thrive in bright, indirect light. If you’re growing your tree indoors, place it in a location that gets plenty of sunlight throughout the day.
Conclusion
Growing a lemon tree from a cutting is a simple and rewarding way to add a touch of citrus to your garden or home. With just a little patience and care, you can have a healthy lemon tree that will provide you with fresh fruit for years to come. Whether you’re looking to propagate a tree for yourself or share a cutting with a friend, this process offers a great way to experience the joy of growing your own food.
So, gather your supplies, take a cutting from a healthy lemon tree, and watch as it grows into a beautiful, fruitful tree that will brighten up your space and provide you with delicious lemons. Happy gardening! 🍋