
Growing your own vegetables at home is a rewarding and sustainable practice. It not only ensures that you are consuming fresh, organic produce, but also reduces waste, especially if you are using parts of the vegetables that are typically discarded. One such vegetable that is surprisingly easy to regrow at home is celery. Using a simple bunch of store-bought celery, you can cultivate your own healthy crop in just a few weeks.
In this comprehensive guide, we will explore everything you need to know about growing celery at home, from using a single bunch to maintaining the plant and ensuring a steady supply of fresh, crunchy stalks.
Why Grow Celery at Home?
Celery is a staple ingredient in many dishes, from soups and stews to salads and snacks. However, store-bought celery can often be expensive, especially if you prefer organic varieties. By growing your own, you can ensure a consistent supply of fresh celery at minimal cost. Plus, it’s a fun gardening project that requires little space, making it perfect for those with small gardens or even apartment balconies.
Moreover, celery is a biennial plant, meaning it takes two years to complete its life cycle. This gives home growers ample opportunity to harvest stalks multiple times before needing to replace the plant. Even if you’re new to gardening, growing celery is a simple project that will yield great results with minimal effort.
Materials Needed
Before we dive into the steps of growing celery at home, here are the basic materials you’ll need:
- One bunch of celery (store-bought or garden-grown)
- A small bowl or container
- Fresh water
- A pot or garden bed with rich, well-drained soil
- Compost or organic fertilizer (optional)
- A sunny spot (either indoors or outdoors)
Step-by-Step Guide to Growing Celery at Home
1. Cut the Base of the Celery Bunch
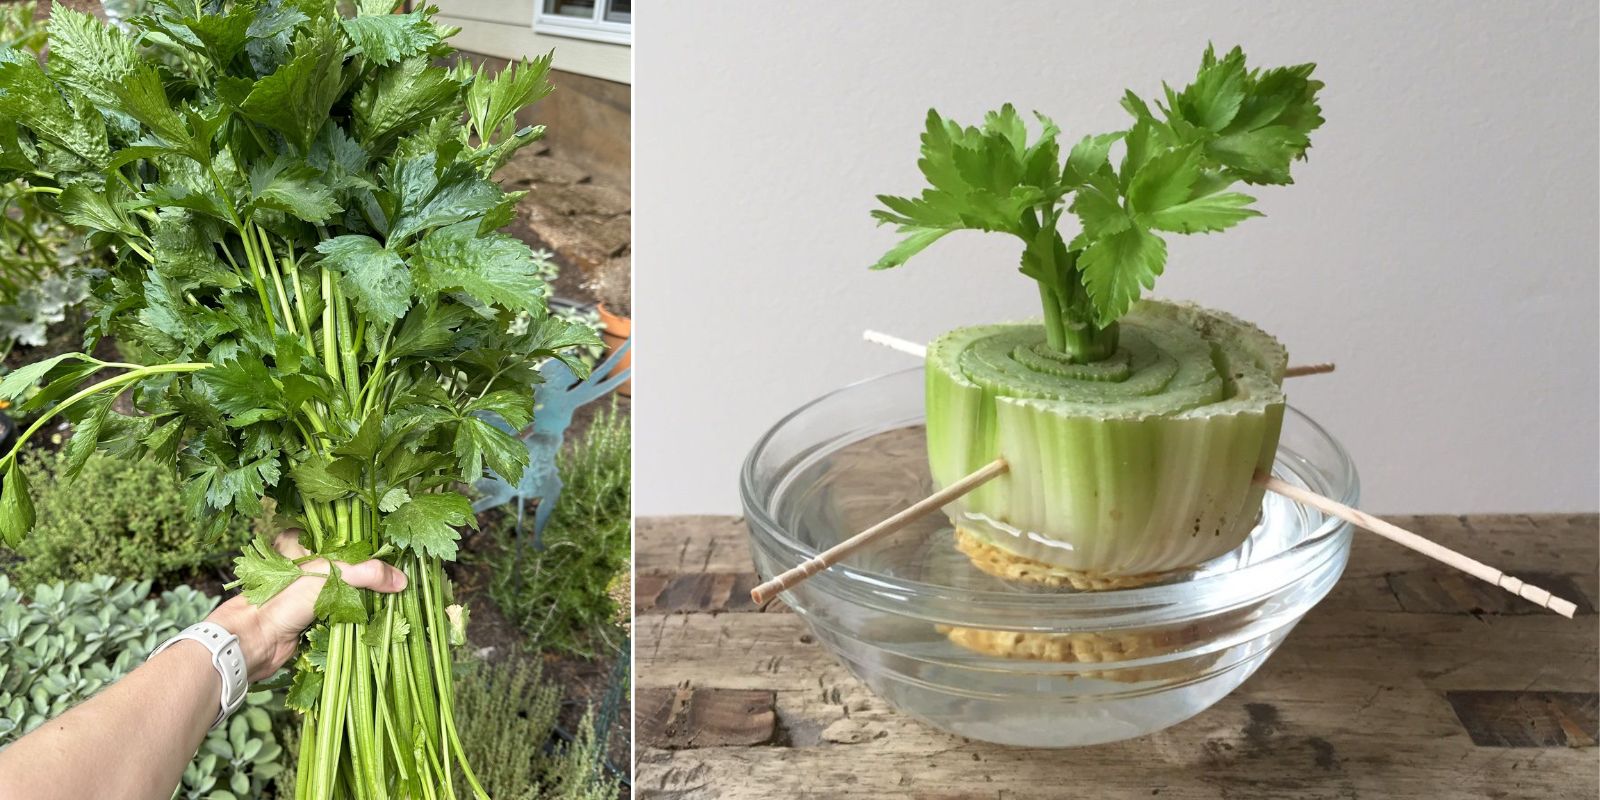
The first step in growing celery from a store-bought bunch is to remove the base. Take a sharp knife and cut off the bottom 2-3 inches of the bunch. This part, often discarded, contains the root structure and is vital for regrowing the plant. The key to success in this process is ensuring that the cut is clean and the base remains intact.
2. Soak the Celery Base in Water
Once you’ve cut the base, it’s time to encourage root growth. Place the celery base, cut side up, in a small bowl of water. The water level should be enough to cover the bottom of the base but not so much that it submerges the entire piece. This step is crucial as it allows the celery to absorb moisture and triggers new growth from the center.
Place the bowl in a sunny spot, such as a windowsill, where it can receive at least 6-8 hours of sunlight per day. Over the next few days, you’ll begin to notice small sprouts and leaves emerging from the center of the base, indicating that the celery is ready for the next step.
3. Wait for Root and Leaf Growth
Be patient! It usually takes about 5-7 days for noticeable growth to occur. During this time, make sure to change the water every other day to keep it fresh and prevent bacterial buildup. You’ll start to see small, green shoots emerging from the center of the base, and tiny roots will form at the bottom.
Once you see both the green shoots and some root development (around 1-2 inches), your celery base is ready to be transferred to soil.
4. Transplant to Soil
At this stage, it’s time to plant your celery in soil. Choose a pot that’s at least 6 inches deep or, if you have space, plant it directly in your garden. Make sure the soil is well-draining and rich in nutrients. You can improve soil quality by mixing in compost or organic fertilizer, though celery isn’t particularly demanding in terms of soil conditions.
Dig a small hole in the soil, just deep enough to cover the roots and base of the celery while leaving the top exposed. Carefully place the celery base into the hole, ensuring that the top (where the green shoots are) remains above the soil line. Gently press the soil around the base to secure it in place.
5. Water and Care for the Plant
Water the soil immediately after transplanting to help the celery adjust to its new environment. Celery requires consistent moisture, so keep the soil damp but not waterlogged. In the first few days after planting, the celery may seem slow to grow, but don’t worry—it’s just adjusting to its new surroundings.
Over the next few weeks, you’ll notice the celery growing taller and fuller. Make sure the plant receives at least 6 hours of sunlight each day. If you’re growing celery indoors, rotate the pot occasionally to ensure even sunlight exposure on all sides.
6. Fertilize and Maintain Growth
To encourage robust growth, you can add a balanced organic fertilizer every 4-6 weeks. While celery is a relatively low-maintenance plant, providing it with a nutrient boost can lead to healthier and more productive stalks. Organic compost, fish emulsion, or liquid seaweed are great choices for feeding your celery.
Keep an eye out for pests like aphids or slugs, which may target the tender stalks. Using natural insecticidal soap or encouraging beneficial insects like ladybugs can help protect your plant without harming your garden ecosystem.
7. Harvesting Celery
Celery takes about 3-4 months to fully mature, but you can start harvesting stalks as soon as they reach about 8 inches in height. The best part is that you don’t need to harvest the entire plant at once. Simply cut off the outer stalks as needed, leaving the inner stalks to continue growing.
By practicing this “cut-and-come-again” harvesting method, you’ll have a continuous supply of celery throughout the growing season. Over time, the plant will regrow and provide you with fresh stalks for months.
Tips for Success
Here are a few additional tips to ensure success when growing celery at home:
- Mulch: Applying a layer of mulch around the base of the plant helps retain soil moisture and prevents weeds from competing for nutrients.
- Temperature: Celery prefers cooler temperatures (55-70°F). If you live in a warmer climate, consider providing shade during the hottest part of the day to prevent the plant from wilting.
- Spacing: If you’re planting multiple celery plants in a garden bed, make sure to space them about 10-12 inches apart to allow for proper air circulation and growth.
Benefits of Growing Celery at Home
- Cost-effective: With just one bunch of store-bought celery, you can regrow multiple plants, saving money over time.
- Sustainability: Growing your own celery reduces the need for plastic packaging and transportation, contributing to a more sustainable lifestyle.
- Freshness: Home-grown celery is often fresher and more flavorful than store-bought, especially when harvested at the peak of ripeness.
- No Waste: Instead of throwing away the base of your celery, you’re giving it a new life in the garden!
Final Thoughts
Growing celery at home is not only a rewarding gardening project but also a sustainable way to ensure you have fresh, organic produce at your fingertips. With minimal effort and basic gardening tools, you can regrow celery from a single bunch and enjoy a continuous harvest throughout the season. Plus, it’s a fun and educational activity for gardeners of all levels.
Start today and experience the satisfaction of cultivating your own healthy, homegrown celery!
Have you tried growing celery at home? Share your tips and experiences in the comments! Let’s grow together! 🌱🥬