
Introduction
In the ever-evolving world of gardening and small-scale farming, efficiency is key. Watering is one of the most critical tasks for plant health, and finding an effective method can make all the difference. Enter the Chapin bucket, an innovative tool that streamlines the watering process while promoting optimal growth for your plants. This article will explore the benefits of using the Chapin bucket, how to set it up, and tips for maximizing its effectiveness in your garden.
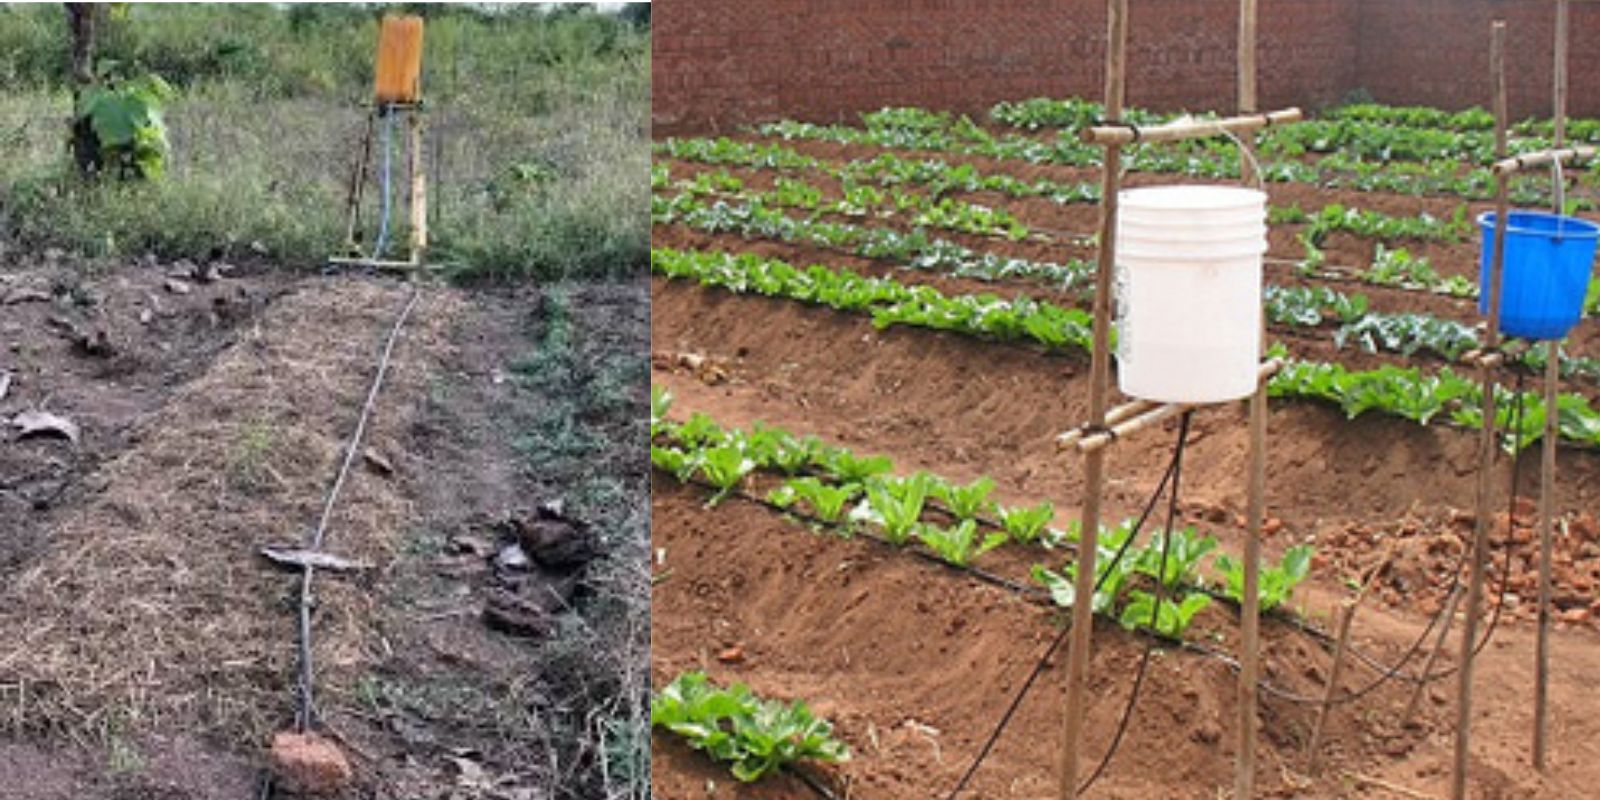
Understanding the Chapin Bucket System
The Chapin bucket system is a versatile watering solution designed for small farms and home gardens. It consists of a specially designed bucket that allows for controlled water application. Unlike traditional watering methods, which can waste water and lead to over-saturation, the Chapin bucket delivers water precisely where it is needed, ensuring that plants receive adequate hydration without the risk of drowning their roots.
Benefits of Using the Chapin Bucket
- Water Conservation: The Chapin bucket minimizes water waste by directing water exactly where it’s needed. This is especially important in regions where water is scarce or expensive.
- Efficient Delivery: With adjustable flow rates, gardeners can tailor the water supply to meet the specific needs of different plants. Whether you’re watering delicate seedlings or robust vegetables, the Chapin bucket can be adjusted to provide just the right amount of moisture.
- Reduced Labor: Traditional watering methods can be time-consuming and labor-intensive. The Chapin bucket simplifies the process, allowing you to spend less time watering and more time enjoying your garden.
- Enhanced Plant Health: By providing consistent and controlled moisture levels, the Chapin bucket helps prevent common problems associated with overwatering or underwatering, such as root rot or wilting.
- Portability: The lightweight design of the Chapin bucket makes it easy to move around your garden, allowing you to water various areas without the hassle of dragging hoses or heavy watering cans.
Setting Up Your Chapin Bucket
Setting up the Chapin bucket is a straightforward process that can be done in a few simple steps:
Step 1: Choose the Right Chapin Bucket
Select a Chapin bucket that meets your gardening needs. The size of the bucket will depend on the area you plan to water and the types of plants you are growing. Chapin offers various capacities, so choose one that best suits your requirements.
Step 2: Prepare Your Garden
Before you start watering, clear the area around your plants. Remove any debris or obstacles that could hinder access to your plants. This will also allow you to monitor the moisture levels in the soil more easily.
Step 3: Fill the Bucket
Using a hose or another water source, fill the Chapin bucket with water. Make sure to fill it to the recommended level for optimal performance. Overfilling can lead to spills, while underfilling may reduce the effectiveness of the system.
Step 4: Set Up the System
Position the bucket near your plants, ensuring that it is easily accessible. Depending on your garden layout, you may need to attach hoses or connectors to direct the water flow to the root zone of your plants.
Step 5: Adjust the Flow Rate
One of the key features of the Chapin bucket system is its adjustable flow rate. Depending on the type of plants you are watering, you can modify the flow to deliver more or less water as needed. For example, delicate seedlings may require a slower flow rate, while established plants may benefit from a faster application.
Step 6: Watering Time
Timing is crucial when it comes to watering. To reduce evaporation and allow for optimal water absorption, it’s best to water your plants during the cooler parts of the day. Early morning or late afternoon are ideal times to water, as temperatures are generally lower, and there is less direct sunlight.
Step 7: Monitor Plant Health
Keep an eye on your plants’ moisture levels after watering. You may need to adjust your watering schedule based on weather conditions, plant growth stages, and soil moisture. Regular monitoring will help you identify any issues early on, allowing for prompt intervention.
Tips for Maximizing Your Chapin Bucket Experience
- Regular Maintenance: Ensure your Chapin bucket is clean and free from debris. Regularly check for any clogs in the hoses or connectors to maintain optimal water flow.
- Consider Plant Types: Different plants have varying water needs. Take the time to research the specific requirements of the plants in your garden and adjust the flow rate accordingly.
- Use Mulch: Applying a layer of mulch around your plants can help retain soil moisture, reducing the frequency of watering needed. This is especially beneficial in hot and dry climates.
- Test Soil Moisture: Before watering, test the soil moisture levels by sticking your finger about an inch into the soil. If it feels dry, it’s time to water. If it’s still moist, wait a day or two before checking again.
- Rotate Locations: If you have multiple areas to water, consider rotating the location of your Chapin bucket. This allows you to give attention to different sections of your garden and ensures even moisture distribution.
Conclusion
The Chapin bucket system is a revolutionary tool for small farmers and home gardeners looking to optimize their watering techniques. By providing efficient water delivery, conserving resources, and enhancing plant health, the Chapin bucket is an indispensable addition to any gardening toolkit.
As you embrace this innovative method, you’ll find that it not only simplifies your watering routine but also allows you to focus on what truly matters—growing healthy and vibrant plants. Whether you’re a seasoned gardener or just starting, the Chapin bucket can help you achieve gardening success with minimal effort.
Call to Action
Ready to transform your watering experience? Try the Chapin bucket system today and watch your garden flourish! Share your gardening journey and tips with others using #ChapinBucket #WaterWise #SustainableGardening #GardenEfficiency #PlantCareSuccess! 🌿💧