
Growing your own food has never been more rewarding, and one of the easiest vegetables to cultivate is the potato. Whether you’re a seasoned gardener or a complete novice, potato farming in containers is an accessible way to produce this versatile and delicious crop right at home. In this comprehensive guide, we will explore the benefits of container gardening, provide a step-by-step approach to growing potatoes in containers, and share tips and tricks to ensure a bountiful harvest.
The Benefits of Container Gardening
Container gardening has become increasingly popular for various reasons, especially for urban dwellers or those with limited outdoor space. Here are some benefits of growing potatoes in containers:
- Space-Saving: Containers allow you to utilize small spaces, such as patios, balconies, or even indoor areas with adequate light.
- Mobility: Containers can be moved to maximize sunlight exposure or protect plants from harsh weather conditions.
- Soil Control: You can control the soil quality and mix, ensuring optimal conditions for your plants.
- Reduced Pests and Diseases: Growing in containers can help reduce soil-borne pests and diseases that often plague traditional garden beds.
- Extended Growing Season: Containers can warm up faster in spring, allowing you to start planting earlier than in the ground.
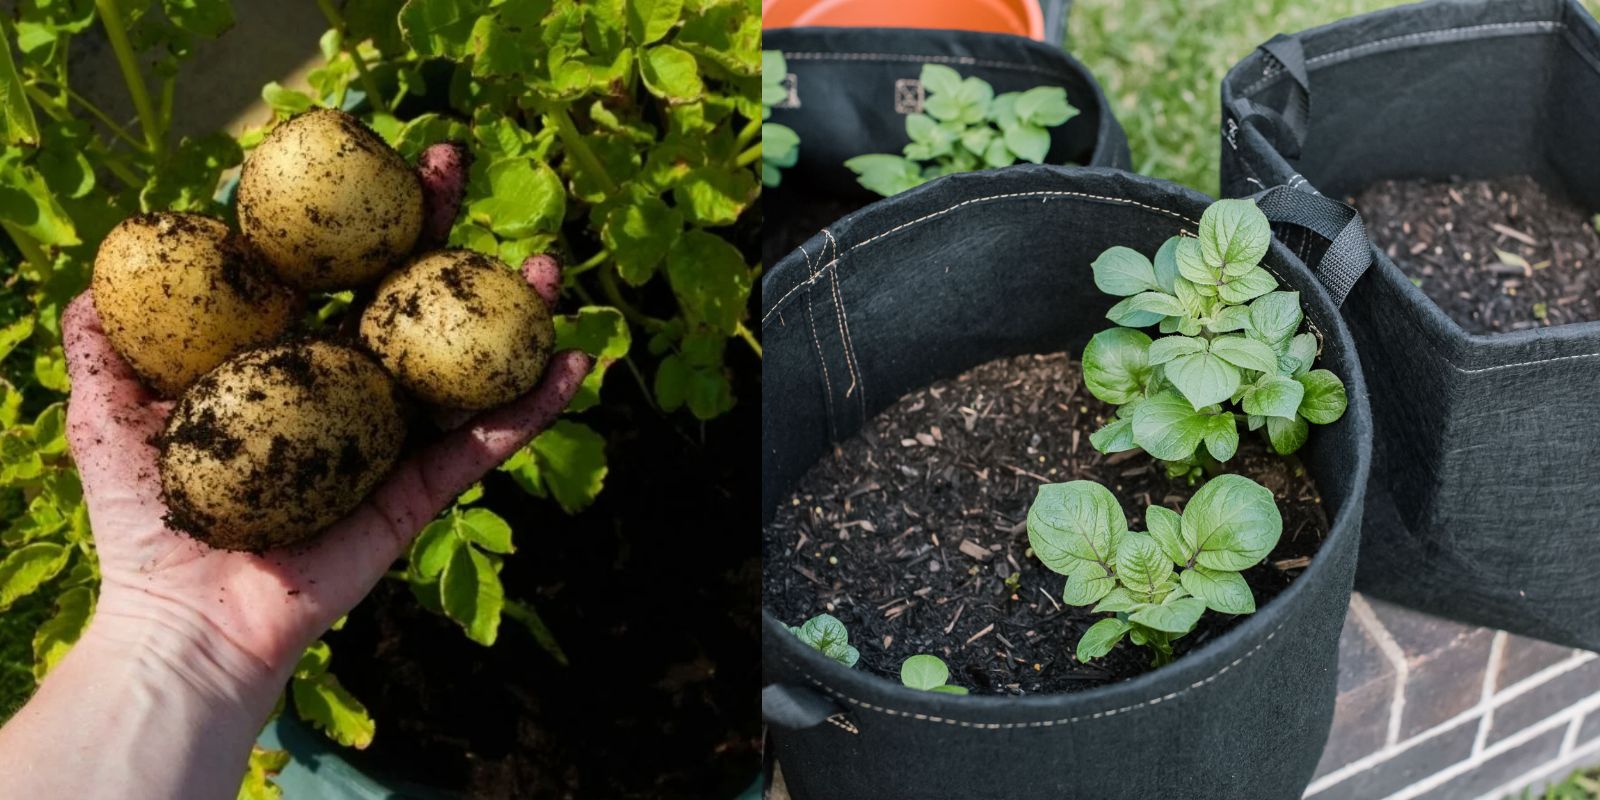
Choosing the Right Container
Selecting the right container is crucial for successful potato farming. Here are some options:
- Size: Choose a container that is at least 12 inches deep. This depth allows potatoes enough space to grow. A 5-gallon bucket is an excellent option, as is a large fabric grow bag.
- Drainage: Ensure your container has adequate drainage holes to prevent water from pooling at the bottom, which can lead to root rot.
- Material: Containers can be made of plastic, wood, or fabric. Each material has its benefits, but ensure the container allows for good airflow to the roots.
- Weight: Consider how heavy the container will become once filled with soil. Make sure you can easily move it if necessary.
Selecting Seed Potatoes
Seed potatoes are small tubers specifically grown for planting. It’s important to choose the right seed potatoes for optimal growth:
- Certified Seed Potatoes: Purchase certified seed potatoes from a nursery or garden center to ensure they are disease-free.
- Variety: Choose a potato variety based on your preference and local growing conditions. Some popular varieties include:
- Yukon Gold: A versatile yellow potato that is great for baking and mashing.
- Red Potatoes: Smooth-skinned and waxy, perfect for salads and roasting.
- Russet Potatoes: Ideal for baking and frying due to their fluffy texture.
- Fingerling Potatoes: Unique shapes and flavors, great for gourmet dishes.
- Size and Preparation: If your seed potatoes are large, cut them into pieces, ensuring each piece has at least one eye (the small sprout area). Allow the cut pieces to dry for a day or two to prevent rot.
Preparing the Soil
The quality of the soil is essential for the success of your potato plants. Here’s how to prepare the perfect potting mix:
- Potting Mix: Use a high-quality potting mix specifically designed for container gardening. Avoid garden soil, as it can compact in containers and hinder root growth.
- Organic Matter: Mix in compost to enrich the soil. Compost improves drainage and provides essential nutrients for healthy growth.
- pH Level: Potatoes prefer slightly acidic soil with a pH of 5.5 to 6.5. You can test your soil and amend it accordingly using lime (to raise pH) or sulfur (to lower pH).
Step-by-Step Guide to Planting Potatoes in Containers
Now that you have your container, seed potatoes, and soil ready, it’s time to start planting!
Step 1: Planting the Seed Potatoes
- Fill the Container: Begin by filling your container with 4-6 inches of the prepared potting mix.
- Place Seed Potatoes: Position the seed potato pieces, cut side down, with the eyes facing up. Space them about 6-8 inches apart.
- Cover with Soil: Gently cover the potatoes with 2-4 inches of potting mix, leaving the tops of the eyes exposed.
Step 2: Watering
Proper watering is crucial for potato health:
- Initial Watering: After planting, water the container thoroughly until water drains out of the bottom. This helps settle the soil around the seed potatoes.
- Consistent Moisture: Keep the soil consistently moist but not soggy. Watering should be done whenever the top inch of soil feels dry.
Step 3: Sunlight Requirements
Potatoes thrive in sunlight:
- Location: Place your container in a sunny spot that receives at least 6-8 hours of direct sunlight each day. If you don’t have full sun, you can still grow potatoes, but yields may be lower.
Step 4: Hilling
As your potato plants grow, hilling is necessary:
- When to Hill: When the potato plants reach about 6 inches tall, it’s time to hill.
- How to Hill: Add more soil around the base of the plants, covering the lower leaves but leaving the top few leaves exposed. This encourages the development of additional tubers and prevents them from being exposed to sunlight, which can cause greening and toxicity.
Step 5: Fertilizing
To boost growth, consider fertilizing your potato plants:
- Organic Fertilizers: Use a balanced organic fertilizer or compost. Fertilize every 4-6 weeks during the growing season, following package instructions for application rates.
Step 6: Pest and Disease Management
Watch for common pests and diseases:
- Pests: Common pests include aphids and potato beetles. Hand-pick pests or use insecticidal soap if needed.
- Disease: Prevent diseases like blight by ensuring good air circulation and not over-watering. Rotate crops if you plan to grow potatoes in containers year after year.
Harvesting Potatoes
The best part of potato farming is harvesting:
When to Harvest
- Timing: Depending on the variety, you can harvest potatoes 10-12 weeks after planting. Wait until the plant foliage begins to yellow and die back.
- Testing: For new potatoes, you can start harvesting a few weeks earlier when the plants are still green.
How to Harvest
- Gently Remove: Carefully tip the container over or use a garden fork to loosen the soil and gently pull out the potatoes.
- Handle with Care: Avoid bruising the potatoes during harvest. Inspect for any damage or disease.
Storing Your Harvest
Once you’ve harvested your potatoes, proper storage is essential:
- Curing: Allow the harvested potatoes to cure in a cool, dark place for about two weeks. This helps toughen their skin and prolongs storage life.
- Storage Conditions: Store cured potatoes in a dark, cool (40-50°F), and well-ventilated area. Avoid washing them until just before use to prevent moisture buildup.
- Regular Checks: Check on your stored potatoes regularly and remove any that show signs of spoilage.
Conclusion
Growing potatoes in containers is a rewarding and enjoyable gardening project that anyone can undertake, regardless of space limitations or gardening experience. With the right containers, seed potatoes, soil, and care, you can enjoy a bountiful harvest of delicious homegrown potatoes. So grab your containers, plant your seed potatoes, and watch them flourish right at home!
Get Started Today!
Now that you have all the information you need, it’s time to start your potato farming adventure. Get your containers ready and enjoy the satisfaction of growing your own food! 🌱🥔 #ContainerGardening #HomeGrownPotatoes #UrbanGardening #SustainableLiving #GardenFresh