
Microgreens have gained immense popularity in recent years as a fresh, nutrient-dense food that you can easily grow at home. These tiny greens are harvested in their early growth stages, making them packed with vitamins, minerals, and antioxidants. They add a fresh crunch to salads, sandwiches, and smoothies while delivering a powerful nutritional punch.
But as you embark on your microgreen-growing journey, you may wonder: do you need special seeds for microgreens, or can you use regular seeds? In this article, we will explore everything you need to know about microgreen seeds, the growing process, and how to cultivate these miniature greens in your home.
What Are Microgreens?
Microgreens are the young seedlings of vegetables and herbs that are harvested just after the first true leaves develop, typically within 7-14 days of germination. They are small in size but loaded with flavor and nutrition, often containing higher concentrations of vitamins and minerals than their mature counterparts. Popular microgreens include kale, arugula, radish, basil, and even sunflower.
Do You Need Special Seeds for Microgreens?
One of the most common questions for beginners is whether special seeds are required for growing microgreens. The simple answer is no—you don’t need special seeds specifically labeled for microgreens. However, there are a few things to keep in mind to ensure that you’re growing healthy and safe microgreens.
Organic and Untreated Seeds: The Key to Growing Safe Microgreens
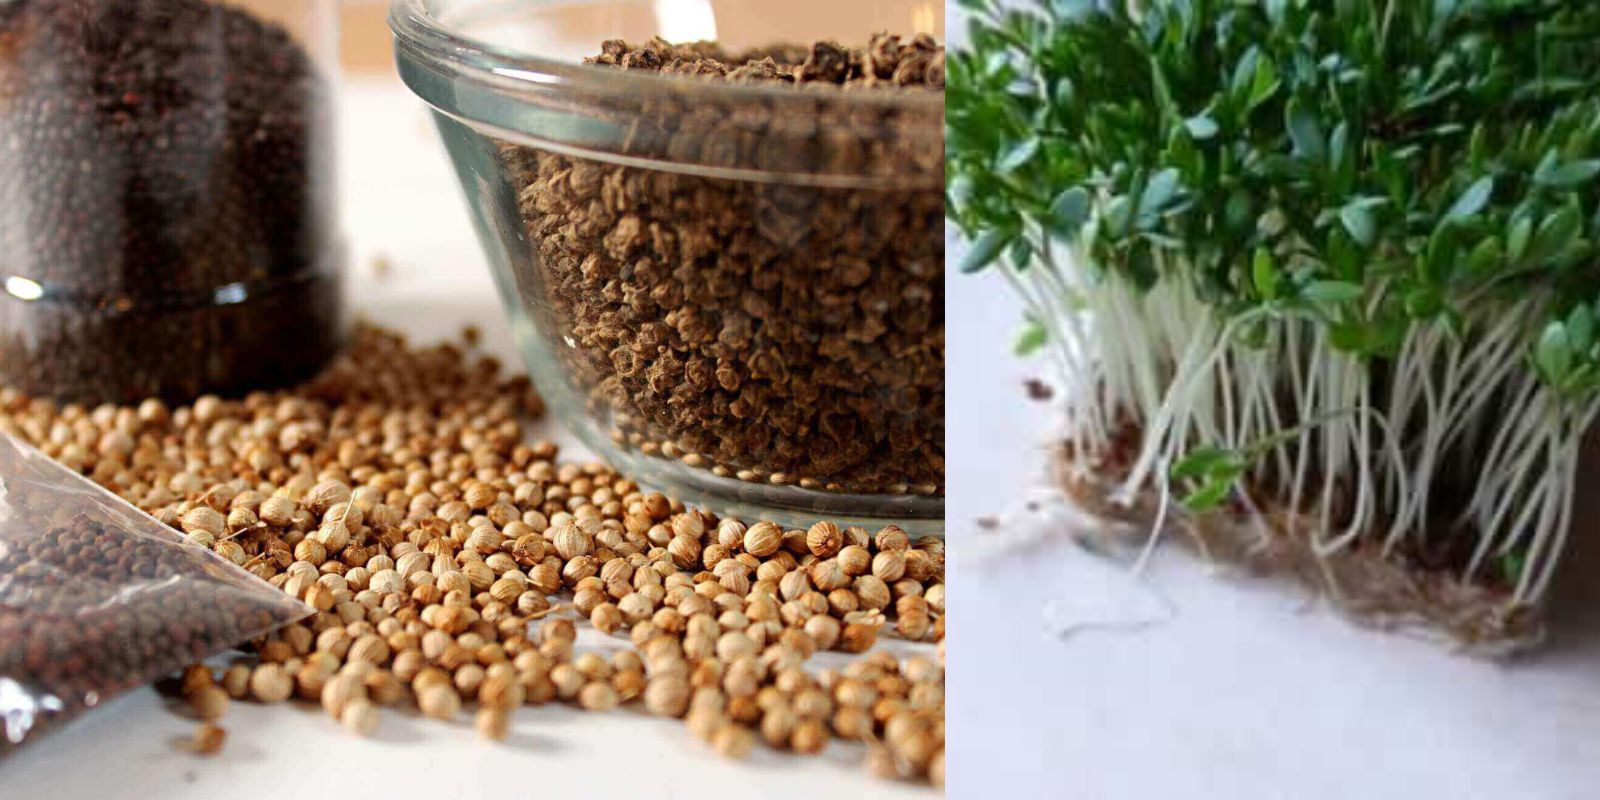
While you can technically use any type of seed to grow microgreens, it’s highly recommended to use organic and untreated seeds. This is because conventional seeds, which are often used for growing mature vegetables and herbs, may be treated with chemicals, fungicides, or pesticides that could be harmful when consumed at such a young stage.
When you eat microgreens, you’re consuming the entire plant, including the stem and leaves. Since they are harvested so early in their growth cycle, any chemicals present in the seeds can be absorbed and concentrated in the plant. Therefore, using organic seeds ensures that your microgreens are free from harmful substances.
Additionally, seeds labeled as “untreated” mean they haven’t been coated with any synthetic substances. These untreated seeds are safe for growing microgreens and for consumption without worry.
Types of Seeds for Growing Microgreens
Most vegetable and herb seeds can be grown as microgreens, so you don’t necessarily need to look for seeds that are exclusively marketed as “microgreen seeds.” However, some varieties tend to perform better than others when harvested at the microgreen stage.
Here’s a list of common seeds used for growing microgreens:
- Brassicas: Kale, broccoli, cabbage, mustard, and radish. These seeds produce quick-growing, flavorful microgreens packed with nutrients like vitamins A, C, and K.
- Herbs: Basil, cilantro, dill, and parsley. Herb microgreens are aromatic and flavorful, making them ideal for garnishing dishes.
- Leafy Greens: Spinach, arugula, lettuce, and chard. Leafy green microgreens are tender and mild in flavor, perfect for salads.
- Legumes: Peas and lentils. These microgreens are slightly heartier and provide a rich source of protein and fiber.
- Grains: Wheatgrass, barley, and oats. Grain microgreens are often used in juices and smoothies for their detoxifying properties.
When selecting seeds, consider choosing organic options from reputable seed suppliers to ensure you’re growing healthy microgreens.
Growing Microgreens: A Step-by-Step Guide
Once you’ve chosen your seeds, growing microgreens is a straightforward process. You don’t need a large garden or sophisticated equipment; all you need is a small space, a growing tray, and a bit of patience.
Here’s how you can grow your own microgreens at home:
Step 1: Gather Your Supplies
To grow microgreens, you’ll need:
- Seeds (preferably organic and untreated)
- Growing tray with drainage holes
- Growing medium (organic potting soil, coconut coir, or seed-starting mix)
- Spray bottle for watering
- Light source (natural sunlight or grow lights)
Step 2: Prepare the Growing Tray
Fill your tray with about 1-2 inches of your chosen growing medium. Lightly press the soil down to create an even surface. Ensure the tray has drainage holes to prevent water from pooling at the bottom, which can lead to mold or root rot.
Step 3: Sow the Seeds
Unlike planting regular vegetables, microgreens thrive when sown densely. Spread the seeds evenly across the surface of the growing medium, making sure they are close together but not overlapping. This dense sowing ensures a lush and abundant crop of microgreens. After sowing, lightly press the seeds into the soil but don’t bury them.
Step 4: Mist the Seeds
Once the seeds are sown, use a spray bottle to gently mist the soil. Watering from a spray bottle ensures the seeds aren’t disturbed and helps maintain even moisture levels. Keep the soil moist but not waterlogged.
Step 5: Cover the Tray and Wait for Germination
After watering, cover the tray with another tray or a clear lid to create a mini greenhouse effect. This will keep humidity levels high and help the seeds germinate more quickly. Most microgreens will start to sprout within 2-3 days.
Step 6: Provide Light
Once the seeds have sprouted, remove the cover and place the tray in a sunny location. If natural light is insufficient, you can use grow lights to provide consistent light for 12-16 hours a day. Good lighting ensures that the microgreens grow upright and develop vibrant colors.
Step 7: Water Regularly
Continue misting the microgreens regularly to keep the soil moist. Avoid overwatering, as excess moisture can lead to mold or fungal growth. A gentle misting once or twice a day is usually sufficient.
Step 8: Harvest Your Microgreens
Microgreens are ready to harvest when they reach about 2-3 inches in height and have developed their first set of true leaves. This typically takes 7-14 days, depending on the variety. To harvest, use a clean pair of scissors and snip the microgreens just above the soil line.
Benefits of Growing Microgreens at Home
Growing microgreens at home offers numerous benefits, making them a great addition to any home garden or kitchen windowsill. Here are some of the reasons why you should consider cultivating your own microgreens:
- Nutrient-Dense: Microgreens are often more concentrated in vitamins and minerals than mature vegetables, offering a high nutritional value in small quantities.
- Quick Harvest: Most microgreens are ready to harvest within 7-14 days, allowing you to enjoy a fresh, homegrown crop in a short amount of time.
- Space-Efficient: Microgreens can be grown indoors, even in small spaces, making them ideal for apartment dwellers or those without access to a garden.
- Low Maintenance: Microgreens require minimal care, just regular misting and access to light, making them an easy crop for beginners.
- Variety: With so many seeds available for growing microgreens, you can experiment with different flavors, textures, and colors in your kitchen.
Incorporating Microgreens into Your Diet
Microgreens are versatile and can be used in various dishes to add flavor, texture, and nutrients. Here are a few ways to incorporate them into your meals:
- Salads: Toss a handful of microgreens into your salad for an extra crunch and burst of flavor.
- Smoothies: Add a few microgreens, such as spinach or kale, to your morning smoothie for a nutrient boost.
- Sandwiches and Wraps: Use microgreens as a fresh, healthy alternative to lettuce in sandwiches, wraps, or burgers.
- Garnishes: Top soups, pizzas, or scrambled eggs with microgreens for a beautiful and nutritious garnish.
Conclusion: Start Growing Your Microgreens Today!
While you don’t need special seeds for growing microgreens, selecting organic and untreated seeds will ensure you produce safe, healthy greens. The process of growing microgreens is simple, quick, and rewarding, making it accessible for gardeners of all experience levels. Whether you have a small windowsill or a large backyard, you can easily cultivate these nutrient-packed greens at home.
Try growing microgreens today, and enjoy fresh, vibrant greens year-round in your own kitchen! 🌱🥗