
Gardening has become increasingly popular in recent years as more people seek to grow their own food and reduce their environmental impact. One way to achieve both goals is by creating a DIY vertical garden worm composting planter. This innovative gardening method not only allows you to grow healthy plants in small spaces but also provides an eco-friendly way to recycle organic waste by turning it into rich, nutrient-dense compost using worms.
In this article, we’ll walk you through how to build your own vertical garden worm composting planter, its benefits, and why it’s the perfect solution for those with limited space or those who want to create a more sustainable gardening system.
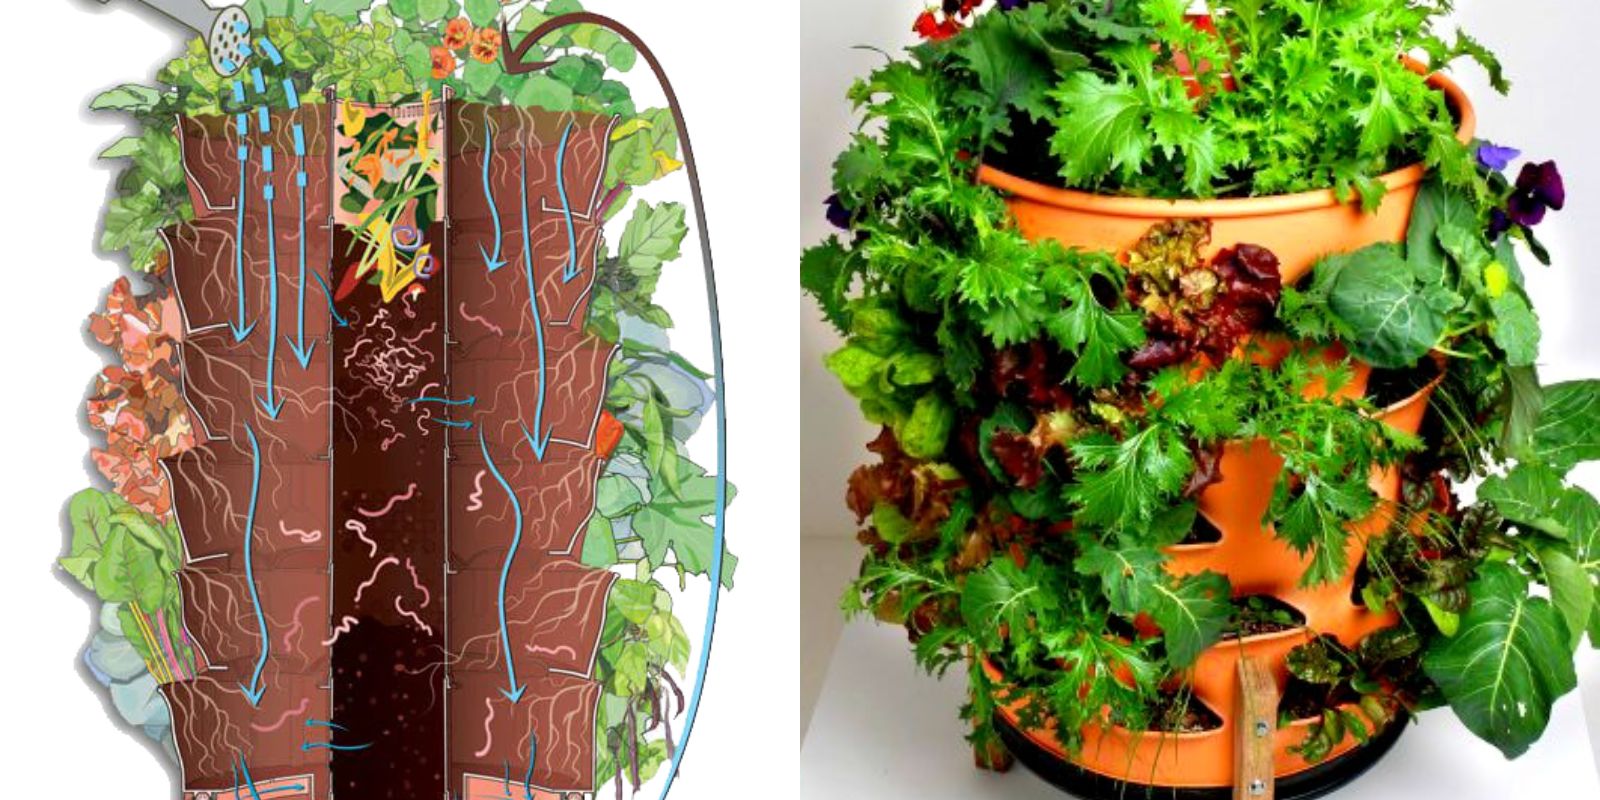
What Is a DIY Vertical Garden Worm Composting Planter?
A vertical garden worm composting planter is a dual-purpose gardening system that combines the benefits of vertical gardening and worm composting. Vertical gardening involves growing plants in a vertical structure, allowing you to make use of limited space in urban environments or smaller gardens. Worm composting, or vermiculture, utilizes worms to break down organic waste into nutrient-rich compost, which can then be used to fertilize your plants.
By combining these two systems, you can efficiently grow plants in a small space while also recycling kitchen scraps, yard waste, and other organic materials. The worms will work diligently to compost the organic waste, providing a continuous supply of rich, dark compost that will enhance the health of your plants.
Why Choose a Vertical Garden Worm Composting Planter?
There are several reasons why a DIY vertical garden worm composting planter is a fantastic choice for gardeners:
- Space-Efficient: Vertical gardening maximizes space by using vertical structures like stacked containers, allowing you to grow a variety of plants in a small area.
- Waste Reduction: Worm composting helps you recycle kitchen scraps, yard waste, and other organic materials, reducing the amount of waste that ends up in landfills.
- Soil Enrichment: The compost created by the worms is an excellent natural fertilizer that can be used to enrich your garden soil, making it more fertile and productive.
- Sustainability: By using organic waste to create compost, you’re not only reducing waste but also contributing to a more sustainable gardening practice that minimizes your ecological footprint.
- Easy to Maintain: Once set up, a vertical garden worm composting planter requires very little maintenance. The worms do most of the work, and you just need to monitor the moisture levels and occasionally add more organic waste.
- Versatility: This system can be used for growing a wide range of plants, including vegetables, herbs, flowers, and even small fruits like strawberries.
How to Build a DIY Vertical Garden Worm Composting Planter
Now that you understand the benefits of a vertical garden worm composting planter, let’s dive into the step-by-step process of creating one for your home.
Materials Needed:
- Vertical garden structure (wooden frame, plastic containers, or any stackable system)
- Worms (red wigglers, which are ideal for composting)
- Organic waste (kitchen scraps like fruit and vegetable peels, coffee grounds, etc.)
- Soil (for layering)
- Drill (for making holes in the containers)
- Watering can or spray bottle (to keep the compost moist)
- Plastic sheeting (optional, to line the containers)
Step 1: Choose Your Vertical Garden Structure
The first step in building your vertical garden worm composting planter is selecting a structure that can hold your containers. You can use a variety of materials, such as a wooden frame, stacked plastic containers, or even repurposed pallets.
For a simple DIY project, stackable plastic containers or crates work well. Make sure the containers are large enough to accommodate worms and provide enough space for plant roots to grow. If you’re building a more permanent structure, you can create a wooden frame with multiple levels.
Step 2: Prepare the Containers
Once you’ve chosen your vertical garden structure, it’s time to prepare your containers. You’ll need to drill small holes in the bottom and sides of each container to allow for proper drainage and airflow. This will ensure the worms have enough oxygen and that the compost doesn’t become too soggy.
If you’re using stacked containers, consider using one larger container at the bottom to catch any liquid that may drain through the others. You can use this liquid, known as “worm tea,” as a nutrient-rich liquid fertilizer for your plants.
Step 3: Create the First Layer of Soil
Place the prepared containers on top of each other in your vertical garden structure. Start by adding a layer of soil at the bottom of the first container. This will provide a base for the worms and help them start breaking down the organic waste.
Step 4: Add Organic Waste
Next, add a layer of organic waste to the first container. This can include fruit and vegetable scraps, coffee grounds, eggshells, or any other compostable material. Avoid adding meat, dairy, or oily foods, as these can attract pests and create unpleasant odors.
Make sure to chop or shred larger scraps to help them break down faster. You want to provide a balanced mix of carbon-rich (dry leaves, cardboard) and nitrogen-rich (fruit and vegetable scraps) materials for the worms to feed on.
Step 5: Introduce the Worms
Now it’s time to introduce the worms to their new home. Red wigglers (Eisenia fetida) are the ideal worms for composting. They thrive in decaying organic matter and are highly efficient at breaking it down into nutrient-rich compost.
Add a handful of worms to the first container. The worms will quickly start eating through the organic material, creating compost as they go. Over time, the worms will move through the layers of organic waste, breaking it down and turning it into rich, dark compost.
Step 6: Water and Maintain the System
After adding the worms, it’s important to keep the compost moist but not too wet. Use a watering can or spray bottle to lightly water the layers. The worms need moisture to survive, but too much water can cause the compost to become waterlogged, which can harm the worms.
Keep an eye on the system and add more organic waste as needed. The worms will continue breaking down the scraps, and you can add more layers of soil and compost as you go.
Step 7: Harvest the Compost
After several weeks, you’ll start to see the composting process in action. The organic matter will break down into dark, crumbly compost that is rich in nutrients. You can harvest the compost from the bottom container by carefully removing it and using it to fertilize your garden plants.
When the compost is ready, simply remove the top layer of soil and organic waste, and replace it with fresh scraps and soil. Your worms will continue to work their magic, producing more compost for your garden.
Benefits of a Vertical Garden Worm Composting Planter
As you can see, a DIY vertical garden worm composting planter is a practical and sustainable way to grow plants while also reducing waste. The benefits of this system are numerous:
- Space-Saving: Perfect for small gardens, balconies, or urban spaces, a vertical garden allows you to grow plants vertically instead of horizontally.
- Organic Fertilizer: The worm compost produced in your planter is a natural, chemical-free fertilizer that will enhance the health of your plants.
- Waste Reduction: This system helps you recycle organic waste, keeping it out of landfills and reducing your overall environmental impact.
- Sustainability: By using organic waste and composting with worms, you’re contributing to a more sustainable, eco-friendly gardening practice.
- Low Maintenance: Once set up, the system requires minimal effort to maintain, making it perfect for both beginner and experienced gardeners.
Conclusion
A DIY vertical garden worm composting planter is an excellent way to grow plants while recycling organic waste. It offers a space-efficient solution for urban gardening, provides natural fertilizer for your plants, and helps reduce your environmental footprint. By following the steps outlined in this article, you can create your own vertical garden worm composting system and start reaping the benefits of sustainable gardening today!
Happy gardening!