
Gardening can be an incredibly rewarding hobby, but it often comes with the challenge of maintaining consistent moisture levels, especially in containers. For busy gardeners, a self-watering container garden offers an innovative solution to this problem. Not only does it help plants stay hydrated, but it also reduces the frequency of watering, allowing you to enjoy gardening without the constant upkeep. In this article, we’ll explore how to create your own self-watering container garden, detailing the materials you’ll need, the steps to build it, and tips for maintaining it effectively.
Understanding Self-Watering Containers
What Is a Self-Watering Container?
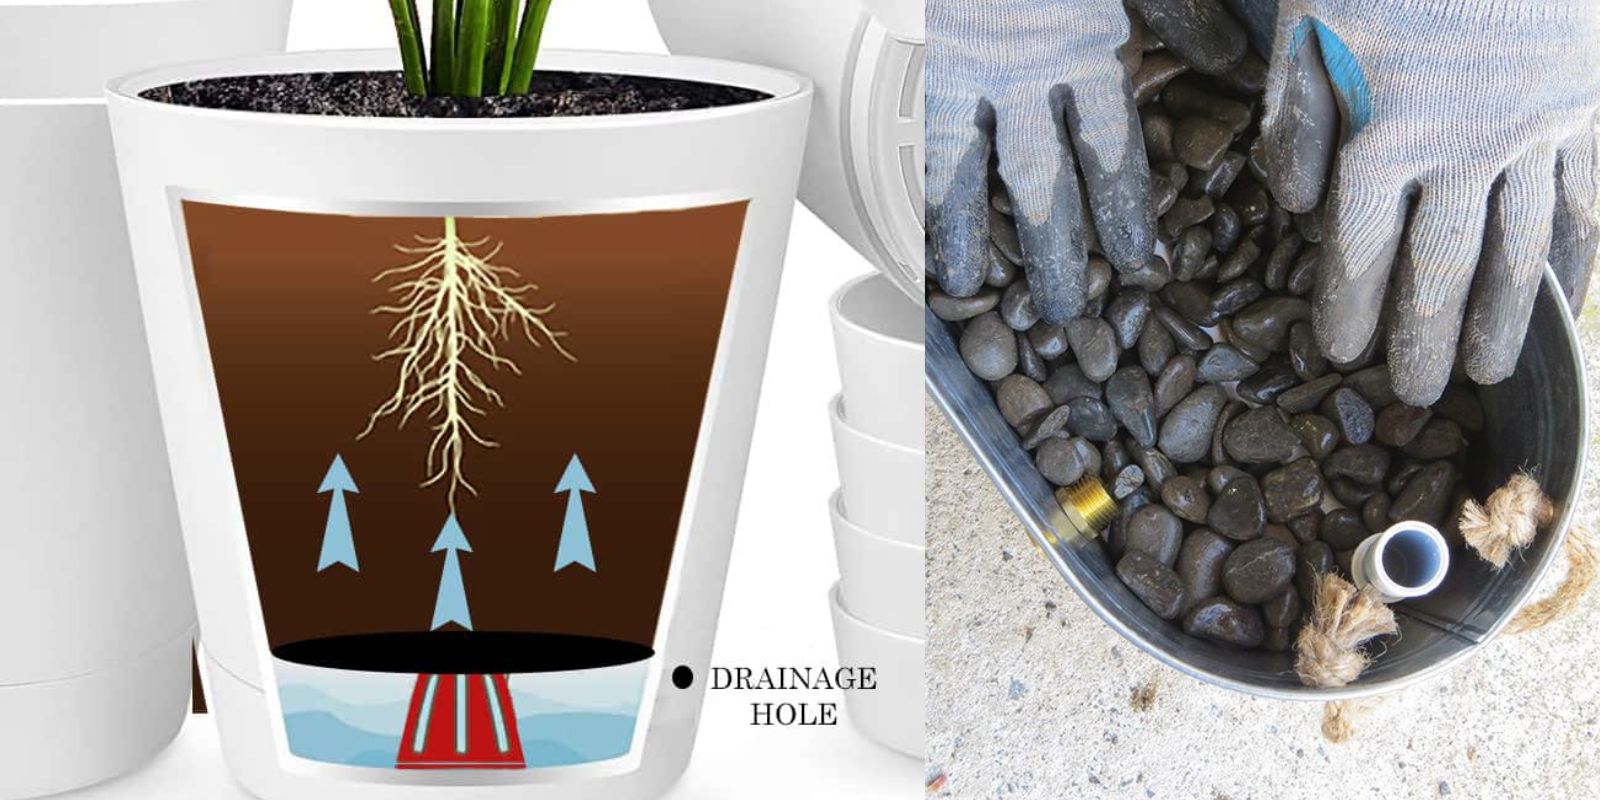
A self-watering container is a gardening setup designed to provide a consistent water supply to plants through a reservoir system. This method utilizes capillary action to draw water up into the soil, ensuring that plants receive moisture as needed without the risk of overwatering.
Benefits of Self-Watering Containers
- Reduced Watering Frequency: Plants draw water as needed, which can extend the time between watering sessions.
- Healthier Plants: Maintaining consistent moisture levels helps prevent stress on plants and encourages robust growth.
- Efficient Water Use: Self-watering systems often use water more efficiently than traditional methods, reducing waste.
- Convenience: Ideal for busy individuals or those with limited mobility, self-watering containers make gardening more accessible.
Materials Needed
Before you start building your self-watering container garden, gather the following materials:
- Large Container: A plastic bucket, storage tote, or large planter pot (ensure it has no drainage holes).
- Smaller Pot: This will hold your plants and needs to have drainage holes.
- Water Reservoir: You can use a PVC pipe, plastic bottle, or another container to hold water.
- Wicking Material: Rope, fabric strips, or specialized wicking materials that can transport water from the reservoir to the soil.
- Potting Soil: Use a high-quality potting mix that retains moisture yet drains well.
- Tools: A drill, scissors, and a measuring tape.
Step-by-Step Guide to Building Your Self-Watering Container Garden
Step 1: Prepare the Large Container
Start by preparing the large container that will serve as the main body of your self-watering system.
- Select Your Container: Choose a container that’s deep enough to hold soil and accommodate your plant’s root system.
- Drill a Drainage Hole: If your container does not have drainage holes, drill one in the bottom to allow excess water to escape.
- Create a Water Level Indicator: Optionally, you can mark a line on the outside of the container to indicate the water level, making it easier to monitor.
Step 2: Prepare the Smaller Pot
The smaller pot will hold your plants and will be placed inside the larger container.
- Drill Drainage Holes: Ensure the smaller pot has enough drainage holes to allow excess water to escape.
- Position the Pot: Place the smaller pot inside the larger container, ensuring it sits elevated above the bottom.
Step 3: Create the Water Reservoir
The water reservoir will supply moisture to the soil through the wicking material.
- Choose a Reservoir: You can use a PVC pipe cut to the height of the large container or a plastic bottle with the bottom cut off.
- Placement: Position the reservoir in the center or side of the larger container, ensuring it’s accessible for filling.
Step 4: Insert Wicking Material
The wicking material is crucial for drawing water from the reservoir into the soil.
- Cut the Wicking Material: Cut a piece of rope or fabric long enough to reach from the bottom of the reservoir up into the soil in the smaller pot.
- Insert the Wicking Material: Thread one end of the wicking material into the reservoir (through the drainage hole if applicable) and place the other end into the soil of the smaller pot.
Step 5: Fill with Soil
Now it’s time to fill your self-watering container with potting soil.
- Add Potting Soil: Fill the smaller pot with high-quality potting mix, making sure to compact it gently.
- Leave Space for Plants: Leave a couple of inches at the top to make watering easier and prevent overflow.
Step 6: Water the Reservoir
Before planting, fill the reservoir with water to activate the self-watering system.
- Check for Leakage: Ensure that there are no leaks in your reservoir or drainage holes.
- Fill with Water: Pour water into the reservoir until it’s full, and observe how the wicking material draws water into the soil.
Step 7: Plant Your Seeds or Seedlings
With your self-watering container ready, you can now add your plants.
- Choose Your Plants: Select herbs, vegetables, or flowers suited for container gardening.
- Plant: Plant your seeds or seedlings according to the recommended spacing and depth for each variety.
Maintaining Your Self-Watering Container Garden
Watering
While self-watering containers reduce the need for frequent watering, it’s important to monitor the water level:
- Check the Reservoir: Regularly check the reservoir and refill it as needed, especially during hot weather.
- Observe Plant Health: If plants begin to wilt, check for blockages in the wicking material or ensure the reservoir is full.
Fertilization
To keep your plants healthy, periodic fertilization is essential:
- Use Liquid Fertilizer: Apply a diluted liquid fertilizer during the growing season, especially after watering the reservoir.
- Follow Recommendations: Adhere to the recommended application rates to avoid over-fertilization.
Pest Control
Keep an eye out for pests that may affect your plants:
- Inspect Regularly: Look for signs of pests or diseases and treat them promptly.
- Natural Solutions: Use organic pest control methods, such as neem oil or insecticidal soap, to keep your plants healthy.
Seasonal Considerations
As the seasons change, adjust your care routine accordingly:
- Winter Preparation: If you live in a region with freezing temperatures, consider bringing your self-watering container indoors or covering it with frost cloth.
- Summer Care: During hot spells, ensure your reservoir is checked more frequently to maintain adequate moisture levels.
Troubleshooting Common Issues
Poor Wicking Action
If your plants are not getting enough water, it may be due to:
- Clogged Wicking Material: Clean the wicking material or replace it if necessary.
- Improper Placement: Ensure the wicking material is properly positioned in both the reservoir and soil.
Overwatering
If you notice yellowing leaves or root rot, you may be overwatering:
- Check Drainage: Ensure excess water can escape through the drainage hole.
- Adjust Watering Routine: Consider reducing the frequency of refilling the reservoir.
Plant Health
If your plants are struggling, evaluate factors such as light, soil quality, and nutrient levels:
- Sunlight: Ensure your self-watering container is placed in a location that receives adequate sunlight.
- Soil Quality: Refresh the soil with compost or new potting mix as needed.
Conclusion
Building a self-watering container garden is a fantastic way to enjoy gardening with less hassle and more efficiency. This innovative method ensures your plants stay hydrated while freeing up your time for other activities. By following the steps outlined in this guide, you can create a thriving self-watering garden that yields delicious produce or beautiful flowers throughout the growing season.
So gather your materials, roll up your sleeves, and dive into this rewarding DIY project. Happy gardening! 🌱💧✨
Feel free to share your own experiences and tips for self-watering container gardens with the gardening community! #SelfWateringGarden #ContainerGardening #DIYGarden #GreenThumb #SustainableGardening