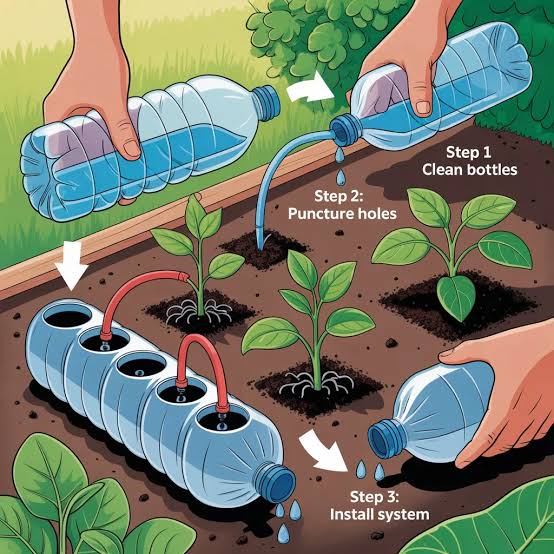
A Low-Cost, Water-Efficient Solution for Healthy PlantsIf you want to save water, reduce daily watering work, and keep plants consistently hydrated, a DIY drip irrigation system using 20-liter buckets is one of the easiest and most effective solutions. It’s affordable, beginner-friendly, and perfect for vegetables, fruit trees, containers, and raised beds.This system relies on slow, gravity-fed drip watering, delivering moisture directly to plant roots—where it’s needed most.🌱 Why Use a Bucket Drip Irrigation System?Compared to hose or sprinkler watering, bucket drip irrigation offers major advantages:✅ Uses up to 60–70% less water✅ Prevents soil erosion and runoff✅ Keeps leaves dry (reduces disease)✅ Ideal for hot, dry climates✅ Works without electricity or pressureIt’s especially useful in the U.S., UK, and Canada during summer heatwaves or watering restrictions.🧰 Materials You’ll NeedAll items are easy to find at hardware or garden stores.Basic Supplies1 or more 20-liter (5-gallon) plastic buckets with lids2–4 meters (6–12 ft) of drip irrigation tubing or aquarium tubingSmall drip emitters or adjustable drippersDrill or hot nail (to make holes)Silicone sealant or rubber grommets (to prevent leaks)Small stones or mesh (for filtering debris)Optional Add-OnsInline valve (for flow control)Liquid fertilizer (for fertigation)Raised stand, bricks, or wooden platform🔧 Step-by-Step: How to Build the SystemStep 1: Prepare the BucketWash the bucket thoroughly.Drill a small hole 2–3 cm (1 inch) from the bottom.Insert tubing snugly into the hole.Seal around it with silicone to prevent leaks.💡 Lower hole = better gravity flow.Step 2: Create a Simple FilterPlace a piece of mesh, cloth, or sponge inside the bucket near the outlet.Add a few small stones to keep it in place.This prevents soil, algae, or debris from clogging the tubing.Step 3: Set Up the Drip LinesAttach drip emitters to the tubing.Place emitters near the root zone of each plant.For rows, use T-connectors to split lines.🌿 One bucket can water 2–6 plants, depending on spacing.Step 4: Elevate the BucketPlace the bucket on bricks, blocks, or a sturdy stand.Height creates pressure for consistent dripping.Ideal height: 30–60 cm (12–24 inches) above ground.Step 5: Fill and TestFill the bucket with water.Adjust drip rate (aim for 1–2 drops per second).Check all connections for leaks.⏱ How Long Will One Bucket Last?This depends on drip rate and plant type:Drip Rate Water DurationSlow drip 12–24 hoursMedium drip 6–10 hoursFast drip 3–5 hours💡 Slow and steady is best for deep root watering.🌾 Best Plants for Bucket Drip IrrigationThis system works especially well for:Tomatoes 🍅Peppers 🌶️Cucumbers 🥒Eggplants 🍆OkraStrawberries 🍓Young fruit trees 🌳Raised bed vegetables🌿 Fertilizing Through the System (Bonus!)You can easily turn this into a fertigation system:Add diluted compost tea or liquid fertilizer to the bucket.Stir well before opening the drip.This feeds plants directly at the roots.⚠️ Always dilute fertilizers properly to avoid root burn.⚠️ Common Mistakes to Avoid❌ Drip holes too large → water drains too fast❌ Bucket not elevated → weak or uneven flow❌ No filter → clogged tubing❌ Emitters too far from roots🧠 Practical Tips for Best ResultsRefill buckets early morning or eveningClean tubing every 2–3 weeksUse dark buckets to reduce algae growthMulch soil to retain moisture longerLabel buckets if using different fertilizers🌎 Why This System Is So PopularThis DIY drip irrigation with 20-liter buckets is widely used because it’s:✔ Eco-friendly✔ Budget-friendly✔ Easy to repair✔ Scalable (add more buckets anytime)It’s ideal for home gardeners, off-grid growers, and water-conscious farms.🏁 ConclusionA DIY drip irrigation system using 20-liter buckets is a simple yet powerful way to water plants efficiently. With minimal tools and cost, you can create a reliable system that saves water, time, and effort—while helping your garden thrive 💧🌱Once you try it, you’ll wonder how you ever gardened without it.