
Gardening enthusiasts know the importance of protecting their beloved plants from unwelcome visitors, whether they be curious pets, wandering wildlife, or neighborhood critters. A removable garden fence is a practical and versatile solution that allows you to safeguard your garden while maintaining flexibility for seasonal changes and easy access. This guide will walk you through the benefits of a removable fence, the materials you’ll need, and a detailed step-by-step process to build one.
Why Choose a Removable Garden Fence?
Unlike permanent fences, removable garden fences offer several advantages:
- Flexibility: Easily take down or adjust sections of the fence as your garden evolves.
- Cost-Effective: Use affordable, lightweight materials that are easy to replace or modify.
- Accessibility: Simplify tasks like planting, weeding, and harvesting by removing or repositioning the fence.
- Aesthetic Appeal: Customize the design to complement your garden’s style.
- Eco-Friendly Options: Reuse materials such as reclaimed wood, mesh, or PVC to minimize waste.
Materials You’ll Need
Before starting, gather the following materials and tools:
Materials:
- Fence panels: Options include wire mesh, wooden slats, or plastic netting.
- Support posts or stakes: Choose from metal stakes, PVC pipes, or wooden posts.
- Fasteners: Zip ties, hooks, screws, or removable clips.
- Gate hardware: Hinges and latches (if you plan to add a gate).
Tools:
- Measuring tape
- Drill or screwdriver
- Hammer
- Saw (if cutting wood or PVC)
- Mallet (for securing posts)
Step-by-Step Guide to Building a Removable Garden Fence
1. Plan Your Fence Layout
- Measure the Area: Outline the dimensions of your garden. Mark where you’ll place support posts and any access points like gates.
- Decide on the Height: Determine the appropriate height based on the animals you’re trying to deter. For instance, 3-4 feet works well for rabbits and small pets, while taller fences may be needed for deer.
- Choose a Design: Decide whether you want a simple functional fence or one with decorative elements.
2. Prepare the Materials
- Cut the fence panels to the required dimensions.
- If using reclaimed materials, clean and inspect them to ensure they’re safe and sturdy.
- Pre-drill holes in wooden posts or mark points on metal stakes for easier assembly.
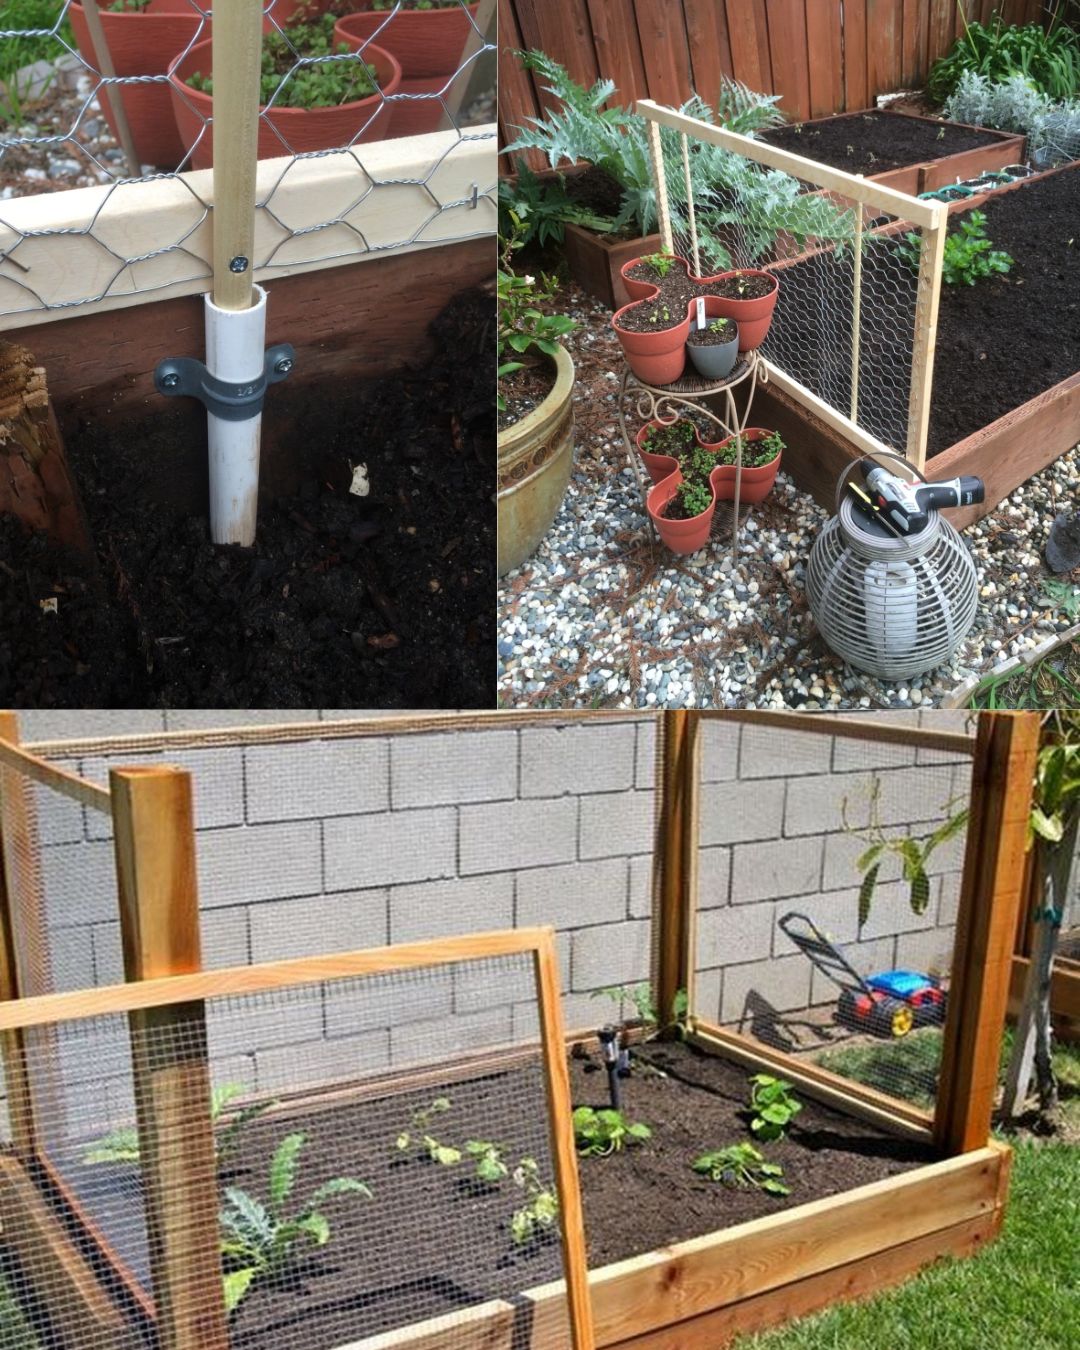
3. Install Support Posts
- Mark the Post Locations: Use stakes and string to outline your fence perimeter. Mark intervals for posts (typically every 4-6 feet).
- Set the Posts:
- For wooden posts: Dig small holes and secure the posts with soil or concrete.
- For metal stakes: Drive them into the ground using a mallet.
- For PVC posts: Use ground sleeves for easy removal.
4. Attach Fence Panels
- Align the panels with the support posts.
- Secure the panels using zip ties, hooks, or removable clips. This allows for easy disassembly.
- Ensure the panels are taut and evenly attached to maintain stability.
5. Add a Removable Gate
- Use a wooden or wire frame to create a gate that matches your fence.
- Attach hinges to one side and a latch on the other for secure closure.
- Ensure the gate swings freely and aligns with the rest of the fence.
6. Test for Stability
- Walk around the fence, gently applying pressure to check for weak spots.
- Reinforce any loose sections with additional fasteners or stakes.
- Ensure the gate opens and closes smoothly.
Tips for Long-Term Maintenance
- Inspect Regularly: Check for damage, rust, or wear on materials.
- Clean Seasonally: Remove dirt and debris to maintain the fence’s appearance and functionality.
- Store Panels Properly: When not in use, store panels in a dry, shaded area to prevent weather damage.
- Adapt to Seasonal Needs: Adjust the fence height or configuration as plants grow or new pests emerge.
Enhancing Your Fence’s Functionality
- Add Netting: Use fine mesh or netting to protect against smaller pests like insects.
- Incorporate Climbing Plants: Train vines or climbing flowers along the fence for added beauty.
- Use Solar Lighting: Attach solar-powered lights to the posts for nighttime visibility.
Final Thoughts
Building a removable garden fence is a rewarding project that combines practicality with creativity. Not only will it protect your plants, but it also offers a chance to customize your garden space to suit your needs and aesthetic preferences. Whether you’re a seasoned gardener or a beginner, this DIY project is both achievable and satisfying.
Engagement Prompt: Have you built a garden fence before? Share your experiences, tips, or photos in the comments! Let’s inspire each other to create beautiful and functional gardens.
Hashtags:
#DIYGardenFence #GardeningTips #SustainableGardening #HomeGardenProjects #GardeningIdeas #GardenProtection #RemovableFence #EcoFriendlyGardening