
Orchids are renowned for their stunning blooms and elegant foliage, but achieving and maintaining the ideal conditions for these tropical beauties can be a bit of a challenge. One crucial aspect of orchid care is humidity. Orchids thrive in environments with higher humidity levels, which mimic their natural tropical habitat. A humidity tray is an effective and straightforward way to provide the moisture your orchids need to flourish. In this article, we will explore how to create a humidity tray for your orchids, ensuring they receive the right conditions to thrive and bloom beautifully.
Understanding the Importance of Humidity for Orchids
Orchids are native to tropical regions where humidity levels are high. In indoor environments, especially during the winter months or in arid climates, maintaining adequate humidity can be challenging. Orchids with insufficient humidity may exhibit dry leaves, wilting, and poor flowering. A humidity tray helps create a microenvironment around your orchids that can significantly improve their health and vitality.
How to Create a Humidity Tray for Your Orchids
Step 1: Select the Right Tray
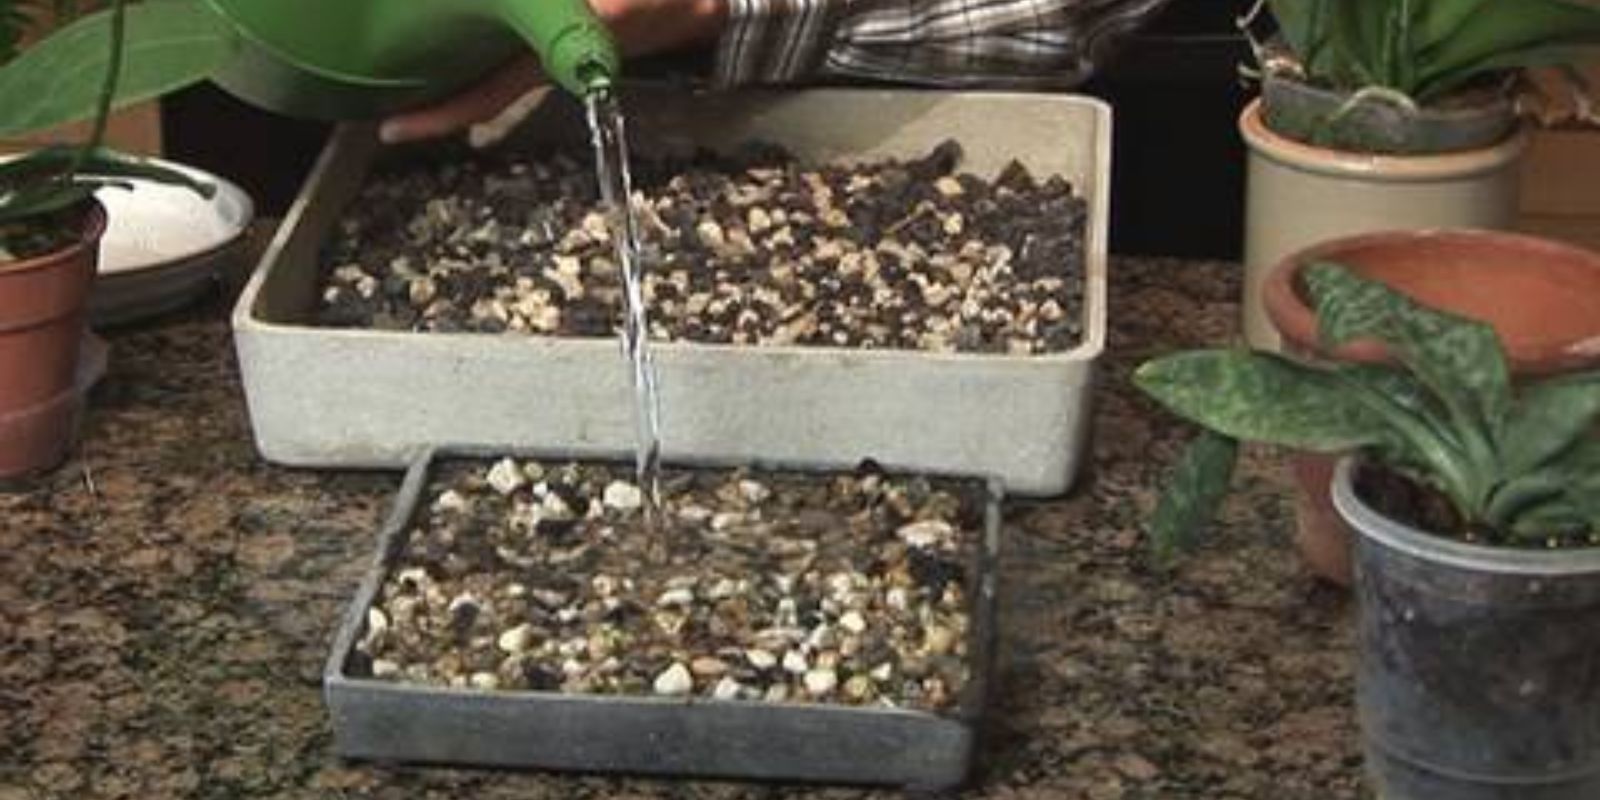
The first step in creating a humidity tray is choosing the appropriate tray or dish. Ideally, you should select a shallow, wide tray that can accommodate the size of your orchid pot. Plastic or ceramic trays work well, as they are durable and easy to clean. The tray should be large enough to hold your orchid pot securely while providing space for water and pebbles.
Step 2: Prepare the Pebbles or Gravel
Next, add a layer of pebbles, gravel, or small stones to the tray. This layer serves as a base to elevate the orchid pot above the water level. The pebbles or gravel create a stable surface and ensure that the orchid’s roots are not in direct contact with the water, which could lead to root rot.
- Choosing Pebbles: Opt for clean, smooth pebbles or gravel that won’t leach chemicals into the water. You can find these materials at garden centers or home improvement stores.
- Layer Thickness: A layer of about 1 to 2 inches of pebbles is usually sufficient. This provides enough elevation for the pot while allowing adequate water evaporation.
Step 3: Add Water
Pour water into the tray until it just reaches the top of the pebbles. The water should cover the pebbles but not submerge them completely. The idea is to create a humid environment around the orchid without letting the pot sit in water.
- Water Type: Use distilled or rainwater if possible, as tap water may contain minerals or chemicals that could affect the orchid’s health.
- Water Level: Ensure the water level remains consistent, as evaporating water helps maintain humidity. Avoid letting the tray dry out completely.
Step 4: Position Your Orchid
Place your orchid pot on top of the pebbles in the tray. The orchid pot should rest securely on the pebbles, with the bottom of the pot not touching the water. The evaporating water from the tray will increase the humidity around the orchid, creating a favorable environment for growth.
- Pot Placement: Ensure the orchid pot is stable and centered on the pebbles. This prevents tipping and ensures even humidity distribution.
Step 5: Monitor and Refill
Regularly check the water level in the tray and refill as needed to maintain consistent humidity. This is especially important during dry seasons or when indoor heating can lower humidity levels.
- Water Maintenance: Refill the tray with water as it evaporates. Depending on your home’s humidity levels, you may need to add water every few days or weekly.
- Cleaning: Clean the tray and pebbles periodically to prevent the buildup of algae or mold. Simply wash the tray with soap and water and replace the pebbles if necessary.
Additional Tips for Successful Orchid Care
While a humidity tray is an excellent tool for maintaining the right moisture levels, combining it with other care practices will ensure your orchids thrive.
1. Choose the Right Orchid Varieties
Certain orchid species are more tolerant of varying humidity levels. Research the specific needs of your orchid variety to tailor your care routine.
2. Monitor Temperature and Light
Orchids also require appropriate temperature and light conditions. Ensure your orchids receive bright, indirect light and maintain a consistent temperature range suitable for their type.
3. Fertilize Regularly
Feed your orchids with a balanced orchid fertilizer during the growing season to support healthy growth and blooming. Follow the manufacturer’s instructions for application rates.
4. Avoid Overwatering
In addition to maintaining humidity, avoid overwatering your orchids. Ensure the potting medium is well-draining and allow it to dry out slightly between waterings.
5. Use Humidifiers or Misting
For added humidity, consider using a room humidifier or misting your orchids occasionally. This can supplement the moisture provided by the humidity tray.
Conclusion
Creating a humidity tray for your orchids is a simple yet effective way to provide the moisture they need to thrive. By following these steps—selecting the right tray, adding pebbles, and maintaining proper water levels—you can create an optimal environment for your orchids, ensuring they remain healthy and vibrant. Remember to complement this with proper care practices, and you’ll enjoy beautiful blooms and lush foliage throughout the year.
Motivational Sentence:
Elevate your orchid care with a DIY humidity tray—simple to set up and sure to reward you with flourishing, beautiful blooms! 🌸💧 #OrchidCare #HumidityTray #GreenThumb #PlantLovers #GardeningTips #OrchidEnthusiast #IndoorGarden #HealthyOrchids #BloomingBeauty