
Introduction
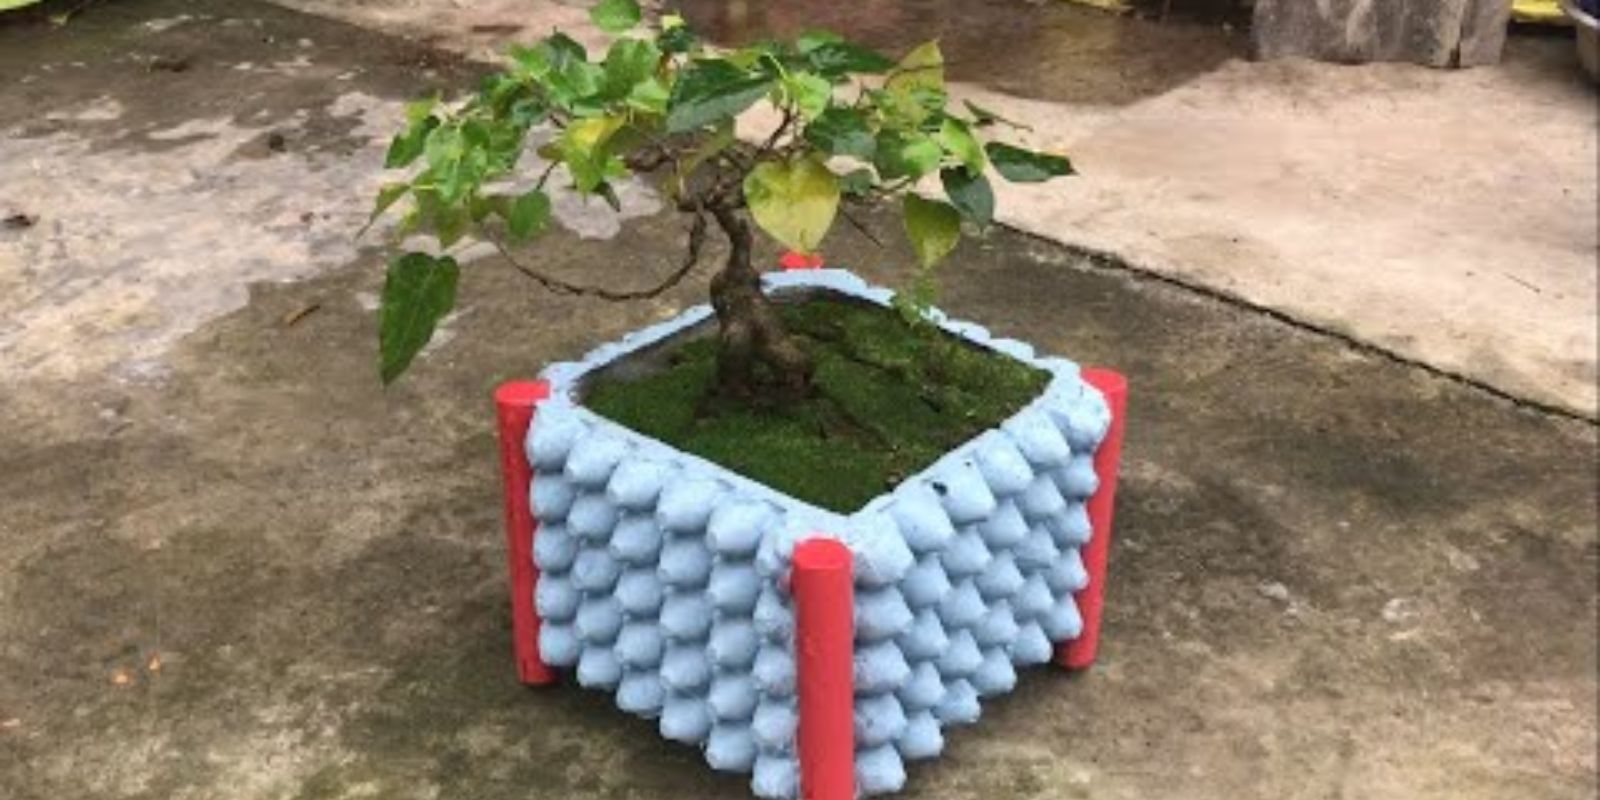
Are you looking to add a personal touch to your garden or indoor plant display? Why not try making your own flowerpots using materials you already have at home? One innovative and eco-friendly project involves using wet cement and egg cartons to create unique and stylish planters. This project not only recycles materials but also allows you to craft distinctive flowerpots that can become a conversation piece in your home or garden. In this guide, we’ll walk you through the step-by-step process of turning egg cartons into cement flowerpots.
Why Use Egg Cartons and Cement?
Egg cartons are often discarded as waste, but they offer an excellent base for creating custom planters. When combined with wet cement, they provide a sturdy structure that can be shaped into various designs. Cement is a durable material that withstands outdoor conditions, making it ideal for flowerpots. By using egg cartons, you’re also recycling and reducing waste, which aligns with eco-friendly gardening practices.
Materials You’ll Need
Before you start, gather the following materials:
- Egg Cartons: Choose sturdy, cardboard egg cartons that will hold their shape during the cement application process.
- Wet Cement: Purchase a bag of pre-mixed cement or concrete mix. You’ll need enough to fill the compartments of the egg cartons.
- Mixing Container: A bucket or large bowl to mix the cement.
- Mixing Tools: A trowel, spatula, or stick for mixing.
- Gloves: To protect your hands from the cement.
- Water: To mix with the cement.
Step-by-Step Instructions
1. Prepare Your Workspace
Set up a clean, well-ventilated area for your project. Cover surfaces with newspaper or a plastic sheet to protect them from spills. Wear gloves to keep your hands clean and safe from the cement.
2. Mix the Cement
Follow the instructions on your cement package to mix the cement with water. Aim for a thick, pudding-like consistency. If the mix is too runny, it may not hold its shape well in the egg cartons. If it’s too thick, it may be difficult to work with. Adjust the water content as needed.
3. Prepare the Egg Cartons
Ensure your egg cartons are clean and dry. If they have any residue or are too flimsy, reinforce them with additional cardboard or paper strips. Flatten out any sections that may be too folded or bent.
4. Fill the Egg Cartons with Cement
Using a trowel or spatula, carefully spoon the wet cement into each compartment of the egg carton. Fill them generously, making sure the cement reaches all corners and covers the edges. Smooth the surface with your tool to create an even layer.
5. Shape the Flowerpots
While the cement is still wet, use your tool to shape and mold the cement within the compartments. You can create different designs, such as rounded edges, textured surfaces, or geometric patterns. Get creative and experiment with various textures to make your planters unique.
6. Dry the Cement
Allow the cement to dry completely before removing it from the egg cartons. This can take anywhere from 24 to 48 hours, depending on the size and thickness of your flowerpots, as well as the humidity and temperature of your environment. Avoid touching or moving the pots while they dry to prevent deformation.
7. Remove the Egg Cartons
Once the cement is fully dry, gently peel away the egg carton from the cement flowerpots. Be careful not to chip or crack the cement as you remove the carton. If any parts are stuck, use a small tool or knife to carefully free them.
8. Finish and Decorate
With the egg carton removed, you can now finish your flowerpots. Sand any rough edges or surfaces if needed to create a smooth finish. You can also paint or decorate the cement pots to match your style or garden theme. Consider using outdoor paint for weather resistance if you plan to place the pots outside.
9. Add Drainage Holes (Optional)
If you’re using the flowerpots for outdoor plants, you may want to add drainage holes to prevent waterlogging. Use a drill or a small tool to make holes at the bottom of the pots. This will help ensure that your plants have proper drainage and grow healthily.
10. Plant Your Flowers
Once your flowerpots are complete and decorated, they’re ready to use. Add potting soil and your favorite plants or flowers. The unique texture and design of your handmade pots will add a touch of individuality to your garden or indoor plant collection.
Tips and Tricks
- Experiment with Molds: Instead of using egg cartons, try other molds like silicone baking molds or plastic containers to create different shapes and sizes.
- Add Texture: Incorporate materials like leaves, fabric, or string into the wet cement to create interesting textures and patterns.
- Seal the Cement: For added durability and to protect the finish, consider applying a sealant designed for cement.
Conclusion
Crafting flowerpots from wet cement and egg cartons is a fun and rewarding DIY project that allows you to create unique planters while recycling materials. By following these steps, you can transform simple egg cartons into eye-catching flowerpots that will enhance your garden or home decor. Enjoy the process of making something special with your own hands and showcase your creativity through your custom planters.
Call to Action
Are you excited to try making your own cement flowerpots? Share your finished creations or ask any questions you have about the process in the comments below. Let’s get crafting and make our gardens and homes even more beautiful with these one-of-a-kind planters! 🌿🪴