
Hydrangeas are one of the most beloved plants in gardens worldwide due to their vibrant, showy blooms and versatility. They add a splash of color to any space, and their graceful flowers come in a wide array of shades, from white to pink, blue, and even deep purple. While hydrangeas are generally easy to grow, many gardeners want to know how to propagate them to expand their garden or share the beauty of these plants with others. One popular method of propagation is through cuttings, and many wonder whether hydrangeas can be propagated in water during the fall season.
In this comprehensive guide, we’ll walk you through the process of propagating hydrangeas in water during fall, offering tips and tricks to ensure you can successfully grow new plants from your favorite hydrangeas.
Why Propagate Hydrangeas?
Hydrangeas are a favorite among gardeners for many reasons. Their large, colorful blooms make them stand out in gardens, and they are relatively low-maintenance once established. The idea of propagating hydrangeas comes from wanting to share their beauty with friends and family or to fill up your garden without purchasing new plants. Hydrangea propagation is also a way to save money while growing your garden collection. Plus, it’s fun and rewarding to watch your own cuttings root and grow into full-fledged plants!
Can You Propagate Hydrangeas in Water During Fall?
Yes, you can propagate hydrangeas in water during the fall season! While spring and summer are the ideal times to take hydrangea cuttings, it is still possible to root them in water during the fall. However, fall propagation comes with its own set of challenges, as cooler temperatures and reduced sunlight can affect the rooting process.
By following the right techniques and understanding the plants’ needs, you can successfully propagate hydrangeas even during the fall. If you plan to propagate hydrangeas in the fall, ensure you’re taking cuttings from healthy stems and providing the proper conditions to encourage root growth.
Why Fall Might Be a Good Time for Hydrangea Propagation
While spring and summer are often the best times to propagate hydrangeas, fall can also be a great opportunity for this gardening task. Here’s why:
- Dormant Season Approaching: As the weather cools in fall, hydrangeas begin to slow their growth and enter a dormant phase. This slower metabolic rate can make it easier to focus on root production rather than foliage growth.
- Less Stress on the Parent Plant: Taking cuttings in fall ensures that the parent plant isn’t stressed by over-harvesting during its peak growing season.
- Fewer Pests: In fall, many pests that target fresh cuttings begin to die down, reducing the likelihood of disease and pest infestation on your cuttings.
However, it’s crucial to remember that while hydrangeas can be propagated year-round, the root development might take a bit longer in fall, and some patience is required.
Step-by-Step Guide to Propagating Hydrangeas in Water During Fall
Follow these easy steps to successfully propagate hydrangeas in water and enjoy the beauty of new plants in your garden.
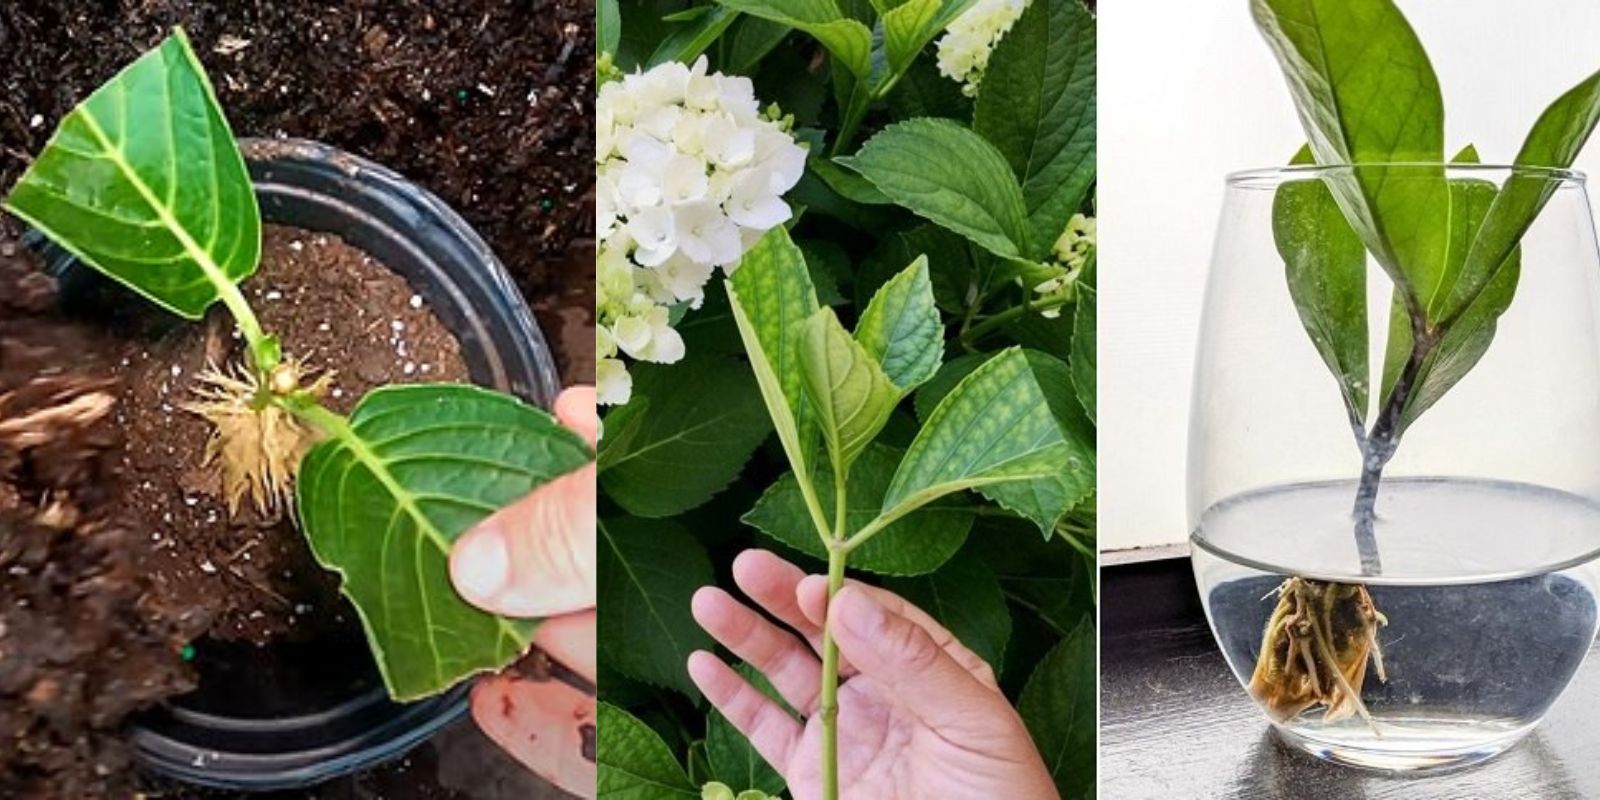
Step 1: Choose Healthy Cuttings
Start by selecting healthy hydrangea stems for propagation. Look for non-flowering branches that are free from disease or damage. It’s important to take cuttings from stems that are semi-hardwood, meaning they are not too soft or too woody. A good indicator is that the stem should be able to bend without snapping.
For the best results, choose stems that are 4-6 inches long and have at least two or three sets of leaves. Remove the flowers, as they will not be necessary for the rooting process and can even slow it down.
Step 2: Prepare Your Cuttings
To prepare your hydrangea cuttings, you’ll need to remove the lower leaves on the stem. This will ensure that there’s no risk of rotting when the cutting is submerged in water. Leave a couple of sets of leaves at the top of the cutting. If there are any leaves below the waterline, pinch them off carefully. This prevents the leaves from rotting and potentially contaminating the water.
You may also want to make a fresh cut at the base of each stem, cutting at an angle to help the cutting take up water more efficiently.
Step 3: Set the Cuttings in Water
Next, place your hydrangea cuttings in a clear glass jar or container. Submerge the cut ends of the stem in clean water. Be sure that the lower part of the stem is submerged, but that no leaves are touching the water.
Choose a container that’s clear so you can monitor the root development. You’ll also want to ensure the water is fresh, so change it every few days to keep it clean and free of bacteria.
Step 4: Find the Right Location for Your Cuttings
Once you have your cuttings in water, place the jar in a location with indirect sunlight. Hydrangeas need light to develop roots, but too much direct sunlight can cause the cutting to dry out or become stressed. A bright windowsill or an area with plenty of filtered sunlight is ideal.
In the fall, temperatures tend to be cooler, so it’s important to keep the cuttings in a warmer spot, ideally between 65-75°F (18-24°C). Avoid placing them near drafts or in cold areas, as this will hinder the rooting process.
Step 5: Wait for Rooting
Hydrangea cuttings can take anywhere from 3 to 6 weeks to root in water. During this time, it’s important to be patient. You should start to see small white roots developing at the bottom of the cutting.
Check the water every few days and replace it if it becomes cloudy. Keep the cuttings in a consistent, warm environment to encourage faster root growth.
Step 6: Transplant to Soil
Once the roots are a few inches long, it’s time to transplant your hydrangea cuttings into a pot with soil. Make sure you choose a well-draining, fertile soil mix, as hydrangeas prefer slightly acidic to neutral soil.
Gently plant the rooted cutting into the soil, and water it well. Keep the new plant in a shady spot until it adjusts to its new home. After a few weeks, you can begin to introduce it to more sunlight.
Step 7: Care for Your New Hydrangea Plant
Now that your hydrangea cutting is rooted and potted, treat it as you would any other hydrangea plant. Water it regularly, but don’t overdo it, as soggy soil can lead to root rot. Make sure the plant is getting enough sunlight, but not too much direct sun in the early stages.
As the plant grows, you can start to fertilize it with a balanced fertilizer in spring to promote strong growth. By the following year, you’ll have a healthy, thriving hydrangea plant to enjoy in your garden.
Tips for Successful Hydrangea Propagation in Fall
- Use Clean Containers and Tools: Ensure all the equipment you use, including scissors and jars, are clean to prevent contamination and disease spread.
- Change the Water Regularly: Fresh water encourages faster rooting and prevents bacteria from building up.
- Be Patient: Rooting in water may take longer in cooler weather, so give your cuttings extra time to develop.
- Check for Roots Before Planting: Ensure that roots are at least 2-3 inches long before transplanting to give the cutting the best chance for survival.
Conclusion
Propagating hydrangeas in water during the fall can be a simple and rewarding way to expand your garden, even as the growing season winds down. With the right care and attention, you can create new hydrangea plants that will thrive in your garden for years to come. While fall propagation may take a little longer, with patience and dedication, you’ll soon be able to enjoy a blooming garden full of hydrangeas—grown from your own cuttings.
Hashtags: #HydrangeaPropagation #FallGardening #PlantPropagation #HydrangeaLovers #GardeningTips #WaterPropagation #DIYGarden #HomeGarden #GardenersOfInstagram