
Mushrooms are a culinary favorite around the world. Their earthy flavor and numerous health benefits make them a perfect addition to many dishes. Imagine having a continuous supply of fresh mushrooms at your fingertips—without even needing much space! That’s where the concept of a mushroom tower comes in. This vertical gardening solution is ideal for home growers, urban gardeners, or anyone looking to cultivate mushrooms with limited space. In this guide, we’ll walk you through everything you need to know about building and maintaining your very own mushroom tower at home.
Why Grow Mushrooms at Home?
Growing mushrooms at home has numerous benefits beyond just convenience. Mushrooms are packed with nutrients, including B vitamins, vitamin D, potassium, and antioxidants. By growing them at home, you can ensure they are free from pesticides and other chemicals. Moreover, mushrooms play a vital role in ecosystems as natural decomposers, breaking down organic material. When you build a mushroom tower, you’re not just growing food—you’re creating a sustainable mini-ecosystem right at home.
Mushroom towers are particularly popular because they maximize vertical space. Whether you’re living in a city apartment with a small balcony or a house with limited garden space, a mushroom tower fits perfectly into your space-saving gardening strategy.
Materials You’ll Need to Build a Mushroom Tower
Before getting started, gather the following materials:
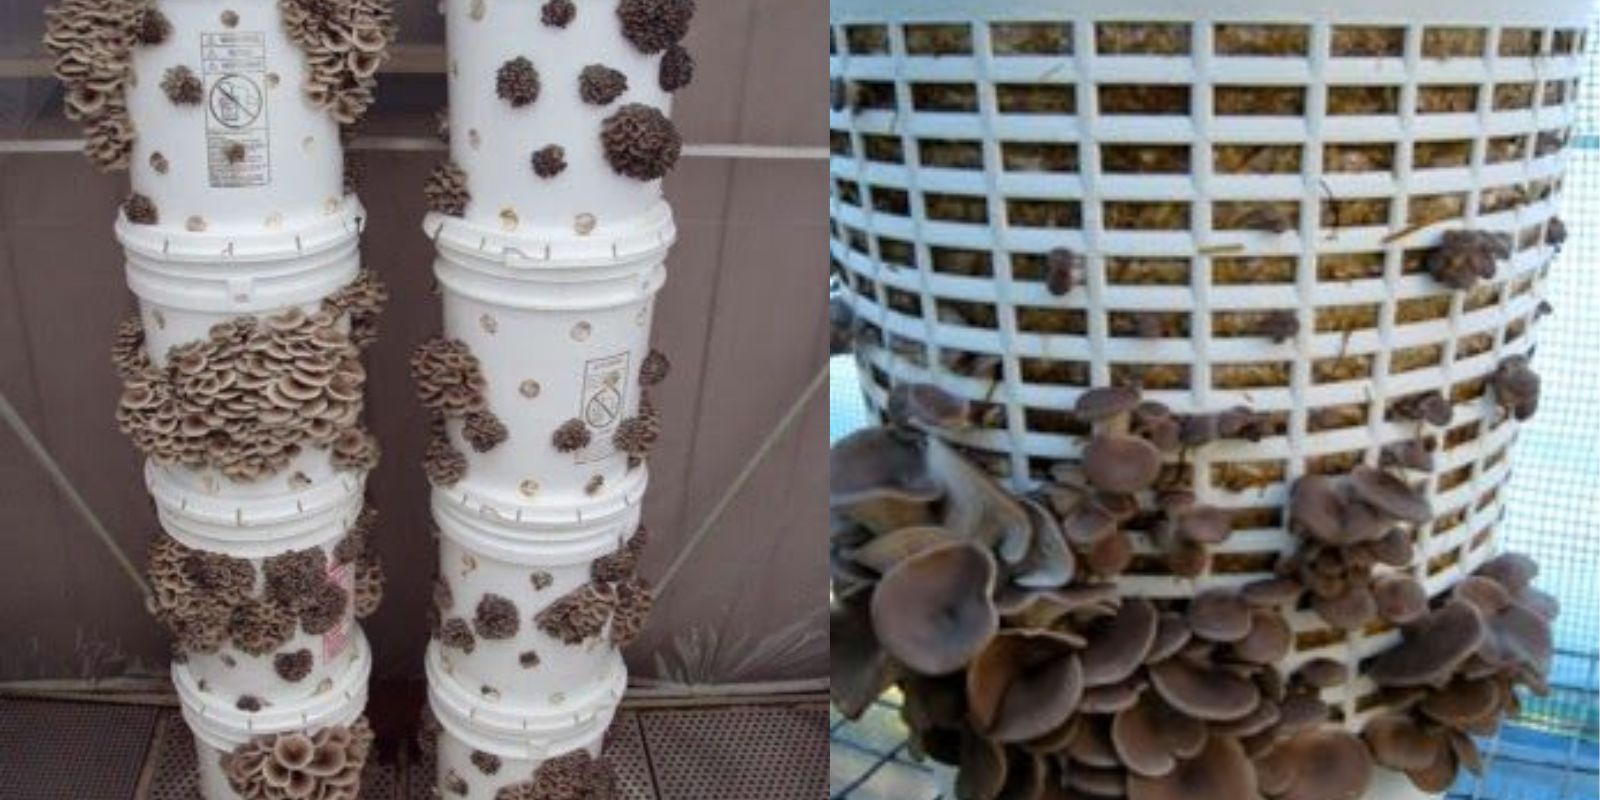
- A plastic or metal tower frame: This could be a stackable planter, vertical planter frame, or even a homemade structure using old pots or buckets. The idea is to have a frame that allows for airflow while holding the growing medium.
- Mushroom spawn: This is the material that contains fungal spores, which will grow into your mushrooms. You can purchase spawn specific to the type of mushrooms you want to grow (oyster, shiitake, or button mushrooms are common varieties for home growing).
- Straw or sawdust: This will serve as the substrate for the mushroom spawn. You can also use wood chips or coffee grounds, depending on the type of mushroom you’re growing.
- Water: Mushrooms thrive in humid environments, so regular misting is crucial.
- A breathable cloth: To wrap around the tower to retain moisture while allowing air to circulate.
- Spray bottle or watering can: To maintain the right level of moisture throughout the growing process.
Step-by-Step Guide to Building a Mushroom Tower
Now that you have your materials ready, let’s dive into the process of constructing your mushroom tower.
Step 1: Setting Up the Base
Choose a location for your mushroom tower. It should be in a cool, shady area as mushrooms prefer lower light conditions and cooler temperatures. The spot should also have good air circulation. Start by placing the tower frame on a flat surface. Ensure it’s stable and won’t topple over once the substrate and mushroom spawn are added.
Step 2: Preparing the Substrate
Mushrooms grow best in organic materials that they can break down, such as straw or sawdust. Begin by soaking your substrate (straw or sawdust) in water to ensure it’s moist but not waterlogged. After soaking, allow it to drain for a few minutes. This moisture level is critical for providing the necessary humidity for mushroom growth.
Step 3: Layering the Tower
Now it’s time to build the mushroom tower. Begin by adding a layer of moist substrate (straw or sawdust) to the bottom of the tower frame. The layer should be thick enough to hold moisture and provide a base for the mushroom spawn. After this, sprinkle a layer of mushroom spawn over the substrate, ensuring an even distribution.
Repeat this process—layering moist substrate followed by mushroom spawn—until the tower is filled. Alternate these layers to create a sandwich effect, where the spawn is nestled between layers of straw or sawdust. This encourages even growth throughout the tower.
Step 4: Wrapping the Tower
Once you’ve filled the tower, wrap it with a breathable cloth or mesh. This will help retain moisture while allowing proper air circulation. The cloth should be tight enough to hold the materials in place but loose enough to allow air to flow freely.
Step 5: Maintaining the Mushroom Tower
The success of your mushroom tower depends on maintaining the right conditions for growth. Mushrooms thrive in a humid environment, so you’ll need to mist the tower regularly to keep it moist. Use a spray bottle or a watering can to lightly mist the tower at least once a day. The goal is to keep the substrate damp, but not soaking wet, as too much water can lead to mold growth.
Step 6: Monitoring Growth
After a few weeks, you should begin to see mushrooms emerging from the sides of the tower. Depending on the type of mushrooms you’re growing, the timeline for growth can vary. For example, oyster mushrooms typically grow faster, while shiitake mushrooms may take longer.
Make sure to monitor the temperature, keeping the tower in a cool and shady spot. Mushrooms prefer temperatures between 55°F and 75°F, so if you’re growing them indoors, ensure the environment stays within this range.
Step 7: Harvesting Your Mushrooms
Once the mushrooms have fully grown, they will be ready to harvest. Gently twist or cut the mushrooms from the base to avoid damaging the rest of the tower. Regularly harvesting the mushrooms encourages further growth, so you can expect multiple harvests from one tower.
Step 8: Maintaining the Tower for Continuous Growth
After your first harvest, the mushroom tower can continue producing mushrooms for several months. Continue to mist it regularly and monitor the environment for optimal growing conditions. When the growth slows down or the substrate appears depleted, you can refresh the tower by adding more layers of straw or sawdust, along with additional mushroom spawn.
Types of Mushrooms You Can Grow in a Tower
Not all mushrooms thrive in the same growing conditions, so it’s important to select varieties that are well-suited to home cultivation and vertical gardening. Here are some popular options:
- Oyster Mushrooms: One of the easiest mushrooms to grow at home, they are fast-growing and tolerant of a variety of substrates, including straw and coffee grounds.
- Shiitake Mushrooms: These take longer to grow but have a rich, earthy flavor. They prefer hardwood or sawdust as their substrate.
- Button Mushrooms: A classic variety that can be grown on compost or manure-based substrates.
Benefits of a Mushroom Tower
- Space Efficiency: Growing mushrooms in a tower allows you to maximize vertical space, making it perfect for small balconies, patios, or indoor spaces.
- Sustainability: You can use recycled materials like old buckets or planters to build your tower, reducing waste and promoting eco-friendly gardening practices.
- Continuous Harvest: With proper care, a mushroom tower can provide multiple harvests over several months, ensuring a steady supply of fresh mushrooms.
- Organic Food Production: By growing your own mushrooms, you control the growing conditions and can avoid harmful chemicals or pesticides.
Conclusion: Build Your Own Mushroom Tower
Building a mushroom tower is a fun and rewarding project that allows you to grow your own fresh mushrooms right at home. Not only does it save space, but it’s also a great way to practice sustainable gardening and ensure that the mushrooms you consume are healthy and organic. With a little time and effort, you can enjoy the flavors and benefits of homegrown mushrooms year-round.
Are you ready to start growing your mushroom tower? Give it a try and share your journey! 🌱🍄