
Gardening is a year-round joy, but the unpredictability of weather can sometimes throw obstacles in your path. Whether you’re trying to protect your plants from early frosts, heavy rain, or pests, building a hinged hoophouse for your raised bed garden is an efficient and economical solution. This DIY project not only extends your growing season but also gives you the flexibility to easily access your garden.
In this guide, we’ll walk you through the process of building a hinged hoophouse that provides your plants with protection and enables you to maximize your harvests in all seasons.
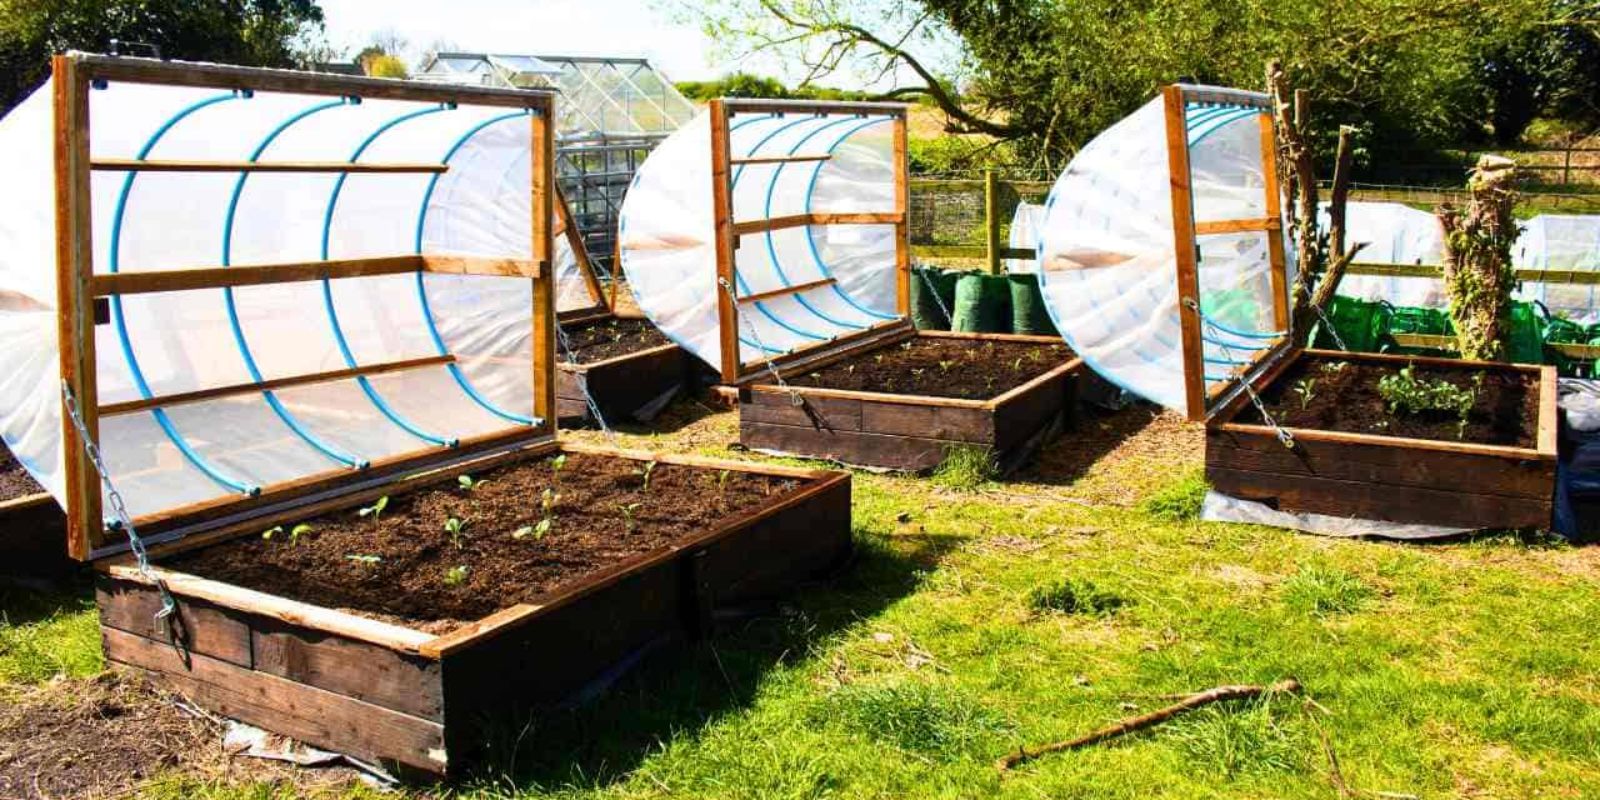
What Is a Hinged Hoophouse?
A hoophouse is a structure designed to protect plants by covering them with a hoop-shaped frame that supports a plastic or fabric cover. A hinged hoophouse is simply a hoophouse that can be opened or closed with a hinge, making it more accessible and versatile than a traditional hoophouse.
The benefits of adding a hinged hoophouse to your raised bed garden include:
- Extended growing season: Protect plants from frost and cold weather.
- Shielding from pests: Keep insects and animals away from your plants.
- Weather protection: Safeguard your garden from heavy rain, wind, and hail.
- Improved plant growth: Create a more consistent growing environment by controlling moisture, temperature, and airflow.
Now, let’s dive into the step-by-step process of building a hinged hoophouse for your raised bed garden.
Materials You’ll Need
Before starting the construction, gather all the necessary materials:
- PVC pipes (1/2 inch or 3/4 inch diameter, depending on the size of your bed): These will serve as the “hoops” for your structure.
- Plastic sheeting (6-mil thickness): This acts as the cover that will protect your plants from the elements.
- Wooden planks (for the base frame): Cedar or treated wood is ideal, as it is rot-resistant.
- Hinges (for the lid): To make the top of the hoophouse easy to open and close.
- Screws: Galvanized screws for securing the frame and hinges.
- Clamps or pipe straps: To hold the PVC pipes in place.
- Drill: For making holes and securing screws.
- Measuring tape: To ensure accurate measurements.
Step-by-Step Guide to Building Your Hinged Hoophouse
Step 1: Plan and Measure Your Raised Bed
Before you begin building, measure the dimensions of your raised bed. The hoophouse needs to cover the bed entirely, so knowing the length, width, and height is crucial.
For a standard 4×8 foot raised bed, you’ll need three to four PVC pipe hoops spaced evenly along the length. Adjust accordingly if your bed is smaller or larger.
Step 2: Build the Wooden Base Frame
If your raised bed doesn’t already have a sturdy frame, it’s time to construct one. Use wooden planks (preferably cedar or pressure-treated wood for durability) to create a frame around your garden bed. This frame serves as the base to which the PVC pipes will be attached.
Use screws to fasten the corners of the wooden frame securely. Ensure the frame is level and stable, as it will support the entire hoophouse structure.
Step 3: Install the PVC Pipe Hoops
Take your PVC pipes and cut them to an appropriate length so they can arch over the width of your raised bed. For a 4-foot-wide bed, 8-foot-long pipes should create a suitable arch.
- Attach the pipes to the inside of the wooden frame using clamps or pipe straps.
- Secure one end of each PVC pipe to one side of the frame, bend it over the bed, and fasten the other end to the opposite side of the frame.
- Repeat this process with the remaining pipes, spacing them evenly along the length of the bed.
The arches should be tall enough to accommodate your plants at full growth but not too high that the structure becomes unstable in wind.
Step 4: Attach the Plastic Sheeting
The next step is to cover the hoops with plastic sheeting. The sheeting will act as a barrier against frost, pests, and excess moisture.
- Lay the plastic sheeting over the PVC pipes, ensuring there’s enough material on each side to fasten securely.
- Pull the plastic tight over the frame, then staple or secure it to the wooden base frame with screws and washers. This prevents the plastic from tearing under tension.
- Make sure the plastic sheeting extends beyond the sides of the raised bed so that it can be weighted down or anchored to the ground, providing additional stability.
Step 5: Install the Hinges
For the hoophouse to be easily accessible, you’ll want to install hinges at the back of the structure. This will allow you to lift the front side of the hoophouse to water, harvest, or tend to your plants.
- Choose two to three heavy-duty hinges, depending on the size of your hoophouse.
- Attach the hinges to the back of the wooden frame and secure them with screws.
- Attach the opposite sides of the hinges to the top of the hoophouse (the frame holding the PVC pipes and plastic cover).
- Test the hinges to ensure the top of the hoophouse opens and closes smoothly.
Step 6: Secure the Hoophouse
Once the hinged hoophouse is complete, it’s important to secure it to the ground or the raised bed to prevent it from being lifted by strong winds. You can use clamps or locks to hold the hoophouse closed during inclement weather.
For extra stability, consider adding stakes or weights around the perimeter of the plastic sheeting.
Step 7: Add Ventilation
While hoophouses provide excellent protection from the elements, they can also trap too much heat and moisture. To avoid creating a greenhouse effect that might harm your plants, it’s essential to add ventilation.
- Open the hoophouse regularly to allow fresh air in and prevent overheating.
- On particularly warm days, prop the hoophouse open with a stick or create vents in the plastic sheeting.
Step 8: Maintain and Adjust as Needed
Your hinged hoophouse will require minimal maintenance, but it’s important to check for wear and tear, especially on the plastic sheeting and hinges.
- Replace or repair any damaged parts as needed.
- Adjust the tension on the plastic sheeting if it becomes loose.
You may also want to adjust the position of the hoophouse depending on the season and weather conditions. During the summer, you might not need the cover at all, while in early spring and late fall, it will be invaluable.
Conclusion: Maximize Your Growing Potential with a Hinged Hoophouse
Building a hinged hoophouse for your raised bed garden is a rewarding DIY project that offers year-round benefits. It protects your plants from harsh weather and pests, extends your growing season, and gives you control over the growing environment.
Whether you’re a seasoned gardener or a beginner, this structure will enable you to grow healthier, more resilient plants with minimal effort. The hinged design ensures easy access to your crops, while the affordable materials make it a budget-friendly solution.
Get Started Today!
Now that you have the knowledge, it’s time to build your own hinged hoophouse and take your gardening to the next level. With this simple structure, you can enjoy fresh vegetables, herbs, and flowers all year long.
🌿 #DIYGarden #Hoophouse #RaisedBedGardening #GardenHacks #YearRoundGardening #GardeningTips #SustainableGardening #HomeGrown #GreenThumb