
Gardening is a rewarding hobby that not only provides fresh, homegrown produce but also a sense of accomplishment. However, one of the biggest challenges gardeners face is dealing with the changing seasons, especially when colder weather rolls in and threatens to cut the growing season short. A greenhouse is a perfect solution to this problem, offering warmth, protection, and a longer season for your plants to thrive. But what if you don’t have the space or resources for a full-sized greenhouse? This is where a folding greenhouse comes in.
A folding greenhouse is a compact, portable, and cost-effective solution for gardeners who want to protect their plants during colder months without the commitment of a permanent structure. It’s especially useful for raised garden beds, where space is often limited. With a folding design, you can set it up when needed and easily fold it away when the weather improves or when space is needed for other purposes. In this guide, we’ll walk you through the process of building your very own folding greenhouse for your raised garden bed.
Why Choose a Folding Greenhouse?
Before diving into the step-by-step instructions, it’s essential to understand why a folding greenhouse is an excellent option for home gardeners:
- Space-saving: Unlike permanent greenhouses, a folding greenhouse can be stored away when not in use, freeing up valuable garden space.
- Protection: It shields plants from frost, cold winds, heavy rains, and pests.
- Extend Growing Season: By keeping your plants warm during early spring or late fall, you can grow vegetables and flowers long after others have stopped.
- Affordability: Building a folding greenhouse is much cheaper than constructing a permanent greenhouse.
- Easy Access: Because it’s designed to fold, you can easily access your plants for watering, pruning, or harvesting.
Materials You’ll Need
To build your folding greenhouse, gather the following materials. Most of these can be found at any home improvement store or online:
- PVC pipes: Lightweight and easy to assemble, PVC pipes will form the frame of your greenhouse.
- PVC elbows and connectors: These are used to connect the pipes and create the shape of the structure.
- Clear plastic sheeting: This will act as the greenhouse covering, allowing sunlight to enter while trapping heat inside.
- Hinges: To create the folding mechanism, you’ll need hinges to attach the frame to the raised bed.
- Zip ties or clamps: These will secure the plastic sheeting to the frame.
- Screws and a drill: To attach the frame to the raised bed.
- Measuring tape: To ensure accurate cuts and measurements for your frame.
- Saw or PVC pipe cutter: To cut the pipes to the desired lengths.
- Velcro strips or hooks: Optional but useful for securing the greenhouse in place when folded open.
Step-by-Step Guide to Building Your Folding Greenhouse
Step 1: Plan Your Greenhouse Dimensions
Start by measuring your raised garden bed. The greenhouse frame will need to cover the entire bed with enough height to accommodate the plants you’re growing. A good rule of thumb is to make the greenhouse about 3 to 4 feet high, giving most vegetables and plants plenty of room to grow.
If your raised bed is 4 feet by 8 feet, you can make your greenhouse frame slightly wider and taller to provide optimal protection.
Step 2: Cut the PVC Pipes
Using your saw or pipe cutter, cut the PVC pipes to the required lengths for the frame. You’ll need:
- 4 vertical corner pipes for height (these will determine how tall your greenhouse is).
- 4 horizontal pipes for the top and bottom edges of the frame.
- 2 or 3 arched pipes that will form the top curve of the greenhouse, connecting the two long sides.
If you want extra stability, consider adding additional horizontal and vertical supports throughout the structure.
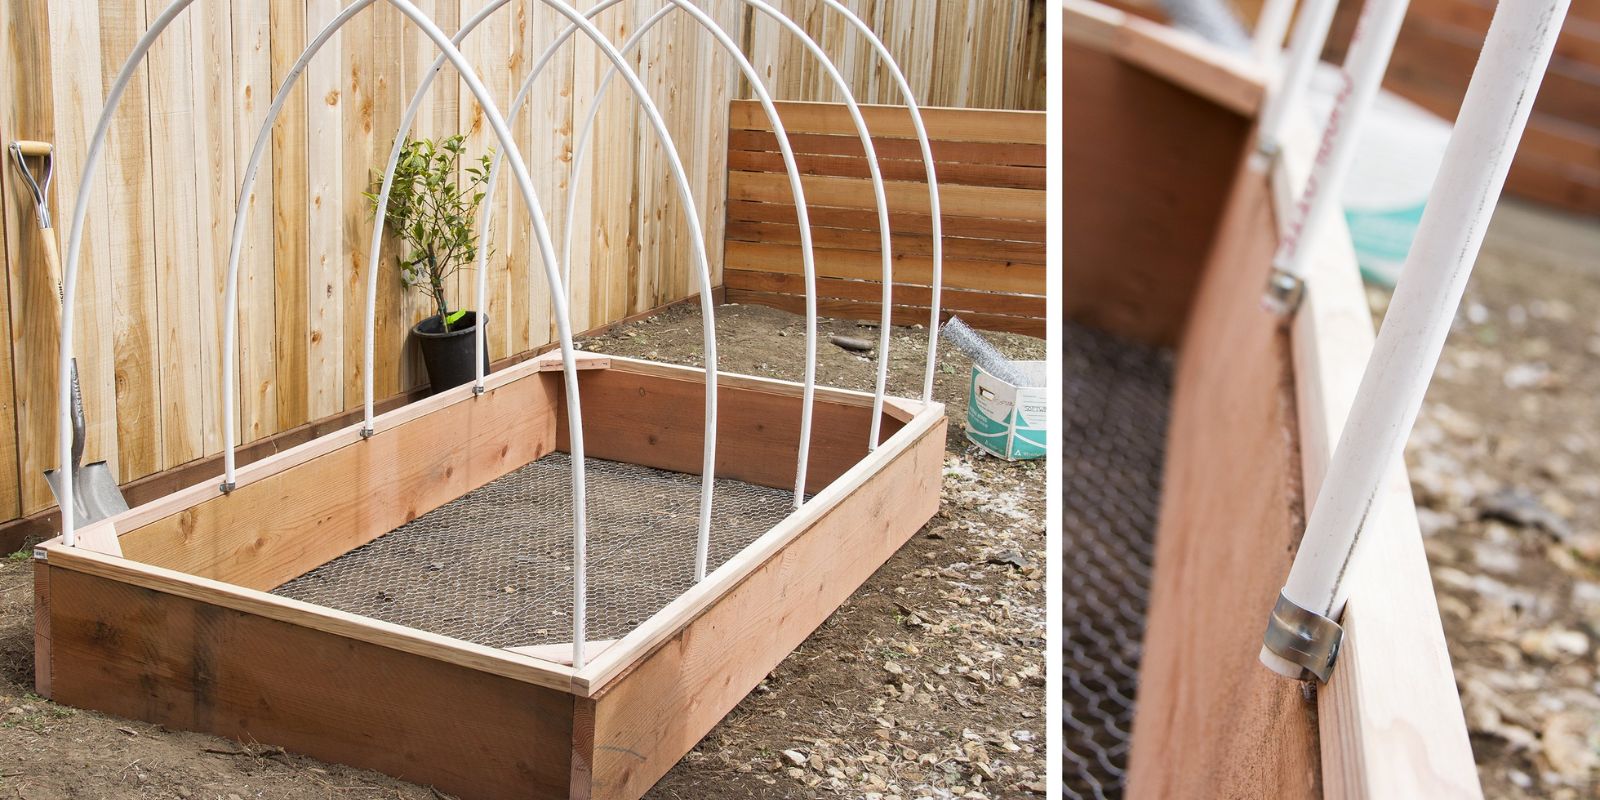
Step 3: Assemble the Frame
Use the PVC elbows and connectors to join the pipes together, forming a rectangular or square frame that will fit over your raised bed. Start with the bottom horizontal frame and attach the vertical pipes to create the height of your structure. Then, add the arched pipes across the top, securing them with elbows.
Once you have the basic frame in place, check to make sure everything is level and sturdy. The frame should be lightweight but stable enough to withstand mild winds.
Step 4: Attach the Hinges
To make your greenhouse foldable, attach hinges to one of the long sides of the frame. The hinges should be secured both to the frame and the side of the raised garden bed. This will allow you to fold the greenhouse open and closed like a door.
If you want the greenhouse to fold from the top (like a clamshell), place hinges along the top horizontal pipe. If you prefer side access, install the hinges on one of the vertical sides.
Step 5: Cover the Frame with Plastic Sheeting
Lay the clear plastic sheeting over the frame, ensuring that it covers the entire structure with some extra material to tuck under the sides. This plastic will trap heat and keep your plants warm.
Use zip ties, clamps, or Velcro strips to secure the plastic sheeting to the PVC pipes. Make sure the plastic is tight to avoid sagging, which can cause rainwater to collect and weigh down the frame. You can also secure the edges of the plastic to the ground with stakes or bricks to prevent wind from lifting it.
Step 6: Add Ventilation and Access
Although the greenhouse will help trap heat, it’s important to provide ventilation on warm days to avoid overheating your plants. You can create roll-up sides or small windows by cutting flaps in the plastic sheeting. Attach these flaps to the frame with Velcro so you can open and close them as needed.
For easy access to your plants, ensure the folding mechanism allows you to lift or open part of the frame. This makes watering, pruning, and harvesting more convenient.
Step 7: Maintain Your Folding Greenhouse
To keep your folding greenhouse in good condition, regularly check for any wear and tear on the plastic sheeting or hinges. Replace or repair any damaged parts as needed.
During the off-season or warmer months, fold the greenhouse down and store it in a garage or shed. This will protect it from harsh weather and extend its lifespan.
Benefits of a Folding Greenhouse for Your Raised Garden
- Extended Growing Season: With a greenhouse, you can start growing earlier in the spring and continue late into the fall. The protection it offers allows for a longer growing period, even for more sensitive plants.
- Protection from Pests and Weather: The plastic sheeting creates a barrier against pests, such as insects, birds, and small animals, while also shielding your plants from frost, heavy rain, or strong winds.
- Versatile Design: The foldable nature of the greenhouse allows you to open or close it as needed. On warmer days, simply fold it up to let air circulate. During colder or rainy days, keep it closed to retain heat and protect your plants.
- Cost-Effective: A folding greenhouse is a much cheaper alternative to a full-sized greenhouse. You can build it with materials that are widely available and relatively inexpensive.
- Space-Saving: When not in use, you can fold the greenhouse down and store it, making it ideal for small gardens or urban spaces.
Conclusion
Building a folding greenhouse for your raised garden is a simple and practical project that can greatly benefit your gardening efforts. Whether you’re looking to extend your growing season, protect your plants from pests and harsh weather, or simply make your garden more efficient, this DIY greenhouse offers a flexible and cost-effective solution.
Now that you know how to build your own, it’s time to get started! Share your progress, tips, and photos with fellow gardeners and help inspire others to take their gardening game to the next level.
#FoldingGreenhouse #DIYGardening #RaisedGarden #SustainableGardening #GreenThumbGoals