
Introduction
Creating a brick walkway in your garden can add both charm and functionality to your outdoor space. Not only does it enhance the visual appeal of your garden, but it also provides a durable path that can withstand various weather conditions. Whether you want a simple path or a more intricate design, building a brick walkway is a rewarding DIY project that can elevate the overall look of your yard. This article will guide you through the process of constructing a beautiful and lasting brick walkway.
1. Planning Your Walkway
Before you begin, careful planning is essential. Consider the purpose of your walkway—will it be a functional path or a decorative feature? Measure the area and sketch out the design. Determine the width of the walkway based on the space available and the intended use. Use a garden hose or stakes and string to outline the shape on the ground. This helps visualize the final result and makes it easier to adjust the design if needed.
2. Preparing the Site
Once your design is in place, it’s time to prepare the site. Start by clearing the area of any grass, weeds, or debris. Use a shovel to dig out the soil to a depth of about 6 inches. This depth ensures a stable base for your walkway and allows for proper drainage. Make sure the excavation is level and smooth to provide a solid foundation for the bricks.
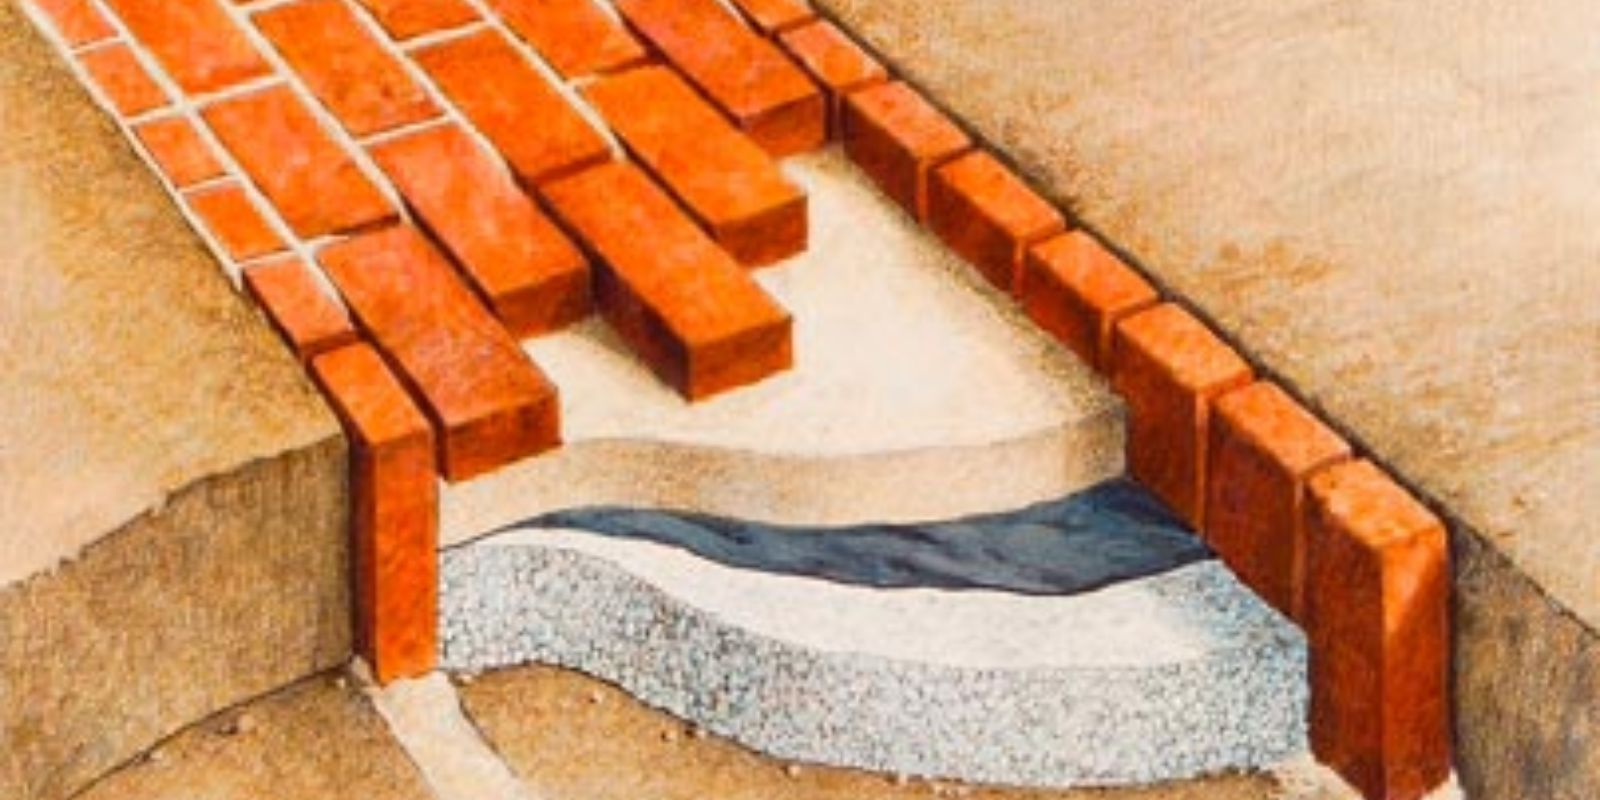
3. Creating a Solid Base
The stability of your walkway relies on a well-prepared base. Lay down a 2-3 inch layer of crushed gravel or crushed stone in the excavated area. This layer provides drainage and prevents the walkway from shifting over time. Use a hand tamper or a mechanical compactor to compact the gravel, ensuring it’s firm and level. A solid base is crucial for the longevity of your walkway.
4. Adding a Sand Layer
To create an even surface for laying the bricks, add a 1-inch layer of sand over the compacted gravel. Spread the sand evenly using a rake, making sure it covers the entire area of the walkway. Level and smooth the sand to provide a consistent surface for the bricks. This layer acts as a cushion, allowing for slight adjustments to the bricks as you lay them.
5. Laying the Bricks
Begin laying the bricks from one end of the walkway, following your design pattern. Place the bricks closely together, ensuring minimal gaps between them. Use a rubber mallet to tap each brick into place, making sure it is level and properly aligned. Continue laying bricks in the desired pattern, periodically checking for levelness and alignment.
6. Cutting Bricks for Edges and Curves
For edges or curved sections of your walkway, you may need to cut some bricks to fit. Measure the required size and use a masonry saw or brick splitter to make precise cuts. Cutting bricks ensures a clean and professional finish, especially along curves and edges where standard-sized bricks may not fit.
7. Filling Gaps
Once all the bricks are laid, it’s time to fill the gaps between them. Spread sand over the entire walkway and use a broom to sweep it into the gaps. The sand helps to stabilize the bricks and prevent them from shifting. Sweep off any excess sand from the surface of the bricks, taking care not to leave sand in the gaps.
8. Compacting the Surface
To ensure the walkway is secure and stable, use a plate compactor to press the bricks and sand into place. Run the compactor over the entire surface of the walkway, applying even pressure. This step helps to set the bricks firmly and creates a smooth, level surface. Make sure to follow the manufacturer’s instructions for the compactor to avoid damaging the bricks.
9. Installing Edging
To keep the bricks in place and define the edges of the walkway, install edging along the sides. Edging materials can include plastic, metal, or stone, depending on your preference and the design of your walkway. Secure the edging according to the manufacturer’s instructions and ensure it is level with the surface of the walkway.
10. Final Touches
Once the walkway is complete, give it a final clean. Use a damp cloth or sponge to wipe down the bricks and remove any residual sand or stains. Inspect the entire walkway for any uneven areas and make necessary adjustments. Your brick walkway is now ready to be enjoyed!
Conclusion
Building a brick walkway is a fantastic way to enhance the beauty and functionality of your garden. By following these steps—planning your design, preparing the site, creating a solid base, and carefully laying the bricks—you can create a stunning and durable path that will last for years to come. Enjoy the process and take pride in the transformation of your outdoor space.
Motivational Sentence
Transform your garden into a picturesque haven with a beautiful brick walkway—start your DIY project today and relish the satisfaction of creating a charming path that enhances your outdoor living space! 🌟🏡