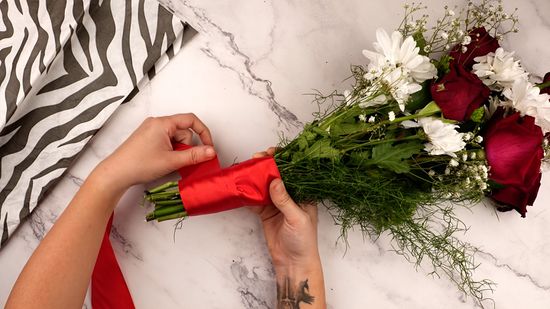
Wrapping flowers beautifully is just as important as choosing the blooms themselves. A well-wrapped bouquet enhances presentation, protects delicate stems, and turns flowers into a meaningful gift. Whether you’re preparing flowers for a special occasion, a business delivery, or a simple heartfelt gesture, learning how to wrap flowers done right can make all the difference. This guide will walk you through techniques, materials, and practical tips suitable for beginners and flower lovers alike in the United States, United Kingdom, and Canada.Why Proper Flower Wrapping MattersFlower wrapping is more than decoration—it serves both aesthetic and functional purposes:Enhances the beauty of the bouquetProtects stems and petalsKeeps flowers hydratedAdds a professional, thoughtful touchWhen you master how to wrap flowers done right, even simple blooms can look elegant and luxurious.Choosing the Right Wrapping MaterialsPopular Flower Wrapping OptionsKraft paper: Natural, rustic, and eco-friendlyTissue paper: Soft, colorful, and lightweightCellophane: Ideal for moisture protectionFabric wraps (cloth or burlap): Stylish and reusableFloral sleeves: Professional and structured💡 Tip: Match wrapping material to the occasion—minimal for casual gifts, elegant layers for weddings or formal events.Tools You’ll NeedFloral tapeScissorsRibbon or twineClear tape or glue dotsOptional: waterproof linerHaving these tools ready makes the process smooth and stress-free.Step-by-Step Guide: How To Wrap Flowers Done RightStep 1: Prepare the FlowersTrim stems at an angleRemove excess leaves below the bloom lineArrange flowers evenlyThis ensures a clean, balanced bouquet.Step 2: Create the Base WrapLay your wrapping paper flat in a diamond shape. Place the bouquet slightly off-center to allow natural folding.Step 3: Wrap with StructureFold one side over the stems, then wrap the opposite side snugly. Secure with floral tape.Avoid wrapping too tightly—flowers need space to breathe.Step 4: Add LayersFor a professional look:Add a second layer of paper or tissueMix textures or colors subtlyOffset layers for depthLayering elevates the bouquet instantly.Step 5: Secure and FinishTie the base with ribbon, twine, or lace. Trim excess paper for a neat edge.Optional: Attach a handwritten tag for a personal touch.Different Flower Wrapping StylesClassic Bouquet WrapSymmetrical and neat—ideal for roses and tulips.Korean-Style Flower WrapLoose, airy, and layered with soft pastel tones.Minimalist WrapSingle wrap with clean lines for modern aesthetics.Rustic WrapKraft paper with twine and dried accents.Each style reflects a different mood and purpose.Practical Tips for Wrapping Flowers Like a ProKeep stems hydrated with damp paper or floral tubesChoose wrapping colors that complement the flowersDon’t cover blooms—let flowers remain the focal pointPractice folding techniques for smooth edgesAdjust height so flowers sit naturally above the wrapThese tips ensure you always wrap flowers beautifully.Common Flower Wrapping Mistakes to AvoidWrapping flowers too tightlyUsing paper that clashes with bloom colorsCovering flowers excessivelyIgnoring stem length balanceSkipping moisture protectionAvoiding these mistakes helps you master how to wrap flowers done right.Flower Wrapping for Different OccasionsBirthdays: Bright paper, playful ribbonsWeddings: Soft tones, layered eleganceSympathy: Neutral colors, simple designRomantic gifts: Classic wrapping with satin ribbonTailoring your wrap to the occasion adds meaning.Eco-Friendly Flower Wrapping IdeasRecycled kraft paperFabric wraps (furoshiki style)Newspaper with twineReusable gift wrapsEco-conscious wrapping is stylish and sustainable.ConclusionLearning how to wrap flowers done right transforms ordinary bouquets into memorable gifts. With the right materials, thoughtful techniques, and a bit of creativity, you can achieve professional-looking results every time.Whether you’re gifting flowers to someone special or preparing arrangements for events, proper flower wrapping enhances beauty, preserves freshness, and shows care in every detail. Start practicing today—and let your wrapped flowers speak for themselves.