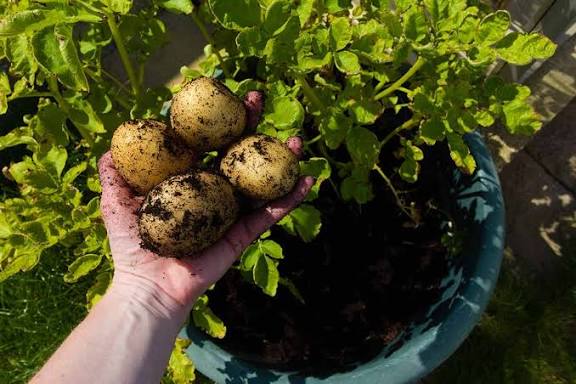
Potatoes are one of the world’s most loved and versatile foods, but you don’t need acres of farmland to grow them successfully. Did you know that with just a container, soil, and some seed potatoes, you can harvest a generous crop right from your balcony, patio, or backyard? If you’ve ever wondered how, this guide will boost your “how to plant potatoes in a container” game and show you step-by-step how to grow potatoes like a pro—even in small spaces!Why Grow Potatoes in Containers?Growing potatoes in containers has multiple advantages:Space-Saving: Perfect for small gardens, patios, or balconies.Easy Maintenance: Fewer weeds and pests compared to garden beds.Harvest Control: Simply tip the container over for a clean, easy harvest.Flexibility: You can move the containers to catch the sun or protect them from frost.What You Need to Get StartedBefore diving into how to plant potatoes in a container, gather these essentials:Seed Potatoes – Choose certified disease-free seed potatoes. Popular varieties include Yukon Gold, Red Pontiac, or Russet.Container – A large pot, grow bag, or even a bucket at least 10–15 gallons with good drainage holes.Soil Mix – Loose, well-draining soil mixed with compost. Potatoes don’t thrive in heavy clay soils.Fertilizer – A balanced organic fertilizer or potato-specific feed.Water Supply – Potatoes need consistent moisture, especially while tubers are forming.Step-by-Step: How to Plant Potatoes in a ContainerStep 1: Prepare the ContainerFill your container with 4–6 inches of soil.Mix in compost or organic fertilizer for a nutrient boost.Step 2: Chit the Potatoes (Optional but Helpful)Place seed potatoes in a bright, cool spot for 1–2 weeks until sprouts appear.This step encourages quicker growth once planted.Step 3: Plant the PotatoesPlace 3–4 seed potatoes (sprouts facing up) on the soil surface.Cover with 4–6 inches of soil.Step 4: Water ConsistentlyKeep soil evenly moist, but avoid waterlogging.Check daily during hot weather.Step 5: Hill the PotatoesAs plants grow 6–8 inches tall, add more soil around the stems, leaving a few inches of leaves above the surface.Repeat until the container is nearly full.This encourages more tubers to grow along the buried stems.Step 6: Harvest TimeEarly varieties are ready in 8–10 weeks; maincrop potatoes in 12–16 weeks.When plants flower and leaves begin yellowing, tip the container over and collect your fresh, homegrown potatoes!Practical Tips for Success 🌱Choose the Right Variety: Early potatoes (like Yukon Gold) are great for beginners since they mature faster.Don’t Overcrowd: Stick to 3–4 seed potatoes per large container to avoid stunted growth.Sunlight Matters: Place containers where they’ll get at least 6–8 hours of sun daily.Mulch Helps: Adding straw or shredded leaves on top helps retain moisture and keeps tubers cool.Continuous Harvest: Stagger plantings every 2–3 weeks for a steady supply of potatoes.Common Mistakes to Avoid ❌Overwatering: Can lead to rot. Always ensure good drainage.Neglecting Hilling: Without hilling, tubers may turn green and become inedible.Wrong Container Size: Small pots limit growth; always choose 10 gallons or larger.ConclusionIf you’re looking for a rewarding and space-saving way to grow your own food, learning how to plant potatoes in a container is the perfect solution. With the right setup, proper care, and a little patience, you’ll soon be enjoying fresh, homegrown potatoes straight from your balcony or backyard.🥔✨ Boost your gardening game today—your next batch of golden, crispy fries or creamy mashed potatoes could come from your very own container garden!