
Roses are one of the most beloved flowers in gardens around the world. Their beauty, fragrance, and versatility make them a favorite among gardeners. However, buying new rose plants can sometimes be expensive. One of the best ways to expand your rose collection without spending a fortune is by propagating them from cuttings. Propagating roses is a simple and rewarding process that allows you to grow new plants from existing ones. In this article, we will explore how to propagate roses using sand as a rooting medium, a method that promotes strong root growth and increases your chances of success.
Why Propagate Roses from Cuttings?
Before diving into the specifics of the process, let’s first take a moment to understand why propagating roses from cuttings is an excellent idea.
- Cost-Effective: Propagating roses from cuttings is an affordable way to create new plants without the need to buy them.
- Genetic Cloning: By propagating a rose cutting, you are essentially creating a genetic clone of the parent plant. This means that you can preserve the unique qualities of your favorite roses, such as color, fragrance, and form.
- Variety and Growth: Growing roses from cuttings can allow you to experiment with different varieties, helping you expand your rose garden while learning more about the plants.
By using sand as a medium to propagate roses, you can achieve successful results because sand offers excellent drainage and aeration, which are essential for root development.
Why Use Sand for Rooting Rose Cuttings?
When it comes to rooting rose cuttings, the medium you choose plays a crucial role in determining the success of the process. Sand is an excellent choice for several reasons:
- Excellent Drainage: Sand allows excess water to drain away, which helps prevent waterlogging and root rot, common problems when propagating plants in other, heavier soils.
- Aeration: The loose, coarse nature of sand promotes better airflow around the roots, which is essential for healthy root development.
- Reduced Risk of Disease: Sand is typically free from pathogens and pests, making it a cleaner, safer environment for rooting.
- Easy to Handle: Sand is easy to work with and readily available at most garden centers or even at your local hardware store.
Materials You Will Need
Before you begin the process of propagating your rose cuttings, gather the following materials:
- Healthy Rose Cuttings: Choose stems that are about 15-20 cm in length. These stems should be healthy and disease-free, preferably from the current year’s growth.
- Well-Aerated Sand: Use clean, coarse sand like play sand or builder’s sand. Avoid using sand that has been treated with chemicals or fertilizers.
- Small Container or Shallow Box: You will need a container to hold the sand and your cuttings. A shallow tray, box, or pot works best.
- Plastic Wrap or Clear Cover: This will help maintain a high level of humidity around the cutting, which is essential for root development.
- Rooting Hormone (Optional): Rooting hormone can help speed up the rooting process, although it is not strictly necessary.
- Spray Bottle: A spray bottle will allow you to mist the cuttings and maintain the proper moisture level in the sand.
Step-by-Step Guide to Propagating Roses from Cuttings Using Sand
Now that you have everything you need, it’s time to get started! Follow this detailed step-by-step guide to propagate your roses successfully.
Step 1: Prepare the Sand
Begin by preparing the sand in the container you’ll be using to root the cuttings. Use a shallow container such as a plastic tray or shallow box, and fill it with 5-10 cm of sand. Make sure the sand is loose and well-aerated, as this will allow for the proper circulation of air and water around the cutting’s roots.
If the sand has any clumps or debris, break it apart to ensure it’s free-flowing. This is essential for the roots to grow properly and for moisture to drain away easily. Once your sand is ready, level it out with your hands to ensure even coverage in the container.
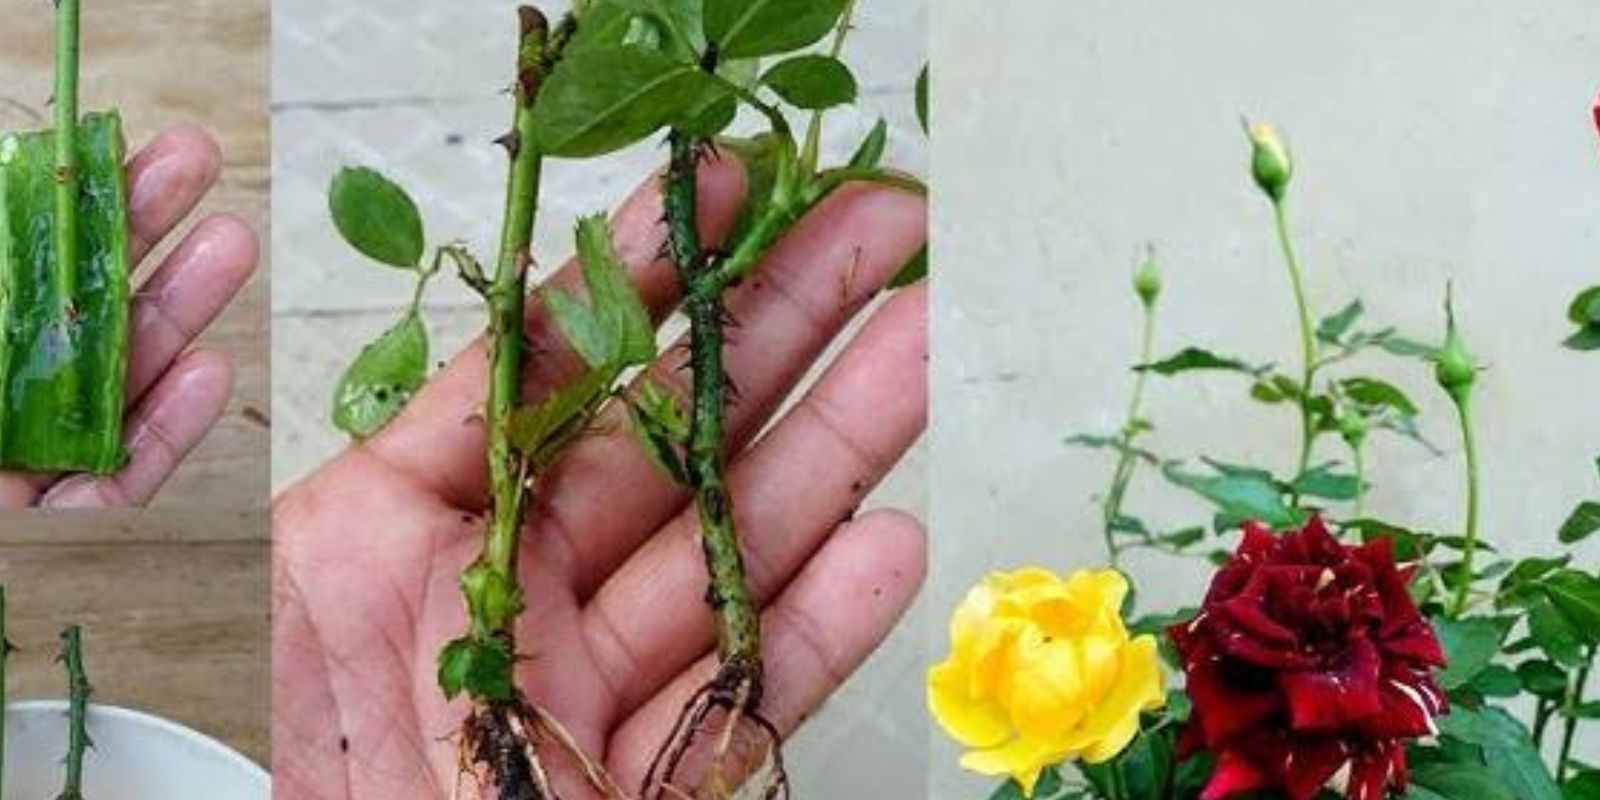
Step 2: Prepare the Rose Cuttings
Select healthy, mature rose stems from your existing plants. Look for stems that are about 15-20 cm long with at least two or three nodes (the areas where leaves or buds grow). Use a sharp pair of pruning shears or scissors to cut the stem just below a node.
Remove any leaves or flowers from the bottom portion of the stem, leaving only a couple of leaves at the top. This will reduce the amount of moisture the cutting loses through evaporation and direct the plant’s energy toward root formation.
Optionally, dip the cut end of the rose stem into rooting hormone, which helps stimulate faster root growth. While this step isn’t mandatory, it can significantly increase your chances of success.
Step 3: Plant the Cuttings in the Sand
Take the prepared cutting and insert it into the sand, burying the bottom node 5 cm deep. Make sure the cutting is firmly anchored in the sand, and gently press the sand around the base of the cutting to hold it in place. Ensure that the top portion of the cutting is still exposed above the surface of the sand.
It’s important to ensure that the cutting is stable, as any movement can disrupt the rooting process.
Step 4: Mist the Cuttings
Using a spray bottle, mist the cutting and the surrounding sand with water. Keep the sand moist but not soggy. Overwatering can lead to rot and fungal infections, so be mindful of maintaining the correct moisture level.
Step 5: Create a Humid Environment
Cover the container with plastic wrap or a clear plastic dome to create a humid environment that will help the cutting retain moisture. If using plastic wrap, make sure to poke small holes in it to allow for airflow. This will prevent the cutting from becoming too humid, which can encourage fungal growth.
Step 6: Place the Cuttings in a Warm Location
Place the container in a warm location, ideally between 20°C and 25°C. The cutting needs warmth to encourage root development but should be protected from direct sunlight, as this can cause the cutting to dry out. A bright, indirect light area is perfect for this process.
Step 7: Monitor and Maintain the Cuttings
Check the cuttings regularly to ensure that the sand remains moist but not waterlogged. If necessary, mist the cutting and sand with water. Also, check for any signs of fungal growth or rot, and remove any unhealthy cuttings immediately.
After 3-6 weeks, you should begin to feel slight resistance when you gently tug on the cutting. This means that roots are beginning to form. At this stage, you can remove the plastic cover for short periods to acclimate the cutting to the air.
Step 8: Transplant the Rooted Cuttings
Once the cutting has developed a healthy root system, it’s time to transplant it into a larger pot or directly into your garden. Gently remove the rooted cutting from the sand and place it in a new container with rich, well-draining soil. Keep the plant in a shaded area for a few days to help it adjust to its new environment.
Additional Tips for Success
- Conditioning the Cuttings: If you suspect that the cuttings may be stressed or prone to failure, you can soak them in warm water for 1-2 hours before cutting. This will strengthen the cell structure and promote better rooting.
- Humidity Control: Be sure to maintain high humidity around the cuttings, especially during the first few weeks. A small room humidifier or a misting bottle can be helpful in maintaining the right level of moisture.
Conclusion
By following this simple, effective method, you can propagate roses from cuttings in sand and enjoy the satisfaction of growing new, healthy plants for your garden. Sand is an excellent medium because of its drainage and aeration properties, providing an ideal environment for root development. With a little patience, you can create an expanded rose garden at minimal cost and grow some of your favorite varieties from cuttings.
Whether you are a beginner or a seasoned gardener, propagating roses from cuttings is a rewarding and simple process that will bring new beauty and fragrance to your home or garden. So, get started today, and happy gardening! 🌹 #RosePropagation #GardeningTips #HomeGardening #PlantLove #GardeningCommunity