
Introduction
Growing tomatoes in bags has become an increasingly popular method for urban gardeners and those with limited space. Whether you have a small balcony, patio, or simply want to add more versatility to your gardening routine, growing tomatoes in bags is a highly efficient and rewarding option. This method not only maximizes your harvest in a compact space but also offers flexibility, better control over soil conditions, and the ability to move plants around as needed. With just a few simple steps and some basic materials, you can enjoy fresh, homegrown tomatoes even in the smallest of spaces.
In this comprehensive guide, we’ll take you through everything you need to know about growing tomatoes in bags, from selecting the right bags and soil to providing the right care throughout the growing season. Let’s dive in and start growing those juicy, delicious tomatoes at home!
Why Grow Tomatoes in Bags?
Before we jump into the steps, it’s important to understand why growing tomatoes in bags is such a great method:
- Space-saving: Perfect for those who lack traditional garden space or live in apartments.
- Mobility: You can move the bags to capture the best sunlight or protect them from adverse weather.
- Improved soil control: Using bags allows you to choose the ideal potting mix and manage soil health more easily.
- Cost-effective: You don’t need to invest in expensive containers—reusable grow bags or even repurposed items like shopping bags can do the trick.
- Pest and disease control: Growing in bags reduces the risk of soil-borne diseases and pests that commonly affect ground-planted tomatoes.
Step-by-Step Guide to Growing Tomatoes in Bags
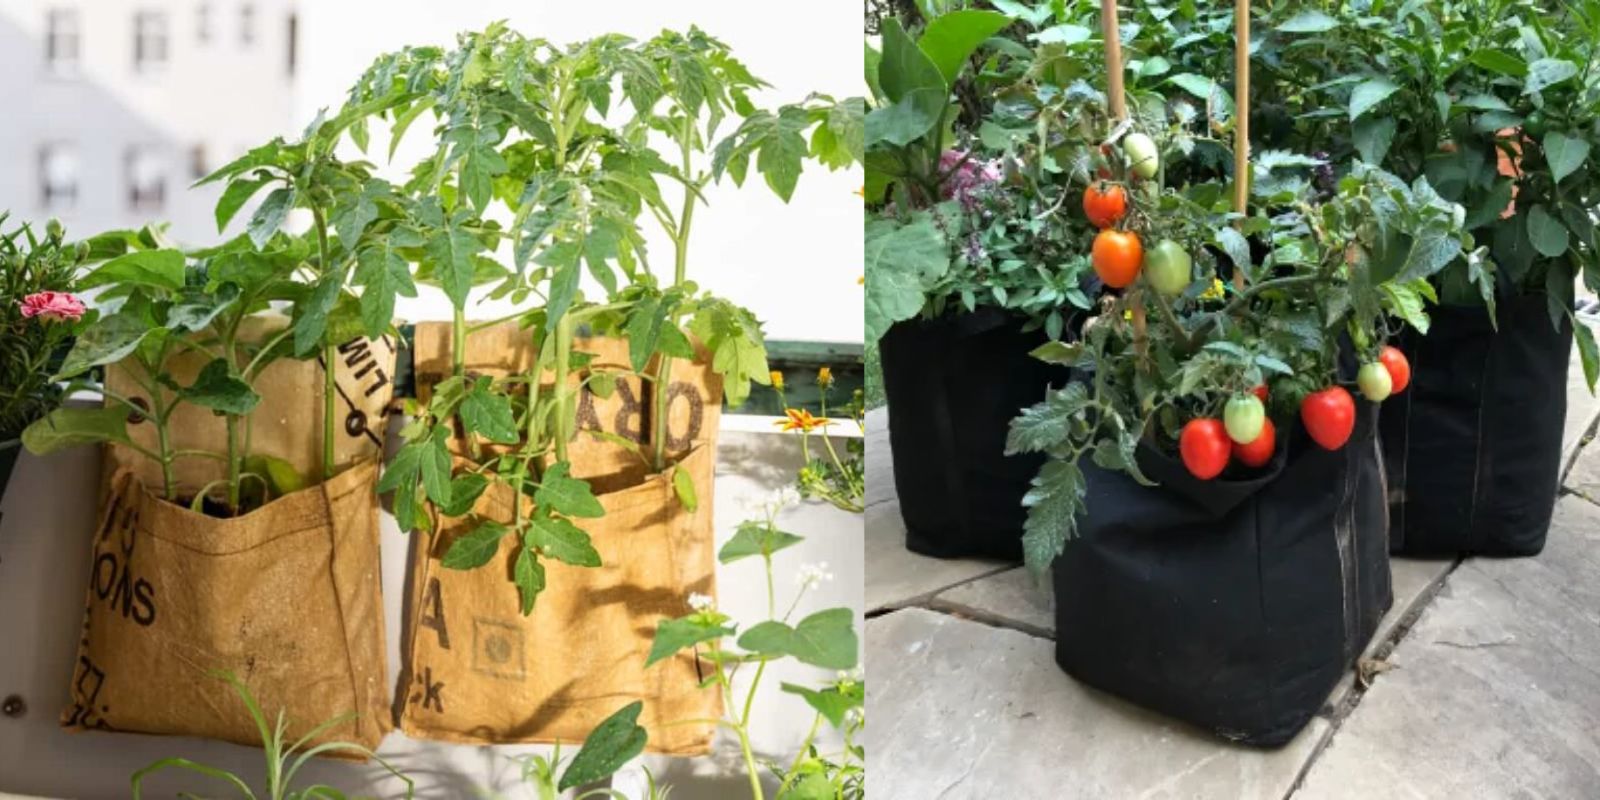
Step 1: Select the Right Type of Bag
The first step in growing tomatoes in bags is to choose the right kind of bag. While you can technically use any sturdy bag, there are a few options to consider:
- Grow bags: These fabric bags are designed specifically for growing plants. They’re breathable, allowing excess moisture to evaporate, which helps prevent waterlogging and root rot. Grow bags are durable and can be reused for several growing seasons.
- Reusable shopping bags: If you’re looking for a cost-effective solution, heavy-duty reusable shopping bags can also work well. Just make sure they have drainage holes at the bottom.
- Plastic bags: You can also use large plastic bags (like garbage bags), but be sure to punch several holes in the bottom to ensure proper drainage.
A bag that holds at least 10-15 gallons of soil is recommended for tomatoes, as they need a lot of root space.
Step 2: Prepare Your Soil
The next step is preparing your soil. Tomatoes thrive in nutrient-rich, well-draining soil, so it’s important to provide them with the right mix. Here’s how you can prepare your soil:
- Use high-quality potting mix: Avoid using regular garden soil, as it can be too heavy and compact in bags. Instead, use a good potting mix that’s light and well-draining.
- Add compost: Mixing in organic compost will boost soil nutrients, giving your tomatoes the best chance at producing a plentiful harvest.
- Fertilizer: You can also mix in a slow-release fertilizer specifically formulated for tomatoes or vegetables. This will ensure the plants get consistent nutrients throughout the growing season.
Fill your bag with the soil mix, leaving about 2 inches of space from the top to prevent water from spilling out when you water the plants.
Step 3: Planting Your Tomato Seedlings
Once your bag is ready with the soil, it’s time to plant the tomato seedlings:
- Choose the right variety: While most tomato varieties will grow in bags, compact or determinate types are ideal because they don’t grow as large as indeterminate types. Popular options include Roma, cherry tomatoes, or bush varieties.
- Transplant seedlings: Start with tomato seedlings rather than seeds, as this will give you a head start on the growing season. Make a hole in the soil and plant your seedling deep, covering the stem up to the first set of leaves. This encourages stronger root growth.
- Spacing: Limit one tomato plant per bag to avoid overcrowding and give the roots enough space to grow.
Step 4: Watering Your Tomato Plants
Consistent watering is crucial for the healthy growth of tomatoes, but you need to be careful not to overdo it. Here are some watering tips:
- Water deeply: Water your tomato plants thoroughly to ensure the roots receive enough moisture. A deep watering 2-3 times a week is usually sufficient.
- Avoid overwatering: Be mindful of not letting the soil become waterlogged. Bags with proper drainage holes will help prevent this, but it’s still important to monitor the soil’s moisture levels.
- Mulching: Add a layer of organic mulch, like straw or grass clippings, on top of the soil. This helps retain moisture and regulate the soil temperature, reducing the need for frequent watering.
Step 5: Supporting Your Tomato Plant
As tomato plants grow, they need support to keep the branches from bending or breaking under the weight of the fruit. Here’s how to provide support:
- Use a stake or cage: Insert a wooden stake or tomato cage into the bag to provide support. As the plant grows, tie the stems loosely to the stake or the cage using soft ties.
- Prune regularly: Remove any suckers (small shoots that grow between the main stem and branches) to encourage better airflow and focus the plant’s energy on producing fruit.
Step 6: Fertilizing Your Tomato Plant
In addition to the initial fertilizer added during planting, tomatoes benefit from periodic feeding throughout the growing season:
- Use a balanced fertilizer: Every 2-3 weeks, apply a water-soluble fertilizer that’s rich in phosphorus and potassium. This promotes healthy root and fruit development.
- Avoid over-fertilizing: Be cautious not to apply too much nitrogen, as this can lead to lush foliage but fewer tomatoes.
Step 7: Managing Pests and Diseases
Tomato plants can sometimes attract pests like aphids, whiteflies, and tomato hornworms, or develop diseases such as blight. Here’s how to manage these issues:
- Inspect plants regularly: Check the leaves, stems, and fruit for signs of pests or diseases.
- Organic pest control: Use natural pest deterrents like neem oil or insecticidal soap to manage infestations. For hornworms, hand-pick them off the plant.
- Air circulation: Ensure your plants have good air circulation by spacing them properly and pruning excess foliage.
Step 8: Harvesting Your Tomatoes
After about 60-85 days, your tomatoes will start ripening. Here’s what to look for:
- Color: Tomatoes are ready to pick when they turn bright red (or the color of the specific variety you’re growing).
- Firmness: Gently squeeze the fruit; it should be firm but not hard.
- Picking: Harvest tomatoes regularly once they ripen to encourage more fruit production.
Tips for Maximizing Your Tomato Harvest in Bags
- Rotate your plants: If growing multiple bags, rotate them to ensure they all receive equal sunlight.
- Provide plenty of sunlight: Tomatoes love sunlight! Position your bags in a spot that receives at least 6-8 hours of direct sunlight per day.
- Proper ventilation: Ensure the plants have enough space for air circulation, which helps prevent fungal diseases.
- Monitor for pests: Regularly check for pests, as bag-grown plants can sometimes attract critters seeking warm, enclosed environments.
Conclusion
Growing tomatoes in bags is a simple, cost-effective, and space-saving method that can yield bountiful harvests even in small spaces. With the right materials, proper care, and a little bit of patience, you’ll soon be enjoying fresh, homegrown tomatoes right from your patio or balcony. Whether you’re a seasoned gardener or a beginner looking for an easy way to grow food, this method is a fantastic way to make the most out of limited space.
So, grab a bag, plant your tomatoes, and get ready to enjoy a fresh and delicious harvest!
Hashtags