
Roses are timeless symbols of beauty, love, and grace. Whether you’re an experienced gardener or just starting out, the idea of growing your own roses from cuttings, seeds, or stems can be incredibly rewarding. Propagating roses allows you to create new plants without spending money on store-bought ones. It also gives you the chance to cultivate specific varieties you love. In this guide, we will explore three proven methods of rose propagation: from cuttings, by layering, and from seeds. With these simple techniques, you can fill your garden with beautiful, fragrant roses that will last for years to come.
1. Propagating Roses from Cuttings
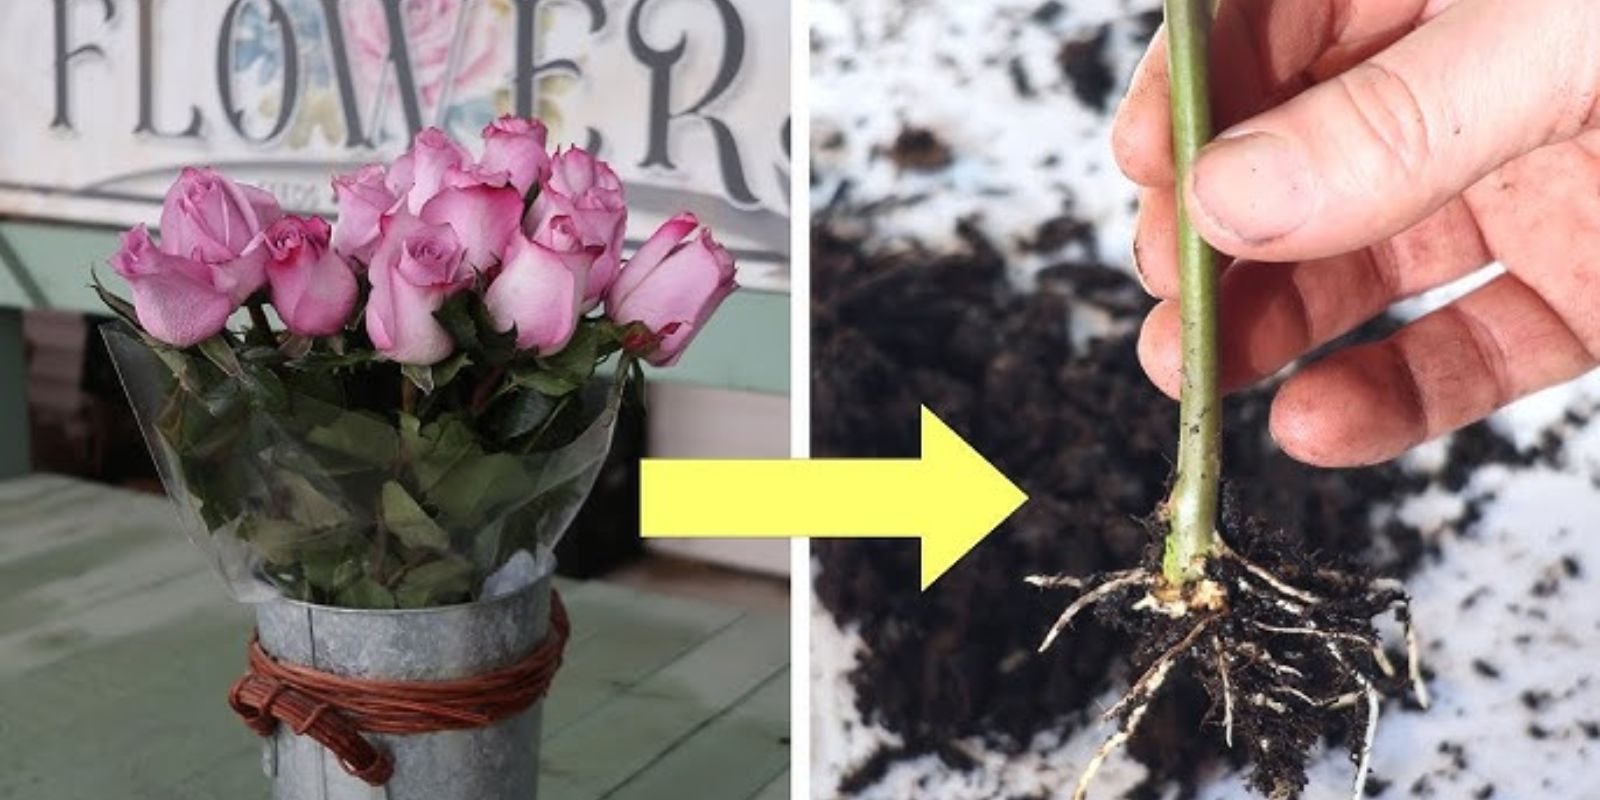
One of the easiest and most common ways to propagate roses is through cuttings. This method allows you to clone the parent plant, meaning the new rose will have the same qualities and characteristics as the original. Whether you’re trying to preserve a special variety or simply want to expand your garden, propagating roses from cuttings is an excellent option.
Step-by-Step Guide to Propagating Roses from Cuttings:
Step 1: Select a Healthy Stem
- Choose a strong, healthy stem from a rose bush that has bloomed recently. The stem should be about 6-8 inches long, with a thickness similar to that of a pencil. Look for stems that are semi-hardwood, meaning they are not too green and not too woody. These will root the best.
Step 2: Cut Below a Leaf Node
- Using clean, sharp pruning shears or scissors, make a diagonal cut just below a leaf node (the point where leaves attach to the stem). This is where new roots are most likely to form.
Step 3: Remove the Bottom Leaves
- Strip the bottom set of leaves from the cutting, leaving at least two sets of leaves on the upper portion. Removing the lower leaves will prevent moisture loss and help the cutting focus its energy on root formation.
Step 4: Apply Rooting Hormone (Optional)
- Dipping the cut end of the rose stem in rooting hormone can increase your chances of success. Rooting hormone helps stimulate root growth and protects the cutting from diseases. You can find rooting hormone powder or gel at most garden centers.
Step 5: Plant the Cutting
- Plant the cutting in a small pot filled with a well-draining soil mix, such as a combination of potting soil and perlite. Insert the cutting about 2 inches into the soil, ensuring that at least one leaf node is below the surface. Water the cutting thoroughly to settle the soil.
Step 6: Create a Humid Environment
- Cover the pot with a plastic bag or place it in a mini greenhouse to create a humid environment, which is essential for root development. Make sure the bag doesn’t touch the leaves to avoid rot. You can use stakes to prop it up.
Step 7: Care for the Cutting
- Place the pot in a warm, bright area, but avoid direct sunlight. Keep the soil consistently moist but not waterlogged. In about 4-6 weeks, you should see new growth, which indicates that the cutting has successfully rooted.
Step 8: Transplant
- Once the roots are established and the cutting has grown a few inches, you can transplant the new rose plant into your garden or a larger pot. Make sure to harden off the plant by gradually exposing it to outdoor conditions before planting.
2. Propagating Roses by Layering
Layering is a technique that allows roses to propagate while still attached to the parent plant. This method works best for climbing and rambling rose varieties with long, flexible canes. It’s an excellent choice if you’re looking for a low-effort, high-success rate method to grow new roses.
Step-by-Step Guide to Propagating Roses by Layering:
Step 1: Choose a Healthy Branch
- Select a healthy, flexible branch from the rose plant. The branch should be long enough to bend down to the ground without breaking. Ideally, choose a stem that is about one year old and still pliable.
Step 2: Prepare the Ground
- Prepare the area where you’ll be burying the branch by loosening the soil and adding compost or organic matter. The soil should be well-draining and nutrient-rich to encourage root growth.
Step 3: Make a Small Cut on the Stem
- Make a small cut or scrape the bark on the underside of the stem where it will be buried. This will help stimulate root growth at that point.
Step 4: Bury the Stem
- Bend the stem down to the ground and bury the wounded section about 2-3 inches deep in the soil. You can use a stone, U-shaped wire, or a small stake to hold the stem in place. Make sure the tip of the branch remains above ground.
Step 5: Water and Wait
- Water the buried section regularly to keep the soil moist. Over the next few months, roots will begin to form at the buried part of the stem.
Step 6: Sever and Transplant
- After about 3-4 months, check to see if the stem has rooted by gently tugging on it. If it resists, it has developed roots. You can now cut the new plant away from the parent rose and transplant it to a new location in your garden.
3. Propagating Roses from Seeds
Although propagating roses from seeds is less common and takes longer than other methods, it can be incredibly rewarding, especially if you’re trying to grow a new variety or hybrid. Growing roses from seeds allows for the possibility of new, unique plants that may differ from the parent roses.
Step-by-Step Guide to Propagating Roses from Seeds:
Step 1: Harvest Rose Hips
- After the roses have bloomed, let the flowers fade and develop into rose hips. These are the round, seed-filled fruits that form after the petals fall. Harvest the rose hips when they turn orange, red, or yellow, depending on the variety.
Step 2: Extract the Seeds
- Cut open the rose hips and scoop out the seeds. Rinse them in water to remove any pulp or debris, then soak them in a 10% hydrogen peroxide solution for 20 minutes to prevent mold growth.
Step 3: Stratification
- To mimic the natural winter dormancy period, rose seeds need to be stratified. Wrap the seeds in a damp paper towel, place them in a plastic bag, and store them in the refrigerator for 10-12 weeks. This cold treatment helps break seed dormancy and encourages germination.
Step 4: Plant the Seeds
- After stratification, plant the rose seeds in seed-starting trays filled with a light, well-draining potting mix. Plant the seeds about ¼ inch deep and water gently. Cover the trays with plastic wrap or place them in a greenhouse to maintain humidity.
Step 5: Care for the Seedlings
- Place the trays in a warm, sunny location with temperatures around 70°F (21°C). Keep the soil consistently moist but not soggy. Germination can take several weeks to months, so be patient.
Step 6: Transplanting the Seedlings
- Once the seedlings have grown a few sets of true leaves and are strong enough, transplant them into individual pots or your garden. Remember to harden them off by gradually exposing them to outdoor conditions.
Conclusion: Choose the Best Propagation Method for You
Whether you’re a beginner gardener or an experienced green thumb, propagating roses can be a fulfilling and cost-effective way to expand your garden. Propagating from cuttings is quick and reliable, while layering is low-maintenance and works well for larger plants. If you’re feeling adventurous, growing roses from seeds allows you to create entirely new varieties.
Now that you know how to propagate roses, why not give it a try and watch your garden flourish with beautiful, home-grown roses? 🌹 Share your progress and let us know which method works best for you!
🌿 #GrowYourOwnRoses #RosePropagation #GardeningHacks #PlantPropagation #RoseCuttings #DIYGardening #GreenThumbTips