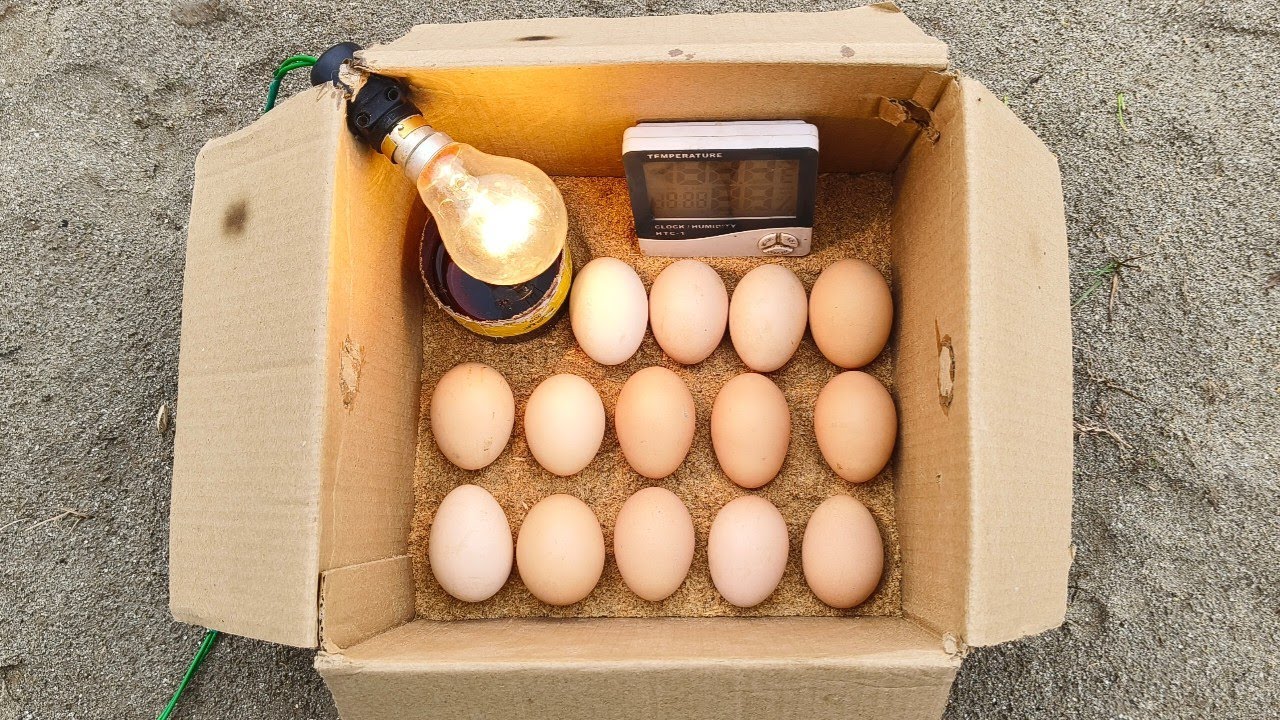
Hatching eggs at home can be a fascinating and rewarding experience—whether you’re raising backyard chickens, teaching kids about life cycles, or starting a small poultry project. Success comes down to preparation, proper temperature and humidity, and consistent daily care. This step-by-step guide will help you hatch eggs safely and confidently, even if you’re a beginner.🥚 Choosing the Right Fertilized EggsNot all eggs will hatch—store-bought eggs are usually not fertilized. You’ll need fertilized eggs from a reliable breeder or local farm.What to look for:Clean, uncracked shellsMedium-sized eggs (very large or tiny eggs may have lower hatch rates)Fresh eggs—ideally less than 7 days oldEggs stored at cool room temperature (not refrigerated)Tip: Handle eggs gently and avoid washing them unless absolutely necessary—natural protective coatings help keep bacteria out.🌡️ Setting Up Your Incubator ProperlyA reliable incubator makes the process much easier. Before placing eggs inside, run the incubator for 24 hours to stabilize temperature and humidity.Ideal incubation conditions for chicken eggs:Temperature: 99.5°F (37.5°C)Humidity: 45–55% during the first 18 daysGood air circulation and ventilationUse a thermometer and hygrometer to double-check the incubator’s built-in readings.🔄 Turning Eggs and Daily CareEgg turning prevents embryos from sticking to the shell and supports healthy development.Best practices:Turn eggs at least 3–5 times per day if your incubator isn’t automaticMark one side with an “X” and the other with an “O” to track turnsWash hands before handling eggsCheck temperature and humidity dailyConsistency is key—large temperature swings can reduce hatch success.🔦 Candling Eggs to Check DevelopmentCandling means shining a bright light through the egg to see embryo growth. It helps identify which eggs are developing properly.When to candle:Day 7: Look for veins or a small dark spotDay 14: Embryo movement and growth should be visibleRemove eggs that appear clear or show signs of spoilage to protect the rest.🐥 Lockdown and Hatching DayFor chicken eggs, the average incubation period is 21 days.During the final stage (“lockdown”):Stop turning eggs on Day 18Increase humidity to 65–70%Avoid opening the incubator unless necessaryYou’ll notice “pipping” when chicks start breaking the shell. Let chicks hatch naturally—helping too soon can harm them.🌟 Practical Tips for Successful Egg HatchingKeep the incubator in a stable indoor environment away from draftsAlways wash hands before touching eggs or chicksAvoid opening the incubator frequently—temperature drops matterHave a brooder ready with warmth, bedding, food, and waterExpect some eggs not to hatch—success rates vary🏡 After the Chicks HatchOnce chicks dry and fluff up (usually within 24 hours), move them to a prepared brooder.Brooder basics:Heat lamp around 95°F (35°C) initiallyNon-slip bedding (pine shavings—not cedar)Clean water and chick starter feedGentle monitoring without overcrowdingLower the temperature gradually each week as chicks grow.✅ ConclusionLearning how to hatch eggs at home successfully is both exciting and educational. By choosing healthy fertilized eggs, maintaining proper incubator conditions, turning and monitoring eggs carefully, and preparing for hatch day, you can dramatically improve your success rate. Remember that patience and consistency are your biggest tools—nature follows its own timeline.Whether you’re raising backyard chickens or simply exploring a fascinating hobby, watching new life emerge from an egg is an unforgettable experience. With the right setup and a little daily care, you’ll be well on your way to happy, healthy chicks 🐣✨.