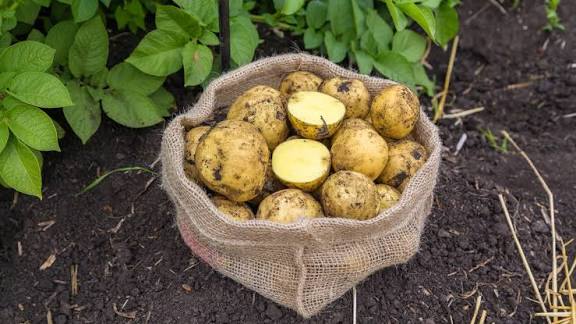
Potatoes are one of the most versatile crops you can grow at home, and the best part? You don’t need a large garden to enjoy them. With a few grow bags, a bit of soil, and some seed potatoes, you can harvest fresh, delicious spuds right from your patio, balcony, or backyard. In fact, 🍽️ transform your look with how to plant potatoes in grow bags – amazing results! is easier than most people think, and the payoff is impressive.Whether you’re in the United States, United Kingdom, or Canada, this method works beautifully, making homegrown potatoes accessible to everyone—even urban gardeners. Let’s walk through the steps and share tips for success.🌱 Why Choose Grow Bags for Potatoes?Before we dig into the process, it’s worth understanding why grow bags are such a game changer.Space-saving: Ideal for small yards, patios, and balconies.Mobility: Easy to move for better sun exposure or to avoid frost.Better drainage: Prevents waterlogging, which can rot potatoes.Ease of harvest: Many grow bags have side flaps for quick picking.👉 Simply put, grow bags make potato growing convenient, practical, and fun.🥔 What You’ll NeedTo follow this how to plant potatoes in grow bags guide, gather:Seed potatoes (Yukon Gold, Russet, or Red Pontiac are great choices)10–15 gallon grow bags (fabric ones are best)Good-quality potting soil (loose and well-draining)Compost or organic fertilizerWatering can or hose with gentle spray nozzle🌿 Step-by-Step: Planting Potatoes in Grow BagsStep 1: Prep the BagFill the grow bag with 4–6 inches of potting soil mixed with compost.Place the bag in a sunny location (at least 6–8 hours of sun per day).Step 2: Add Seed PotatoesCut large seed potatoes into chunks (each with at least one eye).Place 3–4 seed pieces evenly spaced on the soil surface.Cover them with 3–4 inches of soil.Step 3: Water WellKeep the soil moist but not soggy.Consistent moisture ensures healthy tuber growth.Step 4: Hill the SoilAs potato plants grow 6–8 inches tall, add more soil to cover stems, leaving the top leaves exposed.Repeat this process until the bag is nearly full.This encourages more potatoes to grow along the buried stems.Step 5: Maintain GrowthFertilize every 2–3 weeks with a balanced, organic fertilizer.Water regularly—bags dry out faster than garden beds.🌞 Harvesting for Amazing ResultsThe moment you’ve been waiting for—harvest time!New Potatoes: Harvest early when plants flower (8–10 weeks). These are small, tender, and delicious.Full-Sized Potatoes: Wait until plants yellow and die back (about 12–16 weeks). Dump the bag or use the side flap to collect your bounty.👉 With grow bags, harvesting is mess-free and exciting—kids especially love the “treasure hunt” aspect!🪄 Practical Tips for SuccessChoose the right variety: Early varieties (like Yukon Gold) do best in bags.Don’t overwater: Bags drain well, but soggy soil still risks rot.Rotate bags: Move them occasionally to follow the sun.Reuse the soil wisely: After harvest, refresh soil with compost before replanting.Stagger planting: Start new bags every 2–3 weeks for a continuous supply.🌟 Creative TwistsWant to level up your potato-growing experience?Mix varieties: Grow red, gold, and purple potatoes in separate bags for colorful harvests.Add companion plants: Herbs like basil or parsley can grow around the edges.Decorate your bags: Stylish fabric grow bags can even complement your patio décor.ConclusionNow you know how to 🍽️ transform your look with how to plant potatoes in grow bags – amazing results! This simple, space-saving method turns your patio or balcony into a mini potato farm with minimal effort and maximum reward. From crispy fries to creamy mash, you’ll love the taste of fresh, homegrown potatoes on your plate.So grab a grow bag, some seed potatoes, and start planting—you’ll be amazed at how easy (and stylish!) it is to grow your own spuds.