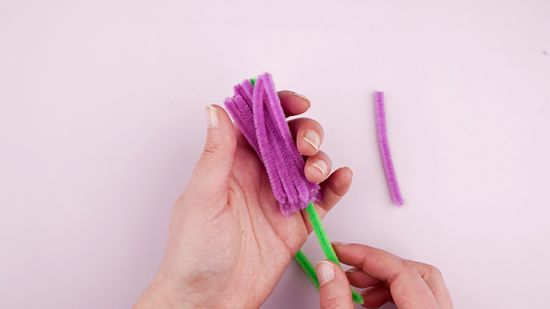
Pipe cleaner flowers are the perfect quick craft: inexpensive, forgiving, colourful, and endlessly adaptable. Whether you’re crafting with kids, making a last-minute bouquet, or creating tiny accents for cards and gifts, these chenille-stem blossoms deliver big charm with minimal fuss. In this guide you’ll find 🔥 Top tips for pipe cleaner flowers step by step – simple and effective! —a friendly, practical walkthrough plus creative variations and troubleshooting so your flowers always turn out great.Why pipe cleaner flowers are so greatPipe cleaners (also called chenille stems) are soft, bendable, and retain shape — ideal for three-dimensional craft projects. They’re safe for children (with supervision for small parts), don’t require glue for many designs, and come in every colour imaginable. Use them to make daisies, roses, tulips, mini bouquets, or hair accessories. Best of all, you can make a finished flower in 2–5 minutes once you know the simple steps.Materials you’ll need (quick list)Pipe cleaners / chenille stems (assorted colours)Scissors (child-safe for little crafters)Beads, pom-poms, or buttons (for flower centers)Floral tape (optional, for bouquets)Green pipe cleaners (for stems and leaves)Craft glue (optional for beads)Basic technique — a simple flower anyone can make (step by step)Step 1 — prepare your materialsCut one coloured pipe cleaner in half (each half makes a small flower). Choose one green pipe cleaner for the stem.Step 2 — make petalsTake one half of the coloured pipe cleaner and fold it in half. Starting at the fold, make 4–6 small loops (petals) by wrapping the pipe cleaner around your finger or a small dowel. Keep the loops similar in size.Step 3 — secure the petalsPinch the base of the loops together tightly and twist the short tail around the base a couple of times to secure the petals.Step 4 — attach the centerSlide a bead, pom-pom, or button onto the remaining short end and secure with a dab of glue if it slips. Alternatively, use a tiny loop of pipe cleaner as the center and twist it in place.Step 5 — add the stem and leavesWrap a green pipe cleaner around the base (where the petals meet) and twist downwards to form a sturdy stem. Add a small leaf by folding a short piece of green pipe cleaner into a teardrop shape and twisting it onto the stem.Step 6 — fluff and finishAdjust the petal loops with your fingers so the flower looks symmetrical. That’s it — one cute pipe cleaner flower!Four quick styles (variations to try)1. Classic daisyMake 6–8 small petal loops from a white or yellow pipe cleaner.Use a yellow bead or pom-pom in the center.Perfect for simple bouquets.2. Twisted rose (simple)Take a whole coloured pipe cleaner and make tight spiral loops from the end, increasing the size of each loop to form a rose bud.Wrap the green stem around the base.Gives a 3D rose look without complex shaping.3. TulipFold a single pipe cleaner into three wide petal loops (like a clover).Twist the base and add a thin green stem.Stylish, modern, and great in clusters.4. Layered blossomUse two colours: create larger outer petals with one pipe cleaner and smaller inner petals with another.Stack and twist together for a fuller bloom.Practical tips — make every flower betterUse consistent loop size. Matching petal loops creates a neat, professional look.Twist tightly at the base. A snug twist keeps petals from slipping.Pre-bend the stem. Slightly curve the green stem before attaching petals for a more natural posture.Combine materials. Add beads, sequins, or tiny paper leaves to vary texture.Make stems sturdy. For bouquets, wrap floral tape over the twisted area to hide joins and strengthen the stem.Work in pairs. One person loops, the other secures — great for classroom projects.Colour theory matters. Complementary colours (purple/yellow, red/green) make the flowers pop.Scale up or down. Use multiple pipe cleaners per petal for giant flowers, or halve pipe cleaners for miniatures.Save time with templates. Use a button or small cap to wrap around for perfectly even loops.Store neatly. Keep pipe cleaners in a box to avoid squashing and tangling.(Repeat main keyword naturally) If you want a simple craft that delights and is fast to teach, 🔥 Top tips for pipe cleaner flowers step by step – simple and effective! will get you making bouquets in no time.Troubleshooting — common problems and fixesPetals keep slipping: Make an extra tight twist at the base and add a short piece of extra pipe cleaner as a wrap.Center won’t stay put: Use a dab of craft glue or thread a thin wire through a bead then twist it into the base.Stem is floppy: Twist two green pipe cleaners together for a thicker stem or add floral tape.Uneven petals: Re-shape loops carefully with fingers; small adjustments make a big visual difference.Safety and cleanup (simple and effective!)Supervise young children when using scissors and small beads. Use child-safe scissors and non-toxic glue when needed. Clean up stray bits of pipe cleaner and beads promptly to avoid accidents; a small tray or craft mat keeps everything contained.Display ideas & projectsMini bouquets: Tie 3–5 flowers with ribbon for teacher gifts or party favors.Card toppers: Glue a single flower onto a greeting card for handmade charm.Hair accessories: Twist flower onto bobby pins or headbands for playful accessories.Wreaths: Make 12–20 flowers and attach to a foam ring for an instant seasonal wreath.Table scatter: Use tiny pipe cleaner flowers as place card holders or napkin ring accents.ConclusionPipe cleaner flowers are a brilliant go-to craft: cheap, cheerful, and forgiving. With these 🔥 Top tips for pipe cleaner flowers step by step – simple and effective!, you’ve got everything from basic techniques to creative variations, troubleshooting and display ideas. Start with one style, then experiment—combine colours, scale, and centers until you develop your favourite. Whether you’re crafting with kids, making gift toppers, or designing a whimsical installation, pipe cleaner flowers make creativity quick and joyful.